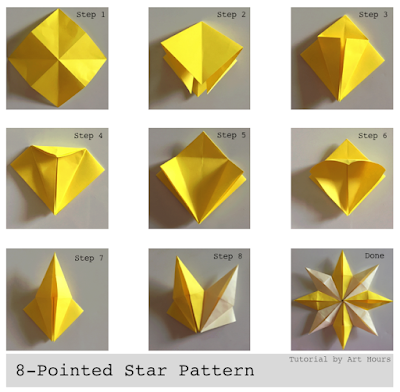
World Origami Days was founded by an American Committee to spread awareness about Origami. The World Origami Days is celebrated every year beginning from 24th October to 11th November. Also, Japan celebrates 11th November as Origami Day.
I am not a member of any committee but I love Origami, and since the day I started practicing Origami I have no regrets.
We celebrated the World Origami Days at Art Hours, by folding a new origami model every week. (Here, 'we' implies my daughter and me).
Origami is a challenge to me and folding a new model gives me immense satisfaction and peace. Generally, I don't follow video tutorials but prefer to search for diagrams instead. The entire process, beginning from understanding the fold diagram to folding the entire model, is like solving a puzzle -and this is where the entire fun and challenge lies. Watching a video to fold an origami model is no fun for me - it's like you are reading a mystery story and your killjoy friend tells you the ending of the story, or you go to watch a suspense movie and somebody tells you the end - same is the case with doing origami. If you know the ending it is no fun...However, sometimes I do watch videos when the folds are too complicated, but not all origami models have video tutorials so that makes me happy as I can continue taking up new challenges!
'World Origami Days' was just a pretext for us to try some new origami models. Thanks to the wonderful creations made by the origami artists around the world and thanks to them for uploading the origami diagrams and tutorials on the internet. It has helped origami lovers like us and many others around the world, to fold and explore new origami models.
In this blog, I am not only posting the origami models we attempted but also the links to the tutorials which we followed, wherever possible. We attempted a new model each day beginning from 24th October to 10th Nov. Unfortunately on the last few days of the World Origami Days when I had planned to conduct a workshop, I fell sick and I had to cancel the workshop. I, hereby apologize to all those students who were keen to attend the origami workshop but I had to cancel the same due to my personal health issues. Hope to see them participating in our future workshops.
Day 01: Mandala Serenata
Design Credit: Vagner Alves/Carla Godoy
We folded a variation of the original model as we learned to fold it from a video tutorial and here's the link to the same: https://www.youtube.com/watch?v=8_C01a1GQ5c
Model details:
Category: Modular Origami
Level: Intermediate, On a scale of 1 to 5, I would give it 3.5 stars (with 1 being easy and 5 being most difficult in terms of complications in folds involved)
Level: Intermediate, On a scale of 1 to 5, I would give it 3.5 stars (with 1 being easy and 5 being most difficult in terms of complications in folds involved)
Uses rectangular units
We folded it using a gift wrapping paper
 |
| Mandala Serenata folded by Art Hours |
Day 02: Variation of Mandala Serenata
Design Credit: Carla Godoy
We folded a variation of the original model as we learned to fold it from a video tutorial and here's the link to the same: https://www.youtube.com/watch?v=8_C01a1GQ5c
Model details:
Category: Modular Origami
Level: Intermediate, On a scale of 1 to 5, I would give it 3.5 stars
Level: Intermediate, On a scale of 1 to 5, I would give it 3.5 stars
Uses rectangular units
We folded it using colored printer paper.
 |
| Variation of Mandala Serenata folded by Art Hours |
Day 03: Mandala Tamba Taja
Design Credit: Falk Brito
We folded the model following an origami diagram. You will surely get it on the internet.
Model details:
Category: Modular Origami
Level: Intermediate, On a scale of 1 to 5, I would give it 3.5 stars
Level: Intermediate, On a scale of 1 to 5, I would give it 3.5 stars
Uses rectangular units
We folded it using origami paper.
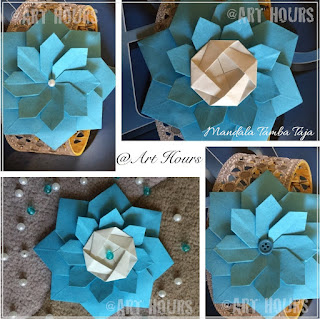 |
| Origami Mandala Tamba Taja folded by Art Hours |
Day 04: Origami Tico Star
Design Credit: Maria Sinayskaya
We folded the model following a video tutorial and here's the link to the same: https://www.youtube.com/watch?v=QyZKB4eaD1A
Category: Modular Origami
Level: Intermediate, On a scale of 1 to 5, I would give it 3.5 stars
Level: Intermediate, On a scale of 1 to 5, I would give it 3.5 stars
Uses square units, requires no glue.
We folded it using origami paper.
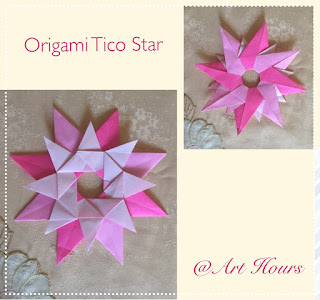 |
| Origami Tico Star folded by Art Hours |
Day 05: Origami Clutch Purse
Design Credit: Chrissy
We folded the model following a video tutorial on paperkawaii.com
Category: Single Sheet folding
Level: Intermediate, On a scale of 1 to 5, I would give it 3 stars.
Level: Intermediate, On a scale of 1 to 5, I would give it 3 stars.
Uses square sheet of size 6"
We folded it with an origami paper.
 |
| Origami Clutch Purse folded by Art Hours |
Day 06: Origami Navigator Star
Design Credit: Maria Sinayskaya
We folded the model following an origami diagram, you can surely find it on the internet.
Category: Modular origami
Level: Easy, On a scale of 1 to 5, I would give it 2 stars
Level: Easy, On a scale of 1 to 5, I would give it 2 stars
Uses 4 square units, requires no glue.
We folded it using colored printer paper sized 8.7 cm square each.
This one is fun to fold and even kids can try folding this one. My kid had fun folding this one.
This one is fun to fold and even kids can try folding this one. My kid had fun folding this one.
 |
| Origami Navigator Star folded by Art Hours |
Day 07: Origami Mandala Macuxi
Design Credit: Falk Brito
We folded the model following an origami diagram, you can surely find it on the internet.
Category: Modular origami
Level: Intermediate, On a scale of 1 to 5, I would give it 3.5 stars
Level: Intermediate, On a scale of 1 to 5, I would give it 3.5 stars
Uses 8 rectangular units.
We folded it using gift wrapping paper sized 10cm x 3cm.
 |
| Mandala Macuxi folded by Art Hours |
Day 08: Origami Humming Bird
Design Credit: Not sure
We folded the model following a video tutorial by Mohamed Galal and here's the link to the same: https://www.youtube.com/watch?v=Si-Mhbu3UCI&t=1s
Category: Single sheet folding
Level: Difficult, On a scale of 1 to 5, I would give it 5 stars.
Though the model is difficult to fold, the video tutorial is very clear and elaborates every step with accompanying diagrams of the folds.
Level: Difficult, On a scale of 1 to 5, I would give it 5 stars.
Though the model is difficult to fold, the video tutorial is very clear and elaborates every step with accompanying diagrams of the folds.
We folded it using McDonald's carry bag paper.
 |
| Origami Humming Bird folded by Art Hours |
Day 09: Origami Elephant
Design Credit: Fumiaki Kawahata
We folded the model following a video tutorial by Leyla Torres and here's the link to the same: https://www.youtube.com/watch?v=InIpbaPdA54
Category: Single sheet folding
Level: Intermediate, On a scale of 1 to 5, I would give it 4 stars
Level: Intermediate, On a scale of 1 to 5, I would give it 4 stars
We folded it using 6" square origami paper.
 |
| Origami Elephant folded by Art Hours |
Day 10: Origami Lotus
Traditional design. You can find lots of diagrams and tutorials on the internet hence am not posting a link.
Category: Single sheet folding
Level: Easy, On a scale of 1 to 5, I would give it 2 stars.
Level: Easy, On a scale of 1 to 5, I would give it 2 stars.
We folded it using tissue papers.
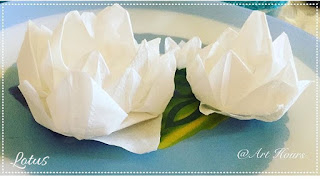 |
| Origami Lotus folded by Art Hours |
Day 11: Origami Miniature Mandalas
Design credit goes to many artists. You can find the links to many such stars and patterns in Origami-club.com.
Category: Modular Origami
Level: Easy, On a scale of 1 to 5, I would give it 2 stars
All the models below have 8 square units.
Level: Easy, On a scale of 1 to 5, I would give it 2 stars
All the models below have 8 square units.
Used paper scraps as units which were as small as 1.5cm squares
We folded it using colored printer paper.
 |
| Miniature Mandalas folded by Art Hours |
Day 11: Origami Long Bookmarks
Category: Single Sheet folding
Heart Bookmark
Design credit: Jo Nakashima and here's the link to the video tutorial: https://www.youtube.com/watch?v=gml2j4bvT88
Level: Intermediate, On a scale of 1 to 5, I would give it 3.5 stars
Well, those who know Jo Nakashima's Origami Models would agree that his designs are not easy as they look!
Level: Intermediate, On a scale of 1 to 5, I would give it 3.5 stars
Well, those who know Jo Nakashima's Origami Models would agree that his designs are not easy as they look!
Crane bookmark
Design credit: Bob Stack, Video tutorial by Yakomoga and here's the link: https://www.youtube.com/watch?v=UdYTw1u8xk8
Level: Intermediate, On a scale of 1 to 5, I would give it 3 stars
Both the models can be folded from a rectangular sheet.
We folded the bookmarks using origami paper.
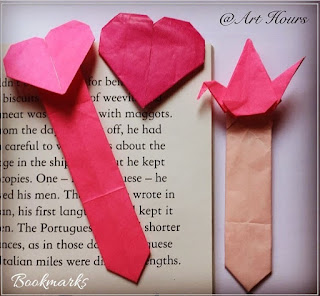 |
| Origami Long Bookmarks folded by Art Hours |
Category: Single Sheet folding
Pencil Bookmark
Uses a rectangular sheet of paper.
We watched a video tutorial for this bookmark and here's a link:https://www.youtube.com/watch?v=Z73dByO_PVI
Level: Easy, On a scale of 1 to 5, I would give it 1 star.
Level: Easy, On a scale of 1 to 5, I would give it 1 star.
Crane bookmark
Uses a square sheet of paper.
We followed a picture tutorial on http://www.all-about-origami.com/
Level: Easy, On a scale of 1 to 5, I would give it 2.5 stars.
Level: Easy, On a scale of 1 to 5, I would give it 2.5 stars.
Cat bookmark
Amongst all of the long bookmarks, we folded, this one had complicated folds and I have lost the link to the tutorial. Sorry for this one!
Level: Intermediate, On a scale of 1 to 5, I would give it 3.5 stars.
We folded all the bookmarks using origami paper.
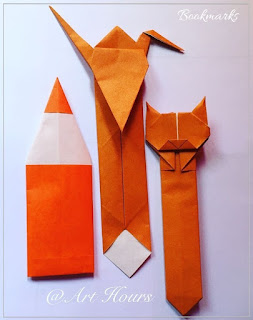 |
| Origami Long Bookmarks folded by Art Hours |
Day 14: Origami Spiral
Design Credit: Tomoko Fuse
Category: Modular Origami
Level: Easy, On a scale of 1 to 5, I would give it 3 stars.
Uses 4 square units, requires no glue.
We watched a video tutorial for this one by paperfolds. While I made the units, my kid enjoyed assembling this model.
 |
| Origami Spiral folded by Art Hours |
Day 15: Origami Magic Circle
Design Credit: Not sure
Category: Modular Origami
Uses 8 square units, requires no glue.
We watched a video tutorial, for this one and here's a link: https://www.youtube.com/watch?v=cb0ICsjkl14
Level: Easy, On a scale of 1 to 5, I would give it 2.5 stars.
We used colored printer paper for this model.
This one was folded entirely by my child watching the video tutorial and she had great fun folding this one, for, in the end, she could even play with it!
 |
| Origami Magic Circle folded by Art Hours |
For the 15 days of World Origami Days, we had awesome fun folding every model. Each day we tried folding a new origami model, we learned and enjoyed on the way. I wish more people could have been a part of this origami exploration!
Anyways, hope the links to the origami tutorials helps those who are keen to learn origami and love attempting new models.
Thanks for stopping by...have a good day.
Follow us to know more about classes and latest events.
Now available on Instagram...link/like/share
www.instagram.com/archguide16...
Follow us to know more about classes and latest events.
Now available on Instagram...link/like/share
www.instagram.com/archguide16...
Link and like our FB page at: FB.me/arthours where we post latest details about our classes and activities.
or you can mail us at archguide16@gmail.com for more queries regarding classes and workshops.
Thank you for stopping by.
---


