30 Aug 2016

Tutorial: How to Sew a Braided Fabric Rug

Sew - a needle pulling thread,
La -  note to follow so and 
Tea - I drink with jam and bread...why this song? well to make a braided fabric rug you will need to do all the above three things...sewing, listening to music or singing, and lots of tea to keep your patience...atleast I needed them all...

Often, we do not want to throw away old clothes or fabrics that have some emotional strings attached for they may have been gifted by our dear ones or they are too expensive to throw away, but you don't know what to do with it since they are of no use now, or maybe they have worn off only from certain areas and look like new mostly...What to do with such clothes? They are in not so good condition and still you don't want to throw them, and they occupy that little space in your closet too. I was in a similar dilemma months ago; Left with a cotton bed sheet that was too precious to be thrown away despite being worn off completely! 

It could have been used as a napkin or maybe for dusting purpose. A single bed sheet - what could it be used for - I wondered. Finally I decided to make a rug out of it. I cut the fabric into long strips and then made braids from it. After making the braids, the braids were just lying off in some closet and I got busy with other things in life. Just a couple of days back, as I got to cleaning the closet I found the braids tucked away in a corner - Oh...and I was feeling too lazy to start...I took the braids out out and kept them on the table where I could see them daily, as a reminder to make the rug soon. But I didn't have the time...finally I brushed aside my laziness, admonished myself that I had to do it now 'kal kare so aaj kar' and I sat down with it all - the braids, needle & thread, and there it was...after hours of laborious stitching, a beautiful small rug. It was beautiful since it was handmade and I had invested a good amount of my time into it. I also ended in making a small container using the same braids to hold some junk jewelry.
art hours nupur acharjya
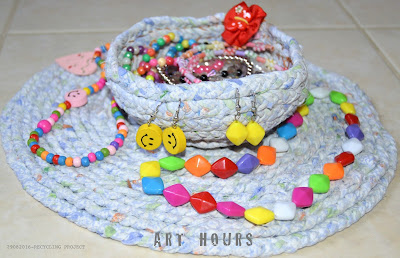
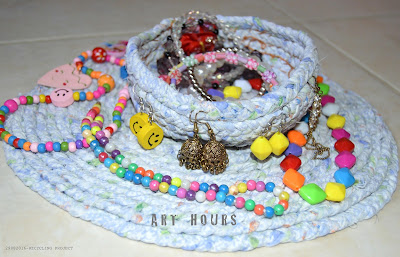
A braided rug and a container to hold junk jewelry
This tutorial presents how to make the braids from fabric strips and then how to stitch it as you keep coiling the braids around. It shows how to make a rug as well as the container to hold junk jewelry. Mind you, it requires a lot of patience to make the entire stuff so be prepared to have a lot of time in hand. Since, I had made the braids in advance, it didn't take time to make the rug - only some couple of hours. It could have been much quicker if I had used some fabric glue instead of stitching it and would look neater too. Since, I had no fabric glue with me, I went ahead with sewing it by hand. The end of the tutorial includes tips and suggestions for alternate use of the braided fabric rug and the braided fabric container. So please go through the entire tutorial.

Here's presenting the tutorial to make a braided fabric rug from an old bed sheet.

Materials required:
Long strips of fabric (preferably from bedsheets or curtain),
A pair of Scissors,
Sewing Needle,
Thread either to match the fabric or of a neutral color

Step1:
Firstly, cut the sheet into long strips, preferably of similar width, using a pair of scissors. I had cut the sheet into @2" wide strips. If they are not of equal strips do not fret, but try to maintain the width as far as possible, for it will make the braids look neater. Thereafter, take 3 strips at a time and sew the top edges as shown in the picture below. This will help you to hold the strips at the top in place as you start with the braiding process next.
art hours nupur acharjya
Step 1: Sewing the edges together
Step 2:
Start making the braids neatly. Once you are done with the 3 strips, add other 3 more strips to it. I kept on sewing one strip to the another and continued braiding them. The resulting product will be a long braid that will cover your entire room and more...
art hours nupur acharjya
Step 2: Making the Braid
A suggestion while you make the braid; keep some music handy to keep you engrossed with the braiding activity or do it while you watch your favorite television show, for after a while, you may start losing all the patience.

Step 3: 
Now that you have the long braid ready, start sewing. Sew... a needle pulling thread.
Start by coiling around the centre. 
art hours nupur acharjya
Step 3: Start making a coil and sewing them as you keep coiling
Step 4: 
Keep sewing the braids as you keep coiling around the centre. If you need to take a break in between, keep your needle tucked into the coil as shown in the picture below to avoid the coil opening up.
art hours nupur acharjya
Step 4: Keep sewing as you coil the braid around the centre
Step 5:
So here we are...after hours of laborious work, we are done with the sewing work. Just make sure to stitch the edges of the braid at the ends carefully, so that they are not hanging loose and are neatly sewed to make it look complete.
art hours nupur acharjya
Step 5:  Sew the edges at the end carefully
Done: 
We are finally done with the braided fabric rug. You can use a thread to match with the fabric or preferably use a neutral color so that the stitches are not visible, unless of course you want to show the stitches, then you can use some contrasting color.
art hours nupur acharjya
Done: A circular braided fabric rug 
Finally, turn it over if you don't want the stitches to be seen. You could also paint it with fabric colors to upscale it or leave it just with the natural look.

The circular braided rug as you see in the picture below is around 11" in diameter. It can be used as a mini floor rug or as a centre piece under flower vases.
 art hours nupur acharjya
Turn it over and you have the final rug ready for use

I also made a jewelry container from the braids. The procedure is the same as above up to a certain point. Keep coiling around the centre to make a round base, thereafter you have to change the direction of the braid. Actually it was a mistake I made as I started coiling. The direction of the braid changed and it was too much of hard work already and I didn't want to redo the entire sewing again so I continued as it is. As I kept sewing, following the direction of the braid, it shaped into a small container that I could use for storing things. 
 art hours nupur acharjya
Coiling the container

The handmade fabric braided container that you see in the picture below is around 5" in diameter - an ideal size to just hold anything!
 art hours nupur acharjya
A braided fabric container ready for use
 art hours nupur acharjya
The circular rug and container to hold junk jewelry

Suggestion or Tips for use:
Other than using the circular rug as a centre piece under a vase or under a flower pot, the size of the same (@11inches in size) is ideal to be used as a pot holder in the kitchen or it could also be used as a coaster. Similarly, the fabric container (@5 inches in size) can be used in the kitchen to store vegetables or fruits. 

Finally, this is where both the products ended up being used in my house, adding a warm personal touch to my home interiors.
 art hours nupur acharjya
Circular rug under a flower pot
 art hours nupur acharjya
Container to hold vegetables in the kitchen
---

23 Aug 2016

Tutorial: From Paper Strips to a Heart Decoration

Just a couple of days ago, I posted a tutorial on how to use paper strips scraps to make a floral decoration. You can view the link here to view how we made the paper hearts. Making the heart units is a fun activity for the kids and keeps them involved up to a certain stage.

Left with lots of paper scraps from our previous workshop we decided to use them for some craft activity. In the previous tutorial, we made simple hearts using two similar sized stripes. To make it interesting we used two different colors to make the heart unit. While in this tutorial, we made hearts using two different sized paper strips with two different color combinations as shown in the picture below. 
 Left Inset: The heart unit formed using similar sized paper strips
Right Inset: The heart unit formed using different sized paper strips

This tutorial begins in a similar manner but the end result is different and much simpler for kids to try with minimum guidance from parents. The following tutorial includes step by step guidance to make the decoration along with pictures to make it easier for kids to follow.  

Tutorial:
We used paper strips that were left over from our previous craft activities. You can cut them as per your requirement or follow the steps below. We had strips of two different lengths, to form the double loop. We joined the two loops to make a heart shape. Once, the heart shapes were done, we joined every heart unit using glue or stapled them together. 

Materials used: Paper strips, scissors, stapler, glue.
Paper size used for outer loop: 6" x 1"
Paper size used for inner loop: 4" x 1"

Step 1: Make the inner loop using the 4"x1" paper strip by applying glue at the edges.
Step 1: The inner loop using the smaller sized strip

Step 2: Using the longer sized strip, make another loop by gluing it to the outer edges of smaller loop.
Step 2: The outer loop glued to the inner paper loop

Step 3: Make two units using two different colored paper strips as shown below.
Step 3: Paper loops using two different colored paper strips

Step 4: Now apply glue to the inner edges of the two looped units, and join them to form a heart shape.
Step 4: The heart unit formed by sticking two looped units together

Step 5: Make many such heart units using the above steps.
Step 5: Many heart units formed using the above steps

Step 6: Staple two units as shown in the picture below. You can also use glue instead of a stapler to join them.
Step 6: Join the units using stapler or glue

Done: Join all the units together using staples or glue to form the heart decoration.
Done: All the units are joined to form the heart decoration

Once done we were looking for places to use the decoration. We placed it in all the locations including the entrance door, the balcony railing, etc. We also used it as a garland around a soft toy. Finally, it ended up as a decoration for the toy house.

Decoration at the entrance door
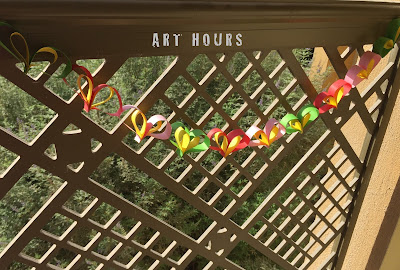
Decoration on the balcony railing
Garland around the soft toy
Finally found the place to decorate the toy house

Suggestion or tips for use: 
This heart decoration can be used for decoration during parties or other events, or also as decoration in your kid's room. Since, its an easy DIY paper craft activity for kids, you can involve your kids to make this decoration for their birthday celebration too; involvement of kids for decoration during their own birthday celebration will not only make them happy but they will also realize the efforts we adults take to celebrate their birthdays.

---

21 Aug 2016

Tutorial: Using Paper Strips to make a Floral Decoration


Have you ever wondered what to do with all those paper scraps that you are left with after all the crafting activities with your kids? Most of you must be throwing them away for they are of no use after all the craft work. Generally, I avoid throwing any paper scrap and I stash them away for later use. I use them for making paper collages or in greeting cards or for some little craft project with my daughter.

Last weekend I was on a cleaning spree and I found a bag full of paper strips that I had kept aside from my previous workshop. My daughter was too busy watching TV and I wanted her to be away from it. So I decided to engage her in some craft activity that would keep her away from the electronic screen atleast for some time. I had something in my mind when we started but I was not very sure of what to do with all those scraps. I let my daughter take the lead.

Her first job was to segregate all similar color paper strips. And that she did quite swiftly. Next, I taught her to make loops and glue them. Once the loops were ready we were quick enough to make some hearts shapes and then the flower pattern and then I knew what we would do with those flower patterns. We stapled all the flower pieces and made a linear flower decoration. Once done, it turned out to be a pretty decoration that we hung from the ceiling in our kid's room.

Hanging Floral Decoration

Material required: Paper strips, glue, stapler, scissors.
Here the paper used was rainbow paper strips left over from our previous workshop. The size was about 6" long by 1" wide. 

Paper Strips Scraps
Tutorial: Follow the captions given below the pictures for detailed instructions. Here's how we did it.
Paper Strips Sorting

Step 1: Adding Glue to the edge
Step 2: Gluing the strip in the shape of a loop
Step 3: Made all the loops and sorted them based on colors
Step 4: Glue together two units to make a heart shape.
Make many such heart units. 
Making this heart shape is an easy task and my daughter usually loves getting involved in crafting activities which doesn't require much of complication. This is where her job ended. She loved making the hearts. And from here I had to take over. She also arranged them into a flower pattern after which I took over and stapled all the units together.
Step 5: Arrange groups of 5 pieces forming a flower pattern
Step 6: Staple all the units one by one.
Note the flower pattern forming in the centre as you staple them.
The flower patterns are ready
Step 7: Staple one flower unit with another unit
Step 8: Add a loop at the top of the unit for hanging it
Done: A decoration piece hanging from the ceiling of my kid's room.

Suggestion & Tips:
Apart from using it as decoration in the kid's room, the above decorating piece can also be used for decorations during parties. Choose the color of strips as per your requirement or theme of the party. It could also be used for decorating the nursery room for kids. Also, the entire assembly can be made longer or shorter by adding or removing the flower pieces as per your requirement.


---


8 Aug 2016

Tutorial for the August Flower: Easy origami tutorial for kids

Come August and it rains all around, 
Splish and Splash and Splosh...
We hear it lashing against the windows,
We enjoy the smell of wet mud.
The wind goes roaring,
It gets cold and dark,
As rain falls pitter patter...

We come to India during our vacations in the UAE during the month of August and end up being stuck indoors due to heavy rainfall in almost every part of the country. The cable television connection is also disrupted due to heavy rainfall. So what do we do now? My child questions me. I search for some paper or any craft material I may have stocked years ago in our drawers and find some deep red colored chart paper and some black colored chart paper. Next what? The paper I found was a little damaged at corners, some part of it was damp due to rains. So we cut out all the damaged portion and decided to do some experimentation with origami. Since the paper was of thick quality, it was not possible to make many folds, so I decided to make something that would require minimum folds and would be easy for my kid to handle also. Once done, we named it 'the August Flower' after the month of August since we made it this month.

Here is the tutorial showing kids how to make the unit and assemble it step by step. It is modular origami but doesn't involve any complex folding and is also easy to assemble, just follow the steps closely.

Materials used: 8 square sheets of paper of size 8cm x 8cm cut out from a chart paper. Glue for the assembly.

Step 1: Start with a square sheet of paper
Step 1: Take a square sheet of paper and fold it in half diagonally to get a crease at the center.

Step 2: Fold in both the sides 
 Step 2: Now fold in both the sides

Step 3: Fold in both the sides to meet the center.
Make 8 such units.
Step 3: Fold in both the sides to meet at the center crease as shown.  One of the unit for the flower pattern is ready.  You can also glue both the flaps, I didn't.
Make 8 such units for the final assembly. 

Step 4: Overlap one unit over the other
 Step 4: Overlap one unit over the other as shown above. Keep glueing the units as you add them one over the other.

Step 5: All units are assembled 
Step 5: Keep overlapping one unit over the other till you are done with all 8 units as shown in the above picture. 

Step 6: Turn over the entire assembly to get the final pattern
Step 6: Now turn over the entire assembly and the August Flower Pattern is ready.

A Ganesha cutout glued at the centre of the flower pattern
Final touches: We took a little Ganesha cut out from an old wedding card and glued it at the centre of the flower piece. A beautiful home decor piece now adorns the wall of our room.

Suggestion: You can use thin paper instead of chart paper. Gift wrappers would be a beautiful alternative. You can use this for home decor purpose or for party decorations too.


1 Aug 2016

Tutorial for an 8-pointed Modular star

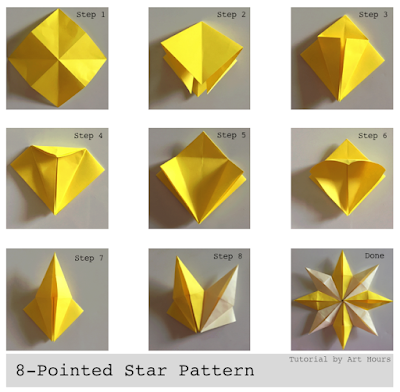
Here's a tutorial for a simple 8-pointed modular star pattern that starts with a square base. Of the many origami patterns and stars, you will find on the internet, most of them start from the traditional origami base or folds.  If you are aware of the origami basic folds and bases, then this star is very easy to make.

8-pointed Star Pattern with an Origami ladybug in centre
Materials used:
- 8 square sheets of size -10.5 cm x10.5 cm, using two shades of yellow color paper
- A glue stick for gluing all the units together and that's all.

Procedure:
art hours
Tutorial for 8-pointed modular star pattern
Step1: Start with a square sheet with the mountain folds on the horizontal and vertical direction; and valley folds in both the diagonal directions. 
Step 2: Once you get the creases from the above step, squash fold to get the square base.
Step 3: Fold the sides as shown to make a crease and then unfold
Step 4: Fold the top to get a crease
Step 5: Unfold to reveal the creases
Step 6: Open the flap following the creases as shown.
Step 7: Flatten it to get a diamond shape.
Step 8: One unit for the star is ready. Make 8 such units.
Start assembling the star by inserting the flap of one unit below the other unit. You can glue them as you add one unit after the other.
The 8-pointed modular star pattern is ready.

Suggestion and Tips:
You can make every unit of different color paper or you can alternate it with two or four different shades of color to make it look more attractive.

Uses: You can use it as a center table decoration, or as a wall piece too. You can also make many such stars and use it for party decorations.

For any queries regarding this tutorial, you can mail me at archguide16@gmail.com.