Clay Modeling is not difficult as it seems to be. It is a fun activity for people of all ages. I remember as a child playing with mud from our garden. I used to collect wet mud, from the potted plants or from under the trees and play with it for hours. Not to mention the wrath of my mother I would incur after this activity! I had an accomplice too; our maid's daughter. Once, she taught me how to make clay pots and utensils. I loved the activity of clay modeling since then. I believe that there's something to learn from everybody and I always look forward to meeting people and interacting with people from whom I can learn something.
Coming back to clay modeling. I got to play with clay once again when I went to my college of architecture. There we had clay modeling as an elective. That's when I got to understand the properties of clay, how to best express your ideas and imagination in a 3D form and it turned out to be real fun. Thanks to our clay modeling instructor; he let us explore and experiment with clay whenever we wanted to, and he was always present to guide us in the clay modeling studio apart from our scheduled classes.
Nowadays, clay is available in the market in various forms: polymer clay, plasticine clay, air dry clay, under different brand names and each one has a different property. I haven't still had the opportunity to explore with them all, but thanks to my daughter's interest in clay modeling I have explored a little with the plasticine clay that is available in the market for kids under the brand name of 'Kiddy Clay'. The clay modeling box we got for our daughter had 7 colors clay slab with some basic plastic molds and tools, which are sufficient for kids and beginners to explore with clay modeling.
This post contains a few pictures of some easy clay modeling ideas to make clay flowers using minimum tools. Most of them use two basic shapes and have been molded by hands only. The pictures are self-explanatory, however, I have included steps to guide you further.
Option 1:
Take two different colored clay for the petals and the center. We took a large round orange ball and divided it into 5 equal round balls. We took a small yellow round ball for the centre. Thereafter, we flattened all the round orange balls and the yellow ball too, using our palms. Then we took the orange ones and made them pointed towards one of the edges using fingers only to get the shape of petals. Once the petals are ready, we arranged them in a round circle and then placed the flattened yellow clay piece at the centre. A simple flower is ready. This option is the easiest one it seems, but reading ahead, you will find some more easy techniques.
 |
| Option 1: Easy Orange Clay Flower |
Option 2:
Similar to the above option, here also make 5 round balls for the petals and one small round ball for the center. Flatten all the balls with your hands. Now, for the petals, take each flattened shape and make them pointed towards one edge and curve them upwards gently using your fingers. Arrange the petals around a center and place a small yellow flattened shape at the center. This flower looks more realistic since we have given a 3D shape to the petals by curving them.
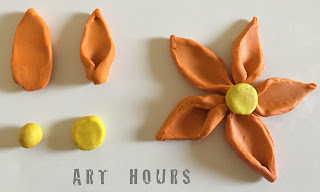 |
| Option 2: Orange Clay Flower with 3D effect |
This option is simple too and fun for kids. All you need to do is take some clay, make 5 equal sized round balls to start with and then make long thin rolls from it. Make 5 such long rolls for the petals and one for the center. Then take the rolls one by one and coil the along the center. If you are familiar with quilling and enjoy quilling activity, this is something even quilling lovers would like to try. Although this one is much simpler than quilling and you don't need any glue or any other tool. Shape the pink coils by squeezing each coiled piece a little towards the edge, gently with fingers only, to get an oval shape for the petals. Arrange them around a center and place a yellow colored one at the centre and your quilled clay flower is ready.
 |
| Option 3: Pink Quilled Clay Flower |
This one we called a peanut clay flower simply because its petals look like peanuts. So here's how we make the peanut shaped petals. We made took a large orange clay ball and divided it into 6 equal sized round orange balls. We made another yellow round ball for the centre. We used a plastic scale to cut halfway through the center. And the peanut shaped petals were ready. Now arrange all the orange petals around the yellow round ball and your peanut clay flower is done. This option is very simple and kids would certainly love making this one as it requires minimum patience and efforts. Just make the round balls and pierce the centre with a plastic scale or any knife-like tool given with the clay moulds.
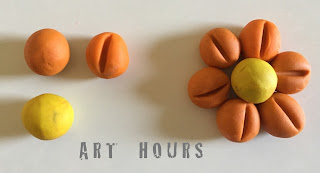 |
| Option 4: Orange Peanut Clay Flower |
This option uses only two balls of clay. We took two different colored clay balls, one small yellow round ball for the centre and one big red colored round ball for the petals. Next, we flattened both the balls; the yellow one with your palms, and the red one we flatted using the roller just like you would roll a small puri or Indian chappati. Now, using the knife tool we first marked the petals on the red one, and then just cut the petals through the marks made using the same knife tool. Thereafter, curl up the petals upwards to make it look more realistic and place the flattened yellow shape at the centre. And your red clay flower is ready.
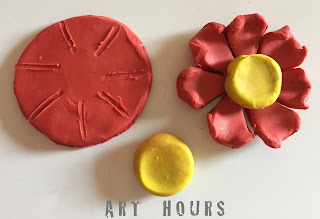 |
| Option 5: Red Clay Flower |
This one combines the technique using Option-1 and Option-3. Take 6 round balls of white colored clay and flatten them between your palms. Take another round ball of pink clay, make a long roll and coil it along the centre like you would do for paper quilling. Arrange the white petals along a centre, overlapping them one over the another as you see in the picture below and place the quilled pink clay for the centre. This one is easy combining the steps using option 1 and option 3. You can also do the other way round, by quilling the petals as in option 3 and placing a flattened centre from option 1.
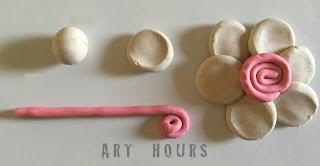 |
| Option 6: Easy Clay Flower with Quilled Clay Centre |
Take a large round ball of red clay and divide it into 8 equal parts. Then roll them into long rolls of equal size. Bend each one of them joining the edges to shape it like a loop; this will be the petals. Take a yellow round ball, flatten it between your palms you have the yellow centre ready. Now, just arrange the 8 petals around the yellow centre and a red looped flower is ready.
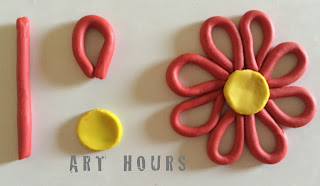 |
| Option 7: Easy Looped Clay Flower |
The above tutorials are easy steps to guide kids and beginners and to encourage all who are interested in clay modeling. Don't be hesitant to explore and try experimenting with clay. You will do wonders once you start exploring.
Happy Clay Modeling!
Note: By mentioning any brand name, this post or the author doesn't endorse the brand in anyway.

No comments:
Post a Comment