29 May 2017

Monday Musings: Let Your Child Dream

It is Monday today and a perfect day to start your week, and reboot your thoughts!

Well, to begin with, this is the time of the year when the board results are out in India and the children make their parents proud. On one side you will hear the media propagating stories of proud parents and excellent achievements of their children and on the other side, you will also hear about failures and disappointments. 

So this morning, when I was reading about the top scorer's performance it made me remember my school days, my parents and my friends' parents, their help and support in fulfilling our dreams and building our careers. I also remember having come across the different set of parents during that time of the year while we students were preparing for our board exams. They were of all types and I am sure they still exist!
- the society fearing parents -'log kya bolenge' types who pressurized their children to study and work harder fearing what will the people say if their child doesn't score well, 
the over-expecting parents -'beta kaise bhi karke ache marks leke aana', who wanted their kid's name to be on the merit list by any means, 
- the incentive rewarding parents - 'beta scooty gift mein milega' who promised to gift their children anything but he/she should get the highest scores, 
and the last one was and still is probably the most common and irritating types, 
- the comparing parents who compare the neighbor's child's performance with their own 'you know Sharmaji ke bete ko itne marks mile....blah, blah..., 

and there are a few more types that are not even worth mentioning...

but why I write this today is that whatever type of parent you or I may be, we are all bonded and blinded by expectations. We want our child to excel in academics, in sports, in extra-curricular activities and so on...And this pressure building up exercise starts right from the preschooling years. Directly or indirectly we build up the pressure and pass on undesired levels of stress and strain on our kids by our undue expectations. We, as parents, want them all to be achievers. In this process, we try to take a control of their lives from an early age. Thinking that we as parents only want the best for our child, we actually steer them into a direction that he/she may not want to take. 

Think about this today. Is this really what your child wants? Does he/she really wants to excel in academics...maybe he wants to be an artist or may be a sportsperson? Maybe he wants to be something else. Support your child and help them to develop and build their careers. 

Let Your Child Dream

Don't weave your dreams and expectations into your child's future...Let your child dream. Support and guide them in their endeavors. 

Thank you for stopping by and reading this post.

Have a great Monday.

---

28 May 2017

Clay Modeling: Clay Palm Tree with a Grass Tuft and some Flowers

Learn Clay Modeling with us today!

If you love clay modeling and like to involve your kids too, then this is one clay modeling project you must try with your kids. I am sure you will enjoy as much as we did...

Well last afternoon, my daughter and I, were, as usual, getting bored. It was a hot summer afternoon and we had already finished watching our quota of movies for the weekend and we had nothing better to do than to get ourselves involved in some creative task. Nothing better than clay modeling we thought. So we took out our clay and clay modeling tools - we used kiddy clay (plasticine clay) and believe me its the best since we can keep reusing it again and again without any qualms or trouble. And yes, we have been using this same batch of clay since the last couple of years. 

Clay Modeling a Palm Tree

Material required:
For making the Palm tree, you will need following colors of clay:
Brown for the tree trunk
Green for the Palm leaves
Yellow for the coconut
Later we also added some tuft of grass and some flowers, so you will also need:
Red for some flowers, and some more green clay for the grass tuft.

Procedure:
The steps are not so difficult so keep a close watch at the pictures and you will definitely find it easy to carry on the clay modeling project.

I. Making of the Palm Tree Trunk
Step 01: Firstly roll out the brown clay using a roller and flatten it as you go up and down.

Step 01: Rolling out the clay to flatten it

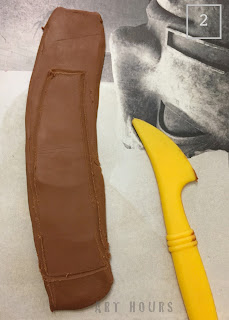
Step 02: Use a plastic knife or any sharp instrument to draw the outlines of the palm tree trunk.
Step 02: Draw the shape of the trunk

Step 03: We used the same plastic knife tool to cut out the extra clay and carved out the palm tree trunk.
Step 03: Carving out the trunk shape

 Step 04: Thereafter, using a toothpick we added the textures to the trunk.

Step 04: Adding textures with toothpick

II. Making of the palm frond/leaves
Step 05: Take a green colored clay ball, roll it out to flatten it. Then draw the shape of the leaves and cut it out as shown in the picture below. Remove any excess clay from the sides and shape the palm frond/leaf with your fingers.


Step 05: Carving out the clay leaves

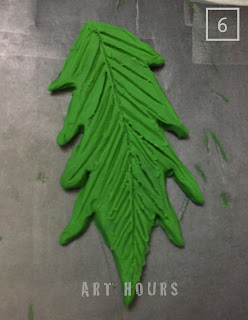
Step 06: Add textures using a tooth-pick or any sharp tool.
Step 06: Adding textures to the clay leaf

III. Making of the coconuts
Step07: The palm tree is incomplete without its fruit. So what we do is use a yellow color clay to make some coconuts. Take a small ball of yellow clay and make it oval shaped. Then flatten it with your fingers. Thereafter add some textures using the toothpick


Step 07: Make the coconut fruits using yellow clay

IV. Assembling the palm tree:
Step 08: You will need to make 4-5 leaves and 3 coconuts. Once they are ready you can begin to assemble them.
Step 08: The tree trunk, leaves, and coconuts ready to be assembled

Step 09: Place the coconuts first on the palm tree trunk and then place the leaves one by one overlapping each other as shown below.
Step 09: Assembling the fruits and the leaves

Step 10: The picture below shows the arrangement of the leaves and the fruits. The palm tree is complete but we can still add some more details. So keep scrolling down. There is more to follow. 
Step 10: The palm tree is complete

V. Adding the grass tuft and flowers:
Step 11: We added a tuft of grass with some flowers below the tree trunk and here's how we did it. We took some green clay and flattened it out with a roller.
Step 11: Green clay for grass 

Step 12: Next we drew the grass outlines on the green clay and cut it out with the plastic knife.
Step 12: Grass outlines on the clay
Step 12b: Cutting out the grass tuft

Step 13: Next, we took some red clay for the flowers and using a toothpick we added the textures to the flower and the green stems later.
Step 13: Red clay for flowers and green for stems

Note: I don't have the pictures of the textures we added to the grass tuft and to the flowers but you can see it the final picture below.


Step 14: The final step is just adding the tuft of grass with the flowers. We just placed the green tuft of grass covering the palm trunk at the bottom and we added a couple of red clay flowers. And done...we have a beautiful clay palm tree with a grass tuft and red flowers. 
Clay Palm Tree with a grass tuft and red flowers

Was it easy? I don't know if it's going to be easy for you all but we had fun making this palm tree with the grass tuft and the flowers. It was like painting but the medium we used was clay. Do give it a try and let us know. 

Here's a quick snapshot of the entire clay palm tree making procedure on our youtube channel.


Hope this tutorial was helpful.

Have a good day!

---

22 May 2017

Monday Musings: Be You


Monday Morning...office & school and lots of work to be done...and what do I end up doing first thing in the morning is having a glimpse at the FB news updates....not an ideal thing to do I would say...

I take a look at the happy faces on the FB page and I am envious; they are all having such a nice time I think! Some friend is out taking a holiday in Europe, somebody out there enjoying in the Maldives island and so on...and what was I doing? Early in the morning a glimpse at the FB news updates can be real demeaning and can reduce your self-worth indeed. How then do I inspire myself at this time of the day...Monday morning and so many things to do...I floundered and wondered.

The first thing then I do is promise myself not to take a look at the FB page for at least a couple of hours ahead (a difficult thing to do!) and I get myself to finish my morning chores. 

Remember...First things First! 

Then, I do a google search of inspiring quotes. I come across this quotes of Bruce Lee. 

"Always be yourself, express yourself, have faith in yourself, do not go out and look for a successful personality and duplicate it." This quote really made a big difference today. It tells you the plain truth to believe in yourself and to just be you.

"Be You"

We look at successful people around us and want to be like them. But is it what we really want?

Will copying them or their lifestyle, copying what they have done or do, bring us true happiness?

Think about it today...

Be You...be yourself. Stop imitating the people around you and stop pleasing others. Don't compare your life with others. Have faith in your talents, trust your instincts. Be You. Be Happy...

Have a wonderful Monday!

----

21 May 2017

Clay Flower Pot: An Easy 2D Clay Modeling Activity for Kids

A small 2D clay modeling project attempted with my daughter on Friday afternoon and here is how we did it. Clay used for this project is plasticine clay that all the kids love to play with and the advantage of using plasticine clay is that you can reuse it for another project if you store them well. We have probably done so many clay modeling work using this same clay. You can refer to some of our previous work done by visiting our previous blog posts.

This post gives you a picture tutorial that explains every step for making clay the flower pot. Its an easy DIY clay modeling activity that the kids can try with little help from parents. 

For this project we used: 
Red, Orange, Yellow, Green, Blue, Pink and Black color clay. 

Firstly let's start with the flower. Make 5 tiny balls of equal sizes first. Then flatten each clay ball, and shape them into a petal as shown in the first step.

Step 01: Shaping the petals

Make five such petals and arrange them in a circle to form a flower.
Step 02: Arrange 5 petals to form a flower

Next, take a yellow color clay ball for the center of the flower
Step 03: Yellow ball for the flower center

Use a sketch pen lid to give an indentation to the flower center. You may even skip this step and move to the next step directly.
Step 04: Make indentation with a sketch pen lid

Shape the flower center as shown using your fingers.
Step 05: Shaping the flower center

Now all you need to do is place it at the flower center.
Step 06: Place it at the center of the flower

Time to make the stems and the leaves using green color clay. Roll them into snakes and bend them to form leaves.
Step 07: Shaping the leaves

Make long snakes for the stems.
Step 08: Shaping the stems

For the pot, we used black color clay. Make a long snake with the black clay and keep bending them and stacking them one upon the other till you get the fpot shape.
Step 09: Shaping the pot

Use the orange, pink and blue color clay to make the flower as shown in the previous steps. Arrange all the flowers, stems and leaves on the pot as shown in the picture below.
Done: Clay flower pot is ready

Note, this is just a 2D clay modeling project which you can just arrange. We disassembled the entire project and rolled back the clay to use it for another project.

It was a fun project done with my daughter and it took us around 30 minutes to finish it all.

Here's a link to a quick preview of the steps on our youtube channel.


Hope this tutorial is helpful.

Thank you for stopping by...Have a good day.

---


18 May 2017

Learn to Sketch: Spring Birds Scenery


Art is one medium that brings you closer to nature and there is no better way to understand Art than by observing the nature. This tutorial is a small attempt to bring the nature inside your house by sketching a spring scenery with the little birds.

Also, I intend to post this tutorial to serve as a guide on using some pencil shading techniques. Often we come across various pencil sketches and wonder how they made such masterpieces. Well, there lies not only the drawing skills but also awareness of the techniques and of course hours of patience labor. These techniques can't be mastered in a day but require a lot of practice. This post will highlight some of the shading techniques that have been used in the scenery made below.

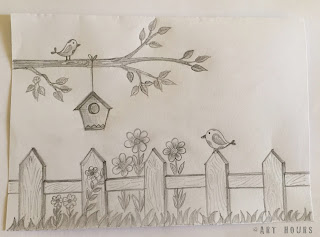
This tutorial will show you step by step to create a small scenery with a wooden fence, a tree branch, tiny birds, flowers and a birdhouse. All the elements mentioned above are easy to draw and sketch, just observe closely and follow the steps. We actually converted a colored vector image found on the internet into a pencil sketch. Don't know who the vector artist is, but thanks to the unknown artist, we found a good art inspiration.

tutorial by art hours


If you are a beginner, before you begin the sketch, you must be aware of some pencil shading techniques that you will need to apply in this sketch. In case you are indeed a beginner or wish to improve your sketching skills, do read this post on Sketching Basics that shows different sketching techniques using a graphite pencil to get a better idea on pencil sketching tutorial that I had posted earlier. 

For this 'Spring Birds' sketching tutorial, you need to learn linear shading, cross hatching and gradated shading techniques as shown in the reference guide below. Also, you will need to apply the wood-grain texture as shown below.
Pencil Shading Reference Guide

Now, let's start with the scenery. All you need for this sketch is a paper, HB and 2B pencils and an eraser. No fancy tools are required. We have used an A5 size printer paper.

Start by adding the outlines of the fence, the grass beneath and the tree branch. Use an H or HB pencil to roughly sketch the layout. This will help you to erase without leaving any dark pencil lines on the drawing sheet.


Next, we add a depth to the fence by adding more lines on the sides.


Now, add a bird house hanging from the tree branch.

Time to add the small birds on the fence and on the tree. We have not added any complicated bird shapes, just a simple doodle sketch of the bird will do for this sketch.

Next, add a few leaves to the branch.

Spring is incomplete without flowers. Add as many flowers you wish to near the fence, to the tree branch, and so on.

Once, all the detailed outlines are added with an HB pencil, time to start adding shades and textures to the sketch using a 2B pencil.

Here, we added pencil shading to the bird house. Oops forgot to add the pencil shading to the walls of the house...will see that in later pictures.

Now, we add the wood-grain texture to the fence with 2B or HB pencil.

Add pencil shading to the grass below the fence with 2B pencil. Use gradated shading or linear shading techniques.

Add, the wood-grain texture to the tree branch also. Add pencil shades to the flowers and the leaves. You can add either linear pencil shading or gradated pencil shading.

You can use the dark to light tone using gradated shading to the leaves and flowers preferably.

Complete the bird house by adding cross hatch pencil shading.


Add some gradated pencil shading to the tiny birds too.


Add some more foliage, creepers and/or flowers to the area near the fence.

Lastly, I added one more flying bird and done.

It was that simple...wasn't it? Do give it a try...

For those of you who wish to watch a quick snapshot, here's a quick view of the sketching steps on our youtube channel.


Try this beautiful sketch at home. I am sure you will enjoy making it as much as we did.

Here's another quick sketch made using the same pencil shading and textures. This cartoon is again an inspiration from a vector artist, but we have added the pencil textures and shades, and also some details as the bird and the flowers to the original sketch.
A Man Fixing a Fence - Pencil Sketching

Using the right pencil shading techniques and textures is as important as your drawing. Combine your drawing skills with the right pencil shading techniques and you will see the difference it makes to your drawings and sketches.

Thank you for stopping by.

---

15 May 2017

Monday Musings: Create A Life You Love


Build a life you love. Create a life you love. Live a life you love. Don't know who said those lines. But they mean and convey something very important yet something very simple. 

How often we have felt pressurized in our lives to do something we don't wish to. I am sure many of us have gone through that phase when our parents wanted us to do something, become something, we didn't want to. We may have chosen the careers our parents showed us - termed as a respectable profession, then we choose an ideal life partner our parents choose for us, and then we need to do things as per our in-laws' or our life partner's directions and lead the life they want to us to lead. In the entire process, we as individuals are lost somewhere. Whether a girl or a boy, we are brought up in a society that makes us believe that we should listen to our elders and that they can never be wrong. 

By this, I don't say that we should not obey them or we should not heed their advice but we should know what to chose and what will make us happy. After all, it's our life and we need to make our own choices. Some things in life, are meant to be under your control and not controlled by other people's whims and wishes. 

Create a Life you Love

I have been reading a lot of motivating articles and writings that inspired me to write this post today.

I was actually curious to find out what life experts have to say on this topic. Bonded by the society and complications of life, how then do we create a life we love? I read a few of them, and all convey the same message: meditation, self-realization, listing down goals, setting your goals, do small things or acts that make you happy and ultimately don't forget the values in life.

Well, what I understand is that we all have a life that we can't change. We are responsible parents, responsible members of the society, and so on... but we still have the choices. You can't disassociate yourself from the roles and responsibilities in your life, but you can still make yourself happy by doing things you like to do. Have the courage, have faith in yourself and don't give up on your dreams. It is your willingness and right intentions that can help you create a life you love.

Thank you for reading this post. 

Have a great Monday. Have a good day.
---

14 May 2017

Happy Mother's Day 2017

My mom is definitely my rock. Alicia Keys
Well said. In good times or bad times, in peace or in trouble, I have always looked upon my mom, who has helped me, guided me and shielded me in this world. I have become a mother myself but that doesn't stop me yet from asking her for help and guidance time and again. 

Today is mother's day, and one of the first things I do on such days is looking out for google's doodles. Hey, I have even pinned some of my favorites. They are so cool and creative. Today the animated doodle shows the story of a cactus mom taking care of her kid. Now I wonder why the google team chose the cactus of all the things in the world. Then it made me think; probably because they grow in the arid region, face all the rough weather conditions and survive through it all...just like our mothers who have to bravely face various situations in life and yet never let us children know what they went through. We see only one side of them and that is love, care, and protection. 

Mother's day is celebrated around the world on different days of the year. In Greece, it's celebrated in February while in UK and Ireland it's celebrated on 4th Sunday of March. It is celebrated on the 2nd Sunday of May in most of the countries like India, USA, Canada, Germany, etc., However, when I was searching for the google doodle UAE today I couldn't find anything different. And then it dawned on me that Mother's Day was already celebrated here in UAE on 21st March. So then this gives me a chance to celebrate the day again. And why not, motherhood is for everyone to endear and enjoy. So love and be loved this day and always.

With that note, I wish all the mothers around the world a very Happy Mother's Day. 
Happy Mother's Day Wishes 2017

Here's sharing some of my favorite quotes for the day:

All that I am, or hope to be, I owe to my angel mother. 
Abraham Lincoln

Motherhood: All love begins and ends there. 
Robert Browning

God could not be everywhere, and therefore he made mothers. 
Rudyard Kipling

For when a child is born the mother also is born again. 
Gilbert Parker

Thank you for stopping by. Have a good day.
---

7 May 2017

Sketching Tulips - Pencil Shading Guide


“A tulip doesn’t strive to impress anyone. It doesn’t struggle to be different than a rose. It doesn’t have to. It is different. And there’s room in the garden for every flower. You didn’t have to struggle to make your face different than anyone else’s on earth. It just is. You are unique because you were created that way. Look at little children in kindergarten. They’re all different without trying to be. As long as they’re unselfconsciously being themselves, they can’t help but shine. It’s only later, when children are taught to compete, to strive to be better than others, that their natural light becomes distorted.” -―Marianne Williamson

These words, by the spiritual teacher and author, Marianne Williamson, really impressed me. They are so true in today's age of competition and survival of the best and the fittest and God knows what not., that we have forgotten to be ourselves, we only want to study to compete, we want to participate to win...this attitude of ours to be a winner in every race has not only made our life stressful but we have put this same pressure on our kids too. We don't give them their space to think, to play, to live, to thrive and be happy. 

I don't know how many of you will even bother to read this blogpost...but whoever reads this I hope will understand and agree that life is not just about winning and shining, competing and thriving, but it is a lot more than that. It doesn't matter if we don't win a trophy always, what matters is our happiness, the moments of love and laughter that we share with our family and friends, that makes our life worth living.

Anyways, let us move on to the main topic of this post, that is, learning to draw and render a bunch of tulips. Drawing tulips is not very difficult. Nothing is difficult if you put your heart in it!


Let's start with a rough sketch first. Draw a rough outline of the tulips and draw some broad leaves as shown in the sketch below. Use an H or HB pencil to start with. We don't want the pencil lines to be seen in the final shading hence light rough outlines will do. 


Define the petals and the stem in this step. Remove any unnecessary lines or pencil marks at this stage. The rough drawing is ready to color. 


Now begin coloring. For the tulips, you will need three color pencils as shown below: red, ochre and black. Instead of ochre, you can use a yellow color instead.


Begin with the red color first, leaving white spaces where you would add the yellow or the ochre color later.


Add the yellow or the ochre and blend it with the red color applied in the last step. The picture below shows how the flower would look after blending yellow with the red.


Add black wherever you want to show the dark areas to the flower, preferably to the petals at the back.


Once the flowers are done, take a dark green color pencil and start with the base of the flower and the stem.

You can even highlight the borders first using the dark green color pencil.

For coloring the stem and the flowers, you can color with dark green and also add some browns or ochre yellow later.

Once all the stems and leaves are colored with green and brown/yellow, you can add some blacks to some areas as shown below.

Once the bunch of tulips is done, it is time to add a background to the sketch. Using a yellow ochre fill up the entire background and then add orange shading near the flowers and the leaves to highlight the area near the flowers and the leaves as shown in the sketch below.


Here's a quick snapshot of the entire process on our youtube channel.


Hope this tutorial on sketching the tulips is helpful.

And, here are some tulip sketches, rendered by our students.


Thank you for stopping by. Have a good day.

---