29 Jun 2017

Bookmarks with Origami Animals: Recycling cardboard and paper scraps


Here is another tutorial on recycling paper and putting it into some good use. We had some cardboard sheets lying from my daughter's previous school projects and loads of paper scraps as usual. We didn't want to throw them and at the same time wanted to make something useful using these materials. Also, I wanted to gift something to our Art Hours students and I was searching for ideas that would not only make them happy but also motivate them to continue with their good work. I decided to make some reward tags for them which they could use as bookmarks too.


We made use of the cardboard sheets and paper scraps to make something beautiful and useful. And here's how we did it.

Materials required:
Cardboard sheets, paper scraps, craft glue, origami paper for making the origami animals.

Procedure:

Step 01:
We used some cardboard of size 18.0 cm x 3.0 cm and paper scraps of size 8.5cm x 3.5cm. For every piece of the bookmark, we used 6 different colored paper scraps. 

Step 01


Step 02:
Cover the top and bottom of the bookmark with the paper scraps and then glue the paper scraps at an angle as shown below in the picture.

Step 02

Step 03:
Keep gluing the paper scraps overlapping one over the another as shown below. Use any color combination you like. We used different combinations and made use of whatever colors we had.

Step 03

Step 04:
Turn over the entire assembly. 

Step 04

Step 05:
Apply glue to the sides of the paper scraps as shown in the picture below.
Step 05


Step 06:
Fold down the paper flaps one after the other as shown below. This becomes the bottom side of the bookmark.
Step 06

Step 07:
Turn it over and the bookmark is ready. You can decorate it further if you wish to.
Step 07

Step 08:
I used 4cm x 4cm square origami sheets to make some origami animal faces. Then, I glued them on the bookmarks and they were ready. 
Bookmarks with origami animals

To fold these cute origami animals is not very tough. I have posted a picture tutorial earlier to make some of these animals. You can click the link here to get the tutorial on folding the origami animals. It shows how you can fold 10 such origami animal faces.

When I was making these bookmarks I intended to reward my talented little students who have been part of Art Hours classes for quite some months now. So, these cute bookmarks served as reward tags to motivate and inspire them on their path to exploring the art world. Hence, one last step was to write something unique for each of my student, some inherent quality that each of my students had that made them uniquely talented.

The smile on their faces when they received these cute reward-tags was my reward!

I hope this tutorial is helpful. Do post your feedback and comments. This will help us learn and improve our posts.

Thanks for stopping by. Have a good day.
---

26 Jun 2017

Monday Musings: Behind a Mask


Behind every mask, there is a face, and behind that a story.
Martin Ruby

Monday Musings: Behind every mask, there's a story!

Every person is unique and every person has a story: an interesting story or a boring one, a good story or a bad one..but each one of us has a story that we hide from the world. We have one face that we show to the people and another face when we are alone, on our own.  We probably hide our true selves behind a mask.

Don't you agree?

Think about it today...

Wish you a very Happy Monday.

Have a great day ahead.

---

22 Jun 2017

Sketching the Dolphins: Pencil Shading Guide

If you love sketching animals and especially Dolphins then you have landed to the right page. 

Lately, we did a lot of artwork related with Dolphins. We made some origami dolphins and did some sketching of Dolphins.

Dolphins are simply adorable and today this tutorial will show you how to draw a pair of Dolphins jumping out of the sea. For this sketching exercise, you will need an HB pencil, an eraser, some color pencils such as dark blue, light blue, orange, yellow, red and gray.


Let's start with the simple tutorial on learning to sketch the dolphins jumping out the water. Follow the steps closely and I am sure it is not that difficult as it looks.

Step 01: Firstly begin with rough outlines of the sea line, and the twin dolphins one behind the other.


Step 02: Next, add the fins.


Step 03: Now, define the mouth area.


Step 04: Add the tail in this step.


Step 05: Add the eyes and complete the fins as shown. The rough sketch of the dolphins is ready.


Step 06: Start applying pencil shading to the body and the tail end.


Step 07: We have just used an HB pencil to add shades. You can try with a 2B pencil too. Use gradiated shading technique here. Apply pencil shading by laying pencil lead sideways. 
Pencil Shading with 2B pencil

Step 08: We also added some dark blue in the dark areas as shown below. Complete shading the dolphins by adding some gray color at the bottom part of the dolphin.


Step 09: Now, add the details for the waves and water splashing around the dolphins as they jump out of the water.


Step 10: Using dark blue and light blue complete the waves. 


Step 11: We added the sun too in the background. Use orange and yellow for the sun at this stage.


Step 12: Add dashes of red also to highlight the sunlight spreading across the sky and blend it with the light blue color for the sky.


Finally, use the eraser to remove some of the oranges and yellow and blend the colors. Also, use the eraser to remove some blue color around the tail of the dolphins to show the water splashes as they rise out of the water.
A Pair of Dolphins jumping out of the sea

Hope this tutorial on sketching the dolphins was helpful. Let us know in your comments. Here's a snapshot of the Dolphin sketching by Art Hours students.

Dolphin Sketching by our students

Thank you for stopping by.

---

19 Jun 2017

Monday Musings: Determination


There are no steps that will lead you to success, No Doorway that will show you the way to succeed. It is only by strong determination that we can achieve success. 

Have you come across any such situation, when you felt that you would just like to leave it all and give up? When you are tired and fatigued and when nothing goes right. Everything seems to fall apart and you just want to stop it all and go back...you just wish the door to success was right in front of you or that this was the last flight of steps and you just want to be there on the top!

Origami Festival Star and
Pencil Sketch of some ruins


Yesterday, I started making this Origami 'Festival Star' designed by the artist Nobuko Okabe. It uses 16 modular units. And as all of you who practice origami would understand that Origami involves precision folding and with that a goes a lot of patience. With just 4 units done, I was about to give up when the blank blue sheet seemed to insist upon me to pick it up and keep going ahead...and that's when I realized that with patience you also need determination to keep going. 

Origami Festival Star - in progress!


And that's true in our everyday lives too. There is no shortcut to success. There may be thousands of steps that we may need to climb and there may be hundreds of doors we would need to reenter...but we shouldn't hesitate or stop when we have to struggle. Be patient, be determined and success will come knocking on your doors.

Think about it today.

Thank you for stopping by.

Have a wonderful Monday...and a wonderful week ahead.

---

15 Jun 2017

Bookmarks from Fabric Scraps: Quick and Easy DIY

If you have a stockpile of loose fabric scraps and you are searching for some ideas then you have landed to the right page. Here, is an easy way to recycle leftover fabric scraps and make something beautiful and get creative all along.


If you are in no mood to sew or too lazy to sew yet you wish you could do something with the fabric scraps then this fabric bookmark is just the project for you. You can make loads of them and give them away as gifts to your bookworm friends!

Earlier, we have posted some tutorial for making origami corner bookmarks. If you love origami then you can refer the tutorial by going to this link: Origami Corner Heart Bookmarks. This will help you in making bookmarks using paper only.

Meanwhile, let's gather the materials required for the bookmark made with fabric scraps and proceed with the tutorial. It is an easy recycling project. Instead of throwing away those tiny fabric scraps left from your previous sewing projects, you can make good use of them. Also, if you love paper crafting and cutting then this is one project you will surely enjoy.

Materials required:
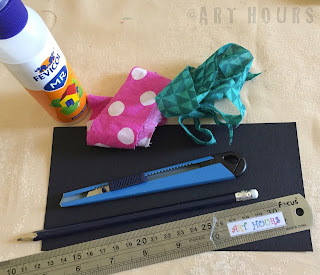
Cardstock sheets, fabric scraps, ruler, pencil, paper cutter, craft glue, white tape

Material required

Procedure:
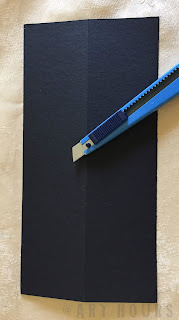
For making the bookmark, we have used cardstock sheet of size 10cm x 20cm. Use a paper cutter to make a slit along the center line to make a neat fold along the center.
Cardstock sheet size 5cmx20cm

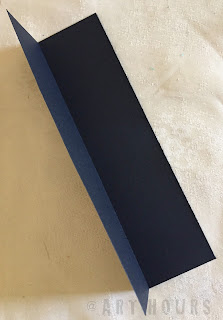
Fold the sheet in half along the center so that the final size of the bookmark is 5cm x 20cm.
Note: You can also use two sheets of size 5cm x 20cm each to make the front and back of the bookmark separately and glue them later. We preferred folding the sheet into half instead.
Fold the sheet into half

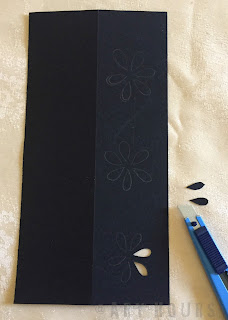
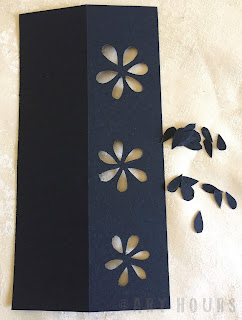
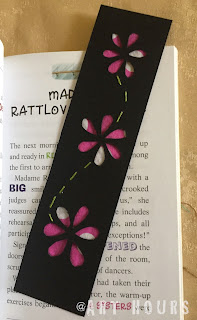
Make the design on the top side of the cardstock with a pencil and use a paper cutter to make the cut outs. This is where all the fun lies...so get creative with the designs at this stage.
Use a paper cutter to cut out the design

This is how it would look after the design is finalized.
The final design after paper cutting

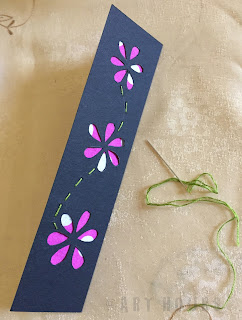
Now, take the fabric scraps and secure them in place using a white tape. Secure and stretch the fabric well so they don't wrinkle later when you apply glue.
Secure the fabric pieces

The bookmark is almost done but before we glue the back side we did some thread work - a simple running stitch as shown. You can skip this step and proceed with sealing the back side of the bookmark.

Running stitch on the bookmark

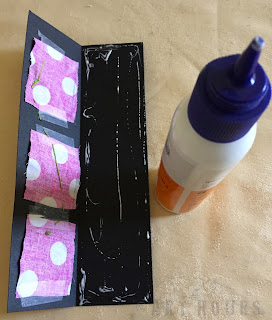
Finally, apply the white glue as shown on the back side. 
Apply Glue
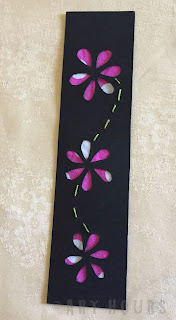
Close and seal the back side as shown and the bookmark is ready for use.
Bookmark ready
Bookmark from fabric scraps 

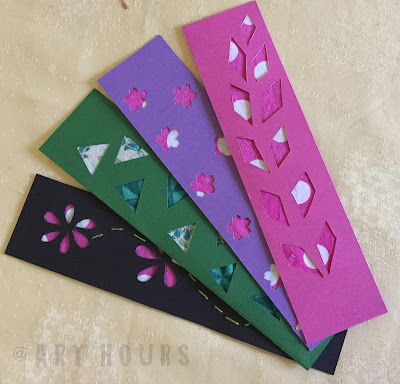
Use different colors and combinations of colored cardstocks and fabric scraps, mix and match and have fun. We made more such bookmarks as you can see below. They are quick and easy to make.
Bookmarks from fabric scraps

You can make many such bookmarks using fabric scraps. We had fun making them.

So get going and use those leftover fabric scraps that you have been stacking all along. Gift them to your friends or even to yourself. You don't need to be a bookworm to use a bookmark. You can use them to bookmark your favorite recipes in your recipe booklet or mark some important pages in a report or a bulky file. It certainly makes life easier...

Hope you enjoy making these bookmarks.

Thank you for stopping by. Have a good day!

---

12 Jun 2017

Monday Musings: Build a Rocket and leave the Earth


It's Monday again and we are our grumpy selves again...call it Monday Blues or whatever...come Monday Mornings and we don't want to get out of our bed, we wish that it were a holiday...why Monday again...and in that very instant we are trying to escape from reality, trying to avoid the necessary tasks or chores that we have to face again. I am sure many of you out there would agree with me and feel the same. 

But is it always Mondays that make us feel grumpy...I suppose no...we come across many situations in our lives when we wish to avoid them and want to run away from. Wish we had a rocket and we would just escape from all our worries and sorrows, escape from all the uncertainties of life...escape from this very earth. Well, that's the thought for the day "Build a Rocket and leave the Earth."

Monday Musings: Build a Rocket and Leave the Earth!

But is it so easy to run away from the tasks, duties, and responsibilities...think about it...

Get up...rise...stop musing and build a rocket to face the day instead!

Have a good day...Happy Monday!

---


11 Jun 2017

Clay Modeling Basics: Tutorial for Kids and Beginners


Time and again we have posted various tutorials on clay modeling ideas for children and beginners. We have explored with plasticine clay, salt dough, air dry clay, super-light air dry clay and so on... Each has its own advantages and disadvantages and each has its own purpose. However, we enjoyed every exercise we undertook using different types of clay.

This post simply highlights the basic forms that can be used further by kids in different clay modeling projects. Believe me, if you know the basics, you can do the rest....after all it is said that well begun is half done!

We begin with the most basic shape viz. the Ball shape - and how do you make it?
Just take a lump of clay in your hands and roll between your palms to get a ball of the desired size. Now that is easy, isn't it?
Ball Shape

Next, we have an Egg shape. Just take the ball you made above and roll one of its ends into a point. You have the egg shaped ball ready.
Egg Shape

To get the Pancake shape, all you need to do is flatten the ball till you get a flat round shape. You can also use a roller pin that comes along with the clay modeling tools for kids. The roller pin will help you to flatten it evenly.
Pancake shape

The next shape is the Cone shape which looks similar to the egg shape. The only difference is that you flatten the bottom of the egg-shape to get the cone shaped clay.
Cone shape

The Sausage or Cylinder shape is easy to make as well. Just place the ball you made on a flat surface and roll with a flat palm till you get this cylindrical shape.
Sausage or cylinder shape

The next one is called a Ribbon shape. Take the cylinder shape you made above and flatten it with your palm or use a roller pin.
Flatten the sausage shape with your palm or use a roller pin

Ribbon shape

Another similar shape to the cylinder or sausage shape is the Snake form. All you need to do is take the cylinder shape and keep rolling it with your palm till it becomes longer and thinner.
1. Take the cylinder shape and roll it with your palm
2. Keep rolling the clay to make it thinner
3. Snake shape

Here, are some easy animals you can try making using these basic shapes you just learned above. They were all made by my 8-year-old kid while I was preparing this tutorial. She tried out a clay snail, a spider and a butterfly using some of these very basic shapes that I have highlighted above.

For making the Clay Snail, she has used the snake shape to make the body and has coiled the ribbon shape for the pink shell part above it. Use thin snakes to add tentacles above the head.
Clay Modeling - A Snail

For the Clay Spider, you can make two round balls and then add the legs using the snake shapes. That's really easy...you can mark the details like eyes etc. using a toothpick.
Clay Modeling - A Spider

For the Clay Butterfly, just use the snake shape making it wider at the top. Make the two antennas using the snake shapes, only make it very thin like wires. For the butterfly wings, you can use flattened ribbon shapes. As you can see in the picture below, my child enjoyed adding the textures and patterns to clay model using a toothpick - enjoy exploring with textures and patterns here!
Clay Modeling - A Butterfly

Now, that you have the basics of clay modeling, explore and have fun with clay modeling.

Have a good day!

---