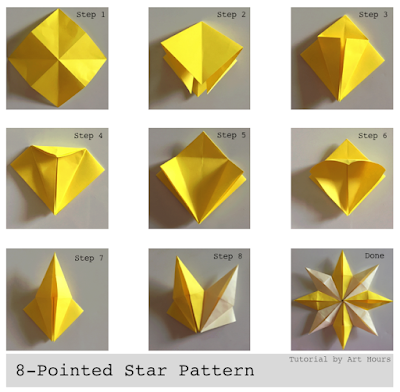
Here's a tutorial for a simple 8-pointed modular star pattern that starts with a square base. Of the many origami patterns and stars, you will find on the internet, most of them start from the traditional origami base or folds. If you are aware of the origami basic folds and bases, then this star is very easy to make.
Materials used:
- 8 square sheets of size -10.5 cm x10.5 cm, using two shades of yellow color paper
- A glue stick for gluing all the units together and that's all.
Procedure:
- 8 square sheets of size -10.5 cm x10.5 cm, using two shades of yellow color paper
- A glue stick for gluing all the units together and that's all.
Procedure:
 |
| Tutorial for 8-pointed modular star pattern |
Step1: Start with a square sheet with the mountain folds on the horizontal and vertical direction; and valley folds in both the diagonal directions.
Step 2: Once you get the creases from the above step, squash fold to get the square base.
Step 3: Fold the sides as shown to make a crease and then unfold
Step 4: Fold the top to get a crease
Step 5: Unfold to reveal the creases
Step 6: Open the flap following the creases as shown.
Step 7: Flatten it to get a diamond shape.
Step 8: One unit for the star is ready. Make 8 such units.
Start assembling the star by inserting the flap of one unit below the other unit. You can glue them as you add one unit after the other.
Start assembling the star by inserting the flap of one unit below the other unit. You can glue them as you add one unit after the other.
The 8-pointed modular star pattern is ready.
Suggestion and Tips:
You can make every unit of different color paper or you can alternate it with two or four different shades of color to make it look more attractive.
Uses: You can use it as a center table decoration, or as a wall piece too. You can also make many such stars and use it for party decorations.
For any queries regarding this tutorial, you can mail me at archguide16@gmail.com.
For any queries regarding this tutorial, you can mail me at archguide16@gmail.com.


No comments:
Post a Comment