12 Nov 2017

World Origami Days Celebrated!


World Origami Days was founded by an American Committee to spread awareness about Origami. The World Origami Days is celebrated every year beginning from 24th October to 11th November. Also, Japan celebrates 11th November as Origami Day.


I am not a member of any committee but I love Origami, and since the day I started practicing Origami I have no regrets.

We celebrated the World Origami Days at Art Hours, by folding a new origami model every week. (Here, 'we' implies my daughter and me).

Origami is a challenge to me and folding a new model gives me immense satisfaction and peace. Generally, I don't follow video tutorials but prefer to search for diagrams instead. The entire process, beginning from understanding the fold diagram to folding the entire model, is like solving a puzzle -and this is where the entire fun and challenge lies. Watching a video to fold an origami model is no fun for me - it's like you are reading a mystery story and your killjoy friend tells you the ending of the story, or you go to watch a suspense movie and somebody tells you the end - same is the case with doing origami. If you know the ending it is no fun...However, sometimes I do watch videos when the folds are too complicated, but not all origami models have video tutorials so that makes me happy as I can continue taking up new challenges!

'World Origami Days' was just a pretext for us to try some new origami models. Thanks to the wonderful creations made by the origami artists around the world and thanks to them for uploading the origami diagrams and tutorials on the internet. It has helped origami lovers like us and many others around the world, to fold and explore new origami models.

In this blog, I am not only posting the origami models we attempted but also the links to the tutorials which we followed, wherever possible. We attempted a new model each day beginning from 24th October to 10th Nov. Unfortunately on the last few days of the World Origami Days when I had planned to conduct a workshop, I fell sick and I had to cancel the workshop. I, hereby apologize to all those students who were keen to attend the origami workshop but I had to cancel the same due to my personal health issues. Hope to see them participating in our future workshops.

Day 01: Mandala Serenata
Design Credit: Vagner Alves/Carla Godoy
We folded a variation of the original model as we learned to fold it from a video tutorial and here's the link to the same: https://www.youtube.com/watch?v=8_C01a1GQ5c
Model details: 
Category: Modular Origami
Level: Intermediate, On a scale of 1 to 5, I would give it 3.5 stars (with 1 being easy and 5 being most difficult in terms of complications in folds involved)
Uses rectangular units
We folded it using a gift wrapping paper
Mandala Serenata folded by Art Hours

Day 02: Variation of Mandala Serenata
Design Credit: Carla Godoy
We folded a variation of the original model as we learned to fold it from a video tutorial and here's the link to the same: https://www.youtube.com/watch?v=8_C01a1GQ5c
Model details: 
Category: Modular Origami
Level: Intermediate, On a scale of 1 to 5, I would give it 3.5 stars
Uses rectangular units
We folded it using colored printer paper.
Variation of Mandala Serenata folded by Art Hours

Day 03: Mandala Tamba Taja
Design Credit: Falk Brito
We folded the model following an origami diagram. You will surely get it on the internet.
Model details: 
Category: Modular Origami
Level: Intermediate, On a scale of 1 to 5, I would give it 3.5 stars
Uses rectangular units
We folded it using origami paper.
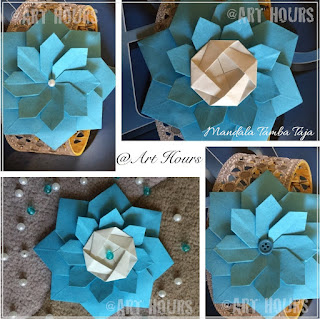
Origami Mandala Tamba Taja folded by Art Hours

Day 04: Origami Tico Star
Design Credit: Maria Sinayskaya
We folded the model following a video tutorial and here's the link to the same: https://www.youtube.com/watch?v=QyZKB4eaD1A 
Category: Modular Origami
Level: Intermediate, On a scale of 1 to 5, I would give it 3.5 stars
Uses square units, requires no glue.
We folded it using origami paper.
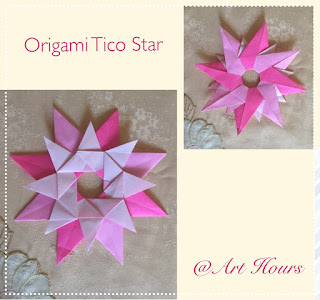
Origami Tico Star folded by Art Hours

Day 05: Origami Clutch Purse
Design Credit: Chrissy
We folded the model following a video tutorial on paperkawaii.com
Category: Single Sheet folding
Level: Intermediate, On a scale of 1 to 5, I would give it 3 stars.
Uses square sheet of size 6"
We folded it with an origami paper.
Origami Clutch Purse folded by Art Hours

Day 06: Origami Navigator Star
Design Credit: Maria Sinayskaya
We folded the model following an origami diagram, you can surely find it on the internet.
Category: Modular origami
Level: Easy, On a scale of 1 to 5, I would give it 2 stars
Uses 4 square units, requires no glue.
We folded it using colored printer paper sized 8.7 cm square each.
This one is fun to fold and even kids can try folding this one. My kid had fun folding this one.

Origami Navigator Star folded by Art Hours

Day 07: Origami Mandala Macuxi
Design Credit: Falk Brito
We folded the model following an origami diagram, you can surely find it on the internet.
Category: Modular origami
Level: Intermediate, On a scale of 1 to 5, I would give it 3.5 stars
Uses 8 rectangular units.
We folded it using gift wrapping paper sized 10cm x 3cm.
Mandala Macuxi folded by Art Hours

Day 08: Origami Humming Bird
Design Credit: Not sure
We folded the model following a video tutorial by Mohamed Galal and here's the link to the same: https://www.youtube.com/watch?v=Si-Mhbu3UCI&t=1s
Category: Single sheet folding
Level: Difficult, On a scale of 1 to 5, I would give it 5 stars.
Though the model is difficult to fold, the video tutorial is very clear and elaborates every step with accompanying diagrams of the folds.
We folded it using McDonald's carry bag paper. 
Origami Humming Bird folded by Art Hours

Day 09: Origami Elephant
Design Credit: Fumiaki Kawahata
We folded the model following a video tutorial by Leyla Torres and here's the link to the same: https://www.youtube.com/watch?v=InIpbaPdA54
Category: Single sheet folding
Level: Intermediate, On a scale of 1 to 5, I would give it 4 stars
We folded it using 6" square origami paper.
Origami Elephant folded by Art Hours

Day 10: Origami Lotus
Traditional design. You can find lots of diagrams and tutorials on the internet hence am not posting a link.
Category: Single sheet folding
Level: Easy, On a scale of 1 to 5, I would give it 2 stars. 
We folded it using tissue papers.
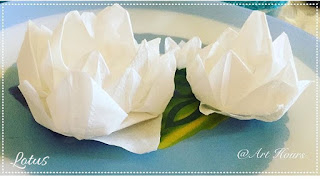
Origami Lotus folded by Art Hours

Day 11: Origami Miniature Mandalas
Design credit goes to many artists. You can find the links to many such stars and patterns in Origami-club.com.
Category: Modular Origami
Level: Easy, On a scale of 1 to 5, I would give it 2 stars
All the models below have 8 square units.
Used paper scraps as units which were as small as 1.5cm squares
We folded it using colored printer paper.
Miniature Mandalas folded by Art Hours

Day 11: Origami Long Bookmarks
Category: Single Sheet folding


Heart Bookmark
Design credit: Jo Nakashima and here's the link to the video tutorial: https://www.youtube.com/watch?v=gml2j4bvT88
Level: Intermediate, On a scale of 1 to 5, I would give it 3.5 stars
Well, those who know Jo Nakashima's Origami Models would agree that his designs are not easy as they look!

Crane bookmark
Design credit: Bob Stack, Video tutorial by Yakomoga and here's the link: https://www.youtube.com/watch?v=UdYTw1u8xk8
Level: Intermediate, On a scale of 1 to 5, I would give it 3 stars

Both the models can be folded from a rectangular sheet.
We folded the bookmarks using origami paper.
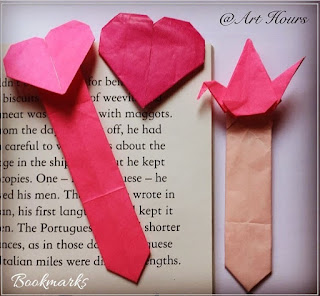
Origami Long Bookmarks folded by Art Hours


Day 12: Origami Long Bookmarks
Category: Single Sheet folding


Pencil Bookmark
Uses a rectangular sheet of paper.
We watched a video tutorial for this bookmark and here's a link:https://www.youtube.com/watch?v=Z73dByO_PVI
Level: Easy, On a scale of 1 to 5, I would give it 1 star.

Crane bookmark
Uses a square sheet of paper.
We followed a picture tutorial on http://www.all-about-origami.com/
Level: Easy, On a scale of 1 to 5, I would give it 2.5 stars.

Cat bookmark
Amongst all of the long bookmarks, we folded, this one had complicated folds and I have lost the link to the tutorial. Sorry for this one!
Level: Intermediate, On a scale of 1 to 5, I would give it 3.5 stars.

We folded all the bookmarks using origami paper.
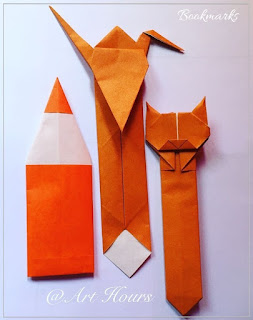
Origami Long Bookmarks folded by Art Hours


Day 14: Origami Spiral
Design Credit: Tomoko Fuse
Category: Modular Origami
Level: Easy, On a scale of 1 to 5, I would give it 3 stars.
Uses 4 square units, requires no glue.
We watched a video tutorial for this one by paperfolds. While I made the units, my kid enjoyed assembling this model.

Origami Spiral folded by Art Hours

Day 15: Origami Magic Circle
Design Credit: Not sure
Category: Modular Origami
Uses 8 square units, requires no glue.
We watched a video tutorial, for this one and here's a link: https://www.youtube.com/watch?v=cb0ICsjkl14
Level: Easy, On a scale of 1 to 5, I would give it 2.5 stars.
We used colored printer paper for this model.
This one was folded entirely by my child watching the video tutorial and she had great fun folding this one, for, in the end, she could even play with it!
Origami Magic Circle folded by Art Hours

For the 15 days of World Origami Days, we had awesome fun folding every model. Each day we tried folding a new origami model, we learned and enjoyed on the way. I wish more people could have been a part of this origami exploration!

Anyways, hope the links to the origami tutorials helps those who are keen to learn origami and love attempting new models. 

Thanks for stopping by...have a good day.

Follow us to know more about classes and latest events. 
Now available on Instagram...link/like/share
www.instagram.com/archguide16...

Link and like our FB page at: FB.me/arthours where we post latest details about our classes and activities.

or you can mail us at archguide16@gmail.com for more queries regarding classes and workshops.

Thank you for stopping by.

---

29 Oct 2017

It's Been a Long Time...from our clay modeling archives today!


It's been a long time since I have posted anything at all. Last week was quite busy all through the weekend and I haven't been able to upload any tutorials recently. Just came across these snaps of clay modeling we had done some time back...maybe at beginning of the last year...thought I should share some pics of the same.

clay modeling by arthours
Clay Modeling 

It was one of those boring summer afternoons here in Dubai...yeah...Dubai and how can it be boring?...Well summers here are hot and boring seriously...either you stay indoors or you spend time loitering around the shopping malls...and people who know me, would also know that I am not of that types who would love to spend hours at a shopping mall doing nothing. Well, so my kid and I, yeah again...my child and I, are most of the time stuck together since the daddy of the house is too busy with his own activities, even on weekends! So my child and I, have to keep each other entertained..

So we took out our stock of clay and our plastic clay modeling tools that came with the clay pack. And we decided to do something creative that afternoon. And the credit of this entire model goes to my daughter for it was her idea completely. Initially, I thought we would model a simple model of a house from clay but she said no...and suggested why not try modeling a mushroom house instead...so there we were...She also had a story to tell...and it went like this...

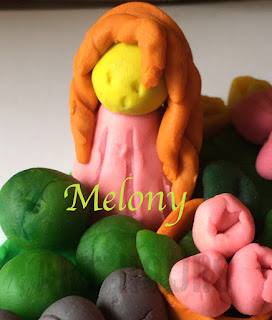
Once upon a time, there lived a little girl called Melony. I asked her why Melony?...and she continued...Because she loved eating melons and she had a big garden full of melons. So, this Melony lived in a Mushroom house, and she was fond of gardening, and her garden was filled with melons and roses...

clay modeling by art hours
Clay Modeling a little girl 'Melony'

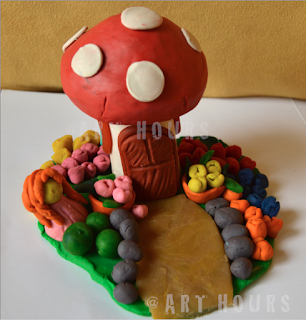
As she wove her story round the character of Melony, we had a nice and playful afternoon, modeling a mushroom house, surrounded with a garden filled with roses and melons. Here, is the final model of the clay mushroom house. By the way, we used plasticine clay for this model.

CLAY MODELING BY ART HOURS
Clay Mushroom House 
As you see in the above picture, we build a mushroom house complete with doors and windows and a small garden. The small garden is complete with a pathway lined up with melons and roses. To the extreme left of the picture, you can also see a tiny girl (yes that's our Melony) with her baskets of flowers and melons.

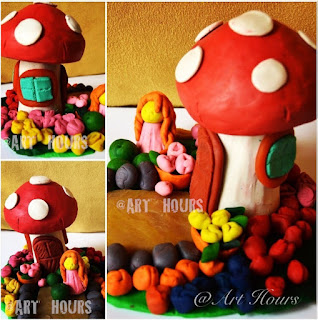
And here are some more pics of the same clay mushroom house with Melony.
clay modeling by art hours
Mushroom House with Melony
We had a wonderful afternoon with stories and clay...laughter and fun...and wonderful memories that I could share with all today!

Thank you for stopping by...have a good day!

---

25 Oct 2017

Origami Mandala and Calmness


Sometimes I wish that I could go into a time machine right now and just look at my self and say, 'Calm down. Things are gonna be fine. Things are gonna be all great. Just relax.' Tristan Wilds

These days, I am simply struggling to be in a place of calm, a place where I can relax and just do what I want to. Believe me, being calm and in a relaxed state of mind, is a fortune that comes to the fortunate few!

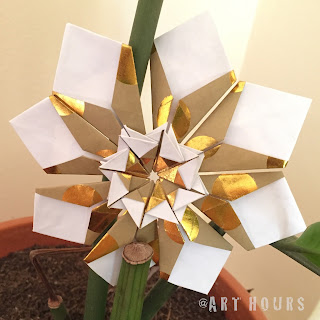
Now before I begin here's an origami model I folded earlier. The original design is by the artist Vagner Alves who named it as the Mandala Serenata. I have used gift wrapping paper to fold this model.
Mandala folded by Art Hours
Mandala Serenata
Design by Vagner Alves,
folded by Art Hours

And now, about the next Origami Model. Well, I have not named this mandala as calmness...but this post is titled as calmness. While I was folding it, truly I was at peace with myself...and it brought down some stress levels indeed! 

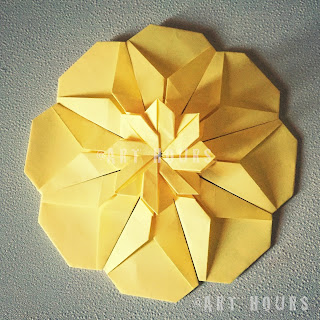
The Origami Mandala design is actually a variation of the artist Vagner Alves' model called Mandala Serenata, that I have posted above.

Category: Modular Origami
Level: Intermediate
Materials used: Rectangular paper strips of size: 10.5cm x5.25cm, cut out from colored printer paper.
Final Model Size: @13.0 cm in diameter

Origami Mandala folded by Art Hours

You will find the diagram to Vagner Alves models on the link given below.
http://artsorigami.blogspot.ae/

Thank you for stopping by...Be calm and have a good day!

---

23 Oct 2017

Monday Musings: A New Day, a New Start!

Every day, I try that I will try to create something new, and sketching is one of my favorite hobbies but life has different plans each day...however, today, while I was cleaning my closet, I came across this small pack of dry crayons that I had probably used when I was in college. So it would be probably 15 years or longer...ah and those lovely days and lovely memories...architecture college and friends, submissions and deadlines, panels and discussions, and what not!

Anyways, I made myself pause with whatever I was doing (or thinking) at that moment, took out a sketchbook and made a quick sketch from an image I had saved earlier - an image I had captured on my mobile one evening thinking that I would sketch it later...but that 'later' never seemed to arrive.
A sketch using dry crayons by Art Hours
'Front Porch' - A sketch using dry crayons by Art Hours
It was difficult to capture all the lines and angles perfectly with the crayons, but in the end, it was a rusty look that sort of made the sketch look more appealing...A new day, a new start! 

That's all I would say today...every day is a new start...so let's not waste any moment...for time once gone, never returns.

Have a great Monday...have a great week ahead!

---

17 Oct 2017

Diya or Candle Holder: Tutorial using Air Dry Clay


Last year, around the same time students at Art Hours, were involved in activities related to Diwali crafts. I was digging up through the archives in my laptop, when I found a few pictures. Thought I should share it today with you all...and if it could be of any help...so you can make your own candle holders using air dry clay. Not a very difficult process either...can be tried by anyone and you don't need to be an expert in clay modeling to try out this one.

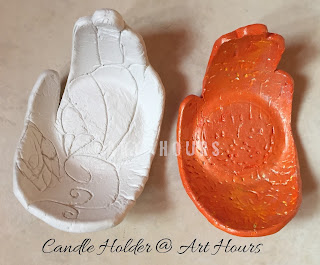
Air Dry Clay Candle Holders hand shaped by art hours
Air Dry Clay Candle Holders for Diwali

Materials required: 
Air dry clay, toothpick, clay modeling tools like a knife, some plastic or metal moulds for making the designs, poster colors or acrylic colors.

Procedure:
Take about 3" diameter ball of air dry clay (size of the clay ball depends upon the size of the candle holder you wish to make or actually the size of your palms) and roll it flat with the help of a roller. Let the thickness not be less than 1.0 cm since the clay will shrink by a few mm once it dries. So let's say we have rolled out a flat slab of 1.0 cm thick. Thereafter, trace the outline of your hand with a toothpick or any sharp instrument. And then cut out the hand shape. The kids used a plastic knife that comes with the kid's clay modeling tools to cut out the hand shape and it worked out just fine.

The kids used a combination of clay moulds, sketch pen lids, and even toothpicks to inscribe some design on the hand surface before leaving it to dry.

Thereafter, we took a bowl and left the hand-shaped clay cut-out on the bowl to dry. Let the clay models dry naturally for at least 48 hours before you apply any paint for further decoration. 
Leave the clay candle holders to dry out naturally

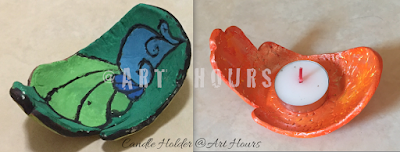
After 48 hours, we applied colors on the candle holder and they were ready to use. The finishes will depend upon the paint you have used. If you desire a glossy finish use acrylic colors, otherwise poster colors also will do.
Candle holders by Art Hours
Lef Inset: Candle Holder with application of Poster Colors
Right Inset: Candle Holder with application of Acrylic Colors

Try this activity with your kids or students. Art Hours clay modeling students simply loved making this one.

Made your Diwali a memorable one...Have a great festive week ahead!
---

16 Oct 2017

Monday Musings: All We Want is Love!


All we want is Love...a beautiful quote and we all would've heard it somewhere. Love is something that connects us all humans...It's what we all crave for! Don't you all agree?

When you land in some trouble, you look for your dear ones for love and support; when you want to take a new step in life, you long for the support of your dear ones; when you have accomplished the goals in your life, you want to share the happiness with someone dear...so, whether you are happy or sad, love is something we all want ourselves to be surrounded with. Everyone wants love, everyone needs love...so cherish the love you have in your life...love your parents, love your elders, love your brother or sister, love your children. Love your friends too...Remember, without love, a human being is not a human...without love this world will cease to exist.

Hand Lettering  - "All we want is Love"

Even, nature teaches you to be compassionate, teaches you to love. The crane, which is closely associated with love and harmony, are known for their loyalty towards their mate. Not only will you find them as favorite subjects in many Asian paintings, they are also popular in America, where crane statues adorn many landscaped gardens. 

Folded by Art Hours
Origami Cranes 

I believe you must love to live...what do you think? Share with us your thoughts.

Have a lovely Monday...Have a great week ahead.

---

14 Oct 2017

Origami Candle Holder

Last year, around the same time, while I was digging the internet to find some interesting Diwali craftwork for children, I discovered different origami models serving as candle holders. Here, are a few origami models that I tried. Each origami candle holder turned out beautiful and just perfect for holding candles for any occasion.

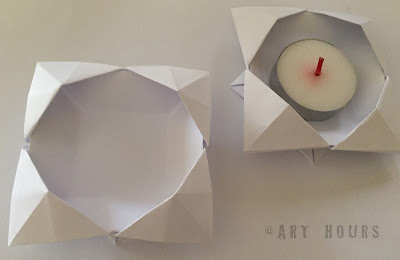
Origami Candle holders
Origami Candle Holders: Model 01 and 02

Origami Candle Holders: Model 03
Out of all the above models, Model 02 is quite easy to make. And, this is what we are going to learn to make in this post.

This Diwali, learn to make a candle holder. An easy model to try and even an origami beginner who isn't aware of complicated folds can try making this one.

Try it out with your kids this Diwali week and involve your children in the festivities and fun. 

This origami candle holder is a single sheet model and the steps to fold it are very simple. Also, it takes less than 5 minutes to make it. So, go ahead and make loads of them this Diwali season. You can fold them back and reuse it in the next season...so that's budget friendly and economic reuse of paper too. 

Materials required: Square Origami paper or square colored papers. The size of the paper to be used depends on the size of the lights you are going to use. For this tutorial, a white square paper of size 6"x 6" was used.

Here's the procedure showing every step.

Step 01:
Start by making creases along both the diagonals as shown in the picture below.
Step 01: Make creases along both the diagonals.

Step 02: Fold down all the four corners to meet at the center. Now, this is what is called an Origami Blintz base.
Step 02: Fold down all the four corners to meet at the centre

Step 03: Turn over the model.
Step 03: Turn over the model

Step 04: Now, fold the four corners again to meet at the center. So, now we have applied a double blintz to the model.
Step 04: Fold down the corners to meet at the center

Step 05: Now, fold the tip of the flap, upwards to touch the outer edge of the square shape as shown in the picture below. Repeat for all the remaining sides.
Step 05: Fold the tips to touch the outer edges of the square

Step 06: Next, turn over the model and fold all the edges to meet at the center one by one. Crease well. Then open the folds and you will observe the creases as you see in the picture below. Do not skip this step.
Step 06: Apply the creases

Step 07: In this step, open the flaps and let it touch the corners as shown below. Crease well again.
Step 07: Open the flaps to touch the corners

Step 08: Now, insert your fingers below the triangular flaps at the corners and press the model downwards following the crease you made in step 06, to get a depth in the model. You will see a square base is formed at the bottom. And it is done. The candle holder is ready for use.


You can use this for holding LED lights or Diyas. 

Tips by Art Hours:
  • Use colored sheets to make them colorful and decorate with sequins or glitter as desired. 
  • This model will turn out well with a little thick paper and last longer too. So, a chart paper or card paper would be ideal for this model.

origami tutorial by art hours
Origami Candle Holder

Now, mind you, this candle holder is safe for use with LED lights or diyas...after all its just made from paper and not safe to use it with wax candles.

I loved this origami model in particular because they can be safely compressed back and reused while they last, for more than one season. You just need to take them out during any festivity which requires a candle holder and reuse them; be it Diwali or Christmas or any other festival of lights, parties or occasions that call for a candle holder. So try making this origami model...decorate with a different theme this year and let your Diwali celebration be an eco-friendly one.

Here's a quick preview of the steps to making this origami candle holder on our youtube channel.


Have a Happy and Safe Diwali.

Thank you for stopping by...Do like and share this post, leave in your comments and queries. We are looking forward to constructive comments.
---
9 Oct 2017

Monday Musings: To Praise or Not - A Teacher's Predicament!


Should you praise or reward a student even if he/she is not performing well...will too much of praises spoil the child? If a child is not praised will he feel inferior to others? How often should you reward your students? How to keep the students motivated? These questions must be every teacher's predicament.

Well, after conducting so many classes for my students since the last couple of years, I still face this regular predicament whether I should offer praises or reward to a child or not at all. I believe that every kid likes to receive praises and rewards and he/she performs better and works harder. But if a student gets too much praise or receives a reward too often or too easily, the results are not positive.

Art Hours
Well done

Initially, I had a 7-yr old student whom I rewarded with a chocolate in every class, wanting to reward her for the patience and hard work she exhibited during the Art Hours classes, but in one of the classes, I didn't reward her with a chocolate since chocolates were out of stock. So she boldly claimed her reward and when I said they are out of stock and that it doesn't matter, you have done well today as always, she was upset and felt unrewarded. The praises didn't matter to this child, it was only the chocolates she cared about!

This made me think, and I stopped rewarding my students with chocolates for quite some time, thinking that it builds up an addiction...also consumption of chocolates not good for the teeth and so on I thought...what if parents complain that their kids aren't allowed too much of chocolates...so quit rewarding with chocolates. But then how to keep these little minds motivated? Are chocolates the only possible solution? How can I encourage them to do better? Was there any way to reward them?

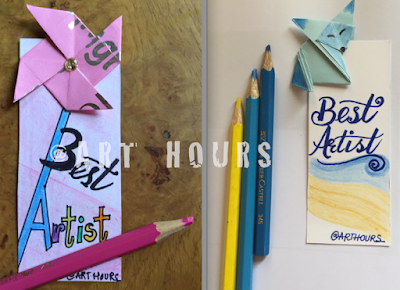
Best Artist Tags by Art Hours

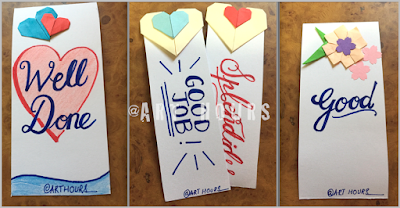
So, I devised this method. Every week I would give away small reward tags with handwritten messages appreciating their work of art. Small words of praise like "that's awesome work", "splendid", "wow, well done", "keep it up", "best artist for the day", "good job", "work harder", and so on were small lines that made them happy and kept them motivated. It kept them interested in their art work and also guessing as to who would win the best artist tag the next week...and this made them perform better. Also, I encouraged the ones performing better to appreciate their neighbor's work and not look down upon them. 

The kids who just came to Art Hours are not only learning new things every week but are becoming better artists with every passing week. 
Reward Tags by Art Hours

Sometimes, I just keep the reward tag in front of them and tell them I will give it only if he/she truly completes the work in every aspect...strict ain't I? Well, sometimes you have to be! And sometimes, these little students are so adorable that I end up giving 'well done' tags to all of them in the batch. 

So well, this is our post today on rewarding a student. Don't give false praises. Only praise and reward when he/she truly deserves it. Exaggeration or too many praises can be deceptive and even a child however small he/she is can understand the difference between honest appreciation and a false one. Let every child earn the reward.

If you agree with me, please drop in your comments. We would love to hear some constructive comments and feedback. 

Thank you for stopping by...have a great Monday!

---

2 Oct 2017

Monday Musings: Knowledge is Power, but Character Respect

You would have heard of the saying that Knowledge is power. I agree with it truly. Nothing can beat you if you have the knowledge. However, the lines by Bruce Lee go on further saying that Knowledge will give you power, but character respect. And these lines form the basis of our thoughts today.
Monday Musings: "Knowledge will give you Power, but Character Respect"
Hand lettering by Art Hours 
You may have all the knowledge in the world, but if you are not humble, not kind, nobody will respect you. Respect will come to you automatically, with the inherent goodness that you have. Nobody likes an arrogant person. Isn't that so? Think about it today. 

Have a great Monday...
---

24 Sept 2017

Learn to make an Organizer with Paper Beads: Recycling Paper Craft

Summer vacations just got over and schools had just restarted here in the UAE when we had another long weekend with the Islamic New Year holiday. So, back after the long weekend, here's a small recycling craft tutorial for all of you crafting buddies out there.

Tutorial by Art Hours


We did a lot of crafting during the summer vacations and we have also posted some tutorials earlier to recycle magazine papers and use them for crafting purpose. 

We posted an easy tutorial on making paper beads for jewelry, you will find the tutorial on this link. Do visit this post if you wish to make some paper beads jewelry. It's an easy and fun crafting activity for the girls especially.
Paper beads Jewelry

Also, we posted a tutorial earlier on making the beads and make a photo frame using those paper beads. You will find the link to make the photo frame by clicking on the here. It's an excellent crafting activity for children, be it a boy or girl. Most of us like to show off their photos and crafting out a photo-frame all on your own is an addition to not only show off your photo but your crafting skills too!
Paper beads Photoframe

Finally, here's another little tutorial from our summer vacation crafts that will show you how to recycle magazine paper into something useful. Magazine papers? Well yes, they are shiny and glossy and are available in many colors. And crafting with them is fun. 

Now, this tutorial is for children who love crafting, for women who love to spend doing something useful on hot afternoon days staying indoors and for all crafters, of course, belonging to any age group. Also, if you don't like painting but would like to get crafty all the same, then this craft activity is a must try for such people. 
Just select colorful magazine papers and get crafty! 
No paints, no messy hands!

So this small recycling project can be basically be done by anyone and you don't need any special crafting skills. All you need is some patience and time in hand. 

However, for kids, I would suggest a little supervision under adults while they do this project. Take help of adults around you especially when you need cutting the magazine papers.

Materials required for this project
You will need magazine papers, crafting glue, paper cutters, skewer stick for making the paper beads and that's it.

Procedure 

Step 01:
As shown in the picture below, you need lots of magazine paper for this project. You can select and remove only those colored papers as per your liking. Thereafter, you will need to fold the paper in half longitudinally and cut it either with a pair of scissors or a paper cutter. Give it another fold lengthwise and cut it along.

Step 01: Cutting the magazine paper into long stripes.
For this step, you can take a couple of sheets together, align them well and cut them all together with a paper cutter. This will save time.

Step 02:
Since we used an A4 sized magazine, from every sheet, we got four long stripes as shown in the right inset in the picture below. Once your long strips are ready you can start with step 02 and that is making the paper beads.

For step 02, take a skewer and use it to roll the paper strips as shown below in the left inset. You will need a lot of patience in this step. Kids love this activity but may start getting bored after making 4-5 beads. So don't attempt to finish this activity in one single day. My kid spent many afternoons just making the paper beads. She would watch some cartoons on the television while she made these paper beads. 
Step 02: Start rolling the paper strip to make the paper beads

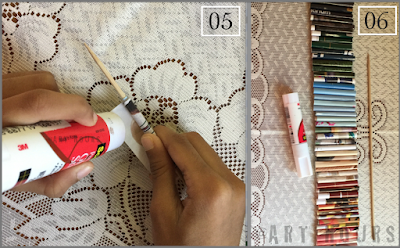
Step 03: 
Once you near the end of the paper strip, apply glue to seal it and leave it to dry. Keep rolling the paper strips one after the another on the skewer stick, apply glue at the end, and slide out the stick from the paper bead.

Step 03: Applying glue to the end of paper bead
After a couple of weeks, we had a row of paper beads all lined up and sorted colorwise. And they lied there all the same till we decided what to do with them.

Finally, we took a rectangle waste carton that was a tea package. We measured the size of the beads and cut the carton as per the height of the beads. Once the carton's height matched with the beads' height, we applied glue to the carton surface and stuck the paper beads one by one, covering the entire outer surface of the carton.

For gluing the paper beads on the carton box, I would suggest the use of good quality liquid glue or a glue gun; this will ensure that the beads are securely stuck on the surface of the paper carton. We used white liquid glue and neatly stuck the beads on the rectangle carton box.

Rectangle Organiser made with Paper Beads
Actually, once the paper beads are ready, all you need to do is use them to make something beautiful. You can make many such organizers to stock your medicine bottles, or cosmetics or anything. You can decorate an old picture frame or an old mirror using the same paper beads. Since these beads are made from magazine papers, they have a glossy and shiny look and give a good finish without having the need to paint them.

Some Aesthetic Tips:

  • To get the right look and effect, it all depends on what color magazine papers you have selected. For example, if you want all greys and white beads, you should choose the magazine papers of those shades only. So decide the color scheme you want to use and select the magazine papers accordingly.
  • Also, the consistency in size of beads is very important for this project. The more consistent the paper beads are in terms of thickness and size, the better look you will get in the final product. 
Hope this tutorial for recycling magazine papers is useful.

Try this activity and let us know your feedback. We are looking forward to constructive comments.

Thank you for stopping by...Have a good day.

----