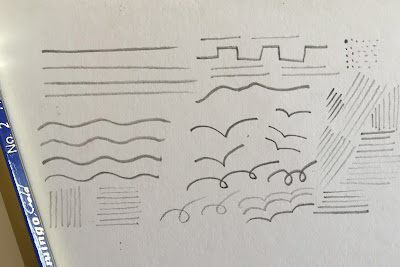
Hold a pencil in your hand...what would you first do? You would start making marks on the paper. Marks in different angles, shapes, size and intensity. As such, when you draw with a pencil, you make marks. Even if you erase it, you are leaving a mark. Marks in isolation makes no sense but when used appropriately, it would describe a form. In the picture below you see marks drawn in different directions, with different intensity, at different angles but they make no sense.
 |
| Variety of lines made but they make no sense |
Do note that varying the pressure on the pencil will give different line-weight. Also, using different types of pencils will give different effects. In this post, the drawings have been made using a No. 2 pencil. For a beginner, this one pencil is enough to take your first steps towards sketching. Other than that, you may make use of 2B or 4B pencil. We will talk more about the different types and grades of the pencils available and how they can make our sketching more effective in our later posts.
 |
| An outline of a scenery using pencil |
The above picture made by using a No. 2 pencil, depicts a scene made using just outlines. Note again, varying the pressure on the pencil will give lines a different intensity.
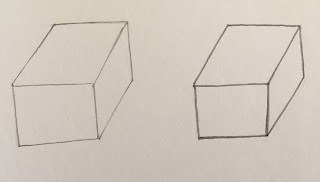
Now let's make a simple cube using a pencil as shown below.
 |
| Cube made using gentle outline and bold outline |
The cube on the left side is made using gentle outlines. This would be idle technique if you are going to outline it over again with a pen or some other medium later. Also, it is easy to erase when you use light strokes and it will not leave any extra marks on the paper.
While, the cube on the right side, shows dark outlines or bold lines wherein you have to assert pressure on the pencil to make dark lines. You would use this method only if this is your final drawing. Remember, once you have darkened the lines using more pressure, erasing it will leave impressions of the previous strokes on the paper. So use assertive pressure only when you want to make it the final drawing.
You will know what I mean when you see the next picture.
 |
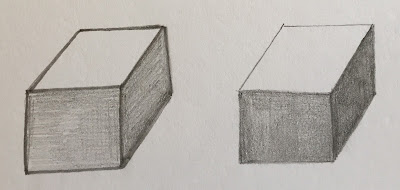
| A cube with a line and another one without a line. |
The cube on the left side clearly shows the outlines that define its edges and the tones show how the light is hitting it. However, there's something wrong with it. Do we really need both the lines and the tones?
Now move over to the adjoining cube on the right side. The lines are lost into the tone. Yet, its three-dimensional form is visible. A couple of lines at the top and the shading on the two sides completes the 3-D form. This is an example of how tones will support the line to complete a figure.
In our later posts, we will talk in detail about how you can use tones and shades for effective sketching.

No comments:
Post a Comment