31 May 2016

The Summer Crowd: Origami Insects


"We don't give a damn to insects on our Earth, but if we could find even a single insect on Mars, the whole world would cherish it like crazy!...Truly said by a contemporary Turkish novelist of our times. 

I have seen many people who love insects so much that they wouldn't kill them even if they crawl into their rooms. These insect lovers would gently pick them up and take them outside. On the other hand, there are people who just freak out at the very mention of the word insects. They would say that these tiny creatures defoliate our plants, trees, fruits...some would say they attack our houses, our furniture, our furs, and clothes...so how could you love these tiny creatures. But then, aren't we humans worse than insects. We kill for no reason. We are destroying this very planet inch by inch daily. Yet, we pride ourselves on being the superior creation on this earth....I believe there's something to learn from everything around us and nature especially. Apart from its beauty, nature is a treasure trove of wisdom. Take some time to look around you and you will find ample sources to learn. These tiny creatures are colorful and adorable...Just take some time out from your busy schedule once in a while and you will find beauty hidden in these little insects too.

"Only two percent of all insects are harmful.  Why are they all in my garden?
Dearly respect the lifestyle of worms.
The spiders, grasshoppers, mantis, and moth larva are all back:  the summer crowd has returned!
Snail - Squash!  Tomato Worm - Squash!  Grasshopper - Squash! The Garden Trooper is at War!" - Michael P. Garofalo, Pulling Onions.

What inspired me to make these little insects was not actually my love for them...but when I was searching for origami things to make for my workshop, I was amazed at the great origami artists' work who have made these insects with such intricate details that I was simply stupefied. I tried in my small capacity and with the time that I had in hand, to give a try to some of the easy models. Once done, I couldn't resist clicking pictures of them in their natural environs. So outdoor shooting it had to be! With the camera in one hand and a box full of these tiny origami models, I was peacefully shooting one tiny model after the other...avoiding the sharp sun rays getting into my eyes and teeny-weeny ants from crawling on my feet...and then I realised how come I missed making an ant...maybe some other time...for now let's deal with the ones in hand.

So here's presenting to you the summer crowd...my origami insects inspired of course from other origami artists...in no particular order.

A Swallowtail
Sing your song of flight
Carry me to winter's end
Paint my wings like yours.  
- Chichi, Swallowtail

A Snail
 "Snails don't walk. 
They slither and slide 
Along wet pathways 
Gleam and glide, 
Squeezed between 
The grasses green, 
Polished houses shell-like gleam." 
-  Theresa Heine

A Beetle
In the under woods where the noise faints
              The vigilant fawn in dreams, rejoices
     In the green petals of the mosses
                The beetle, a living gold, gleams...
Translated from *Victor Hugo* - Spring  

A Stag Beetle 
I found a little beetle; so that Beetle was his name,
And I called him Alexander and he answered just the same.
I put him in a match-box, and I kept him all the day...
- A.  A. Milne, Forgiven

A Lady Bug
Ladybugs all dressed in red
Strolling through the flowerbed.
If I were tiny just like you
I'd creep among the flowers too!
- Maria Fleming

A Buprestid
Buprestidae is a family of beetles known as jewel beetles. From the fact that there are 400,000 species of beetle on this planet, but only 8,000 species of mammals, he concluded that the Creator, if he exists, has a special preference for beetles, and so we might be more likely to meet them than any other type of animal on a planet which would support life. 
- J.B.S. Haldane, In Mark Williamson, 'Haldane's Special Preference', The Linnean, 1992.

A Red Butterfly
 "Happiness is a butterfly, which, when pursued, is always just beyond your grasp, but which, if you will sit down quietly, may alight upon you."  
-  Nathaniel Hawthorne

A Cabbageworm
"It costs me never a stab nor squirm
To tread by chance upon a worm.
"Aha, my little dear," I say,"
- Dorothy Parker, Thought for a Sunshiny Morning 

A Cicada 
Sibilant shimmers of cicadas 
whirr the late August air...
- Late Summer

A Dragonfly
“Despite its dark veins, the transparency of dragonfly’s wings assures me of a pure, innocent world” 
- Munia Khan

A Giant Water Bug
 I ought to keep a giant water bug in an aquarium on my dresser, so I can think about it.” 
- Annie Dillard, Pilgrim at Tinker Creek

A Grasshopper 
When all the birds are faint with the hot sun,
      And hide in cooling trees, a voice will run
From hedge to hedge about the new-mown mead;
That is the Grasshopper's—he takes the lead...
- John Keats

A Spider
"Much like a subtle spider which doth sit 
In middle of her web, which spreadeth wide; 
If aught do touch the utmost thread of it, 
She feels it instantly on every side."
-  Sir John Davies, 1570-1626, The Immortality of the Soul

A Yellow Butterfly
"Just living is not enough," said the butterfly. 
"One must have sunshine, freedom, and a little flower."
-  Hans Christian Andersen 

A Mantis
Green and long I camouflage well in a tree 
You will miss me on a blade of grass too, I like to be a mystery. 
As I get ready to move, I bounce on my legs, back and forth, 
My hands are praying and I'm ready to launch.  
- Lyndsey Watts, The Praying Mantis

Another Stag Beetle
"A little beetle passed me by. 
He didn't make much fuss, 
He ran around my garden 
Like a tiny yellow bus." 
-   Slyvia Gerditz 

Here's a slideshow video we uploaded recently on youtube that gives you a quick glimpse to the origami insects folded by us. 


Thank you for stopping by...
---
19 May 2016

What is Modular Origami: A Teeny-Weeny Glimpse to the World of Modular Origami

We have often seen or heard the word Modular Origami. Do you know what it really is?

Let's have a brief glimpse on Modular Origami today.

nupur acharjya
Modular Origami with Polyhedrons
When you google on the internet on modular origami, you will find various versions and answers. So here we go....

What is Modular Origami?
Modular Origami or Unit Origami is a paper folding technique which uses two or more sheets of paper to create a larger and a more complex structure that would not be possible using single-piece origami techniques. Each individual sheet of paper is folded into a module or a unit, and then these modules are assembled into a flat shape or 3D structure by inserting the flaps into pockets created by the folding process. Assembling them requires no glue or thread.

What holds the model together?
The insertions create tension or friction that holds the model together.

Historical Evidence:
If you want to know the history then there's a lot of information on the net on that too. However, the first historical evidence for a modular origami design comes from a  Japanese book by Hayato Ohoka published in 1734 called Ranma Zushiki.

Some of the most Popular Modular Origami designers include:
Misonobu Sonobe, Tomoko Fuse, Kunihiko Kasahara, Miyuki  Kawamura, David Mitchell, Heinz Strobl and yes, I was immensely pleased to find an Indian name on the list: Meenakshi Mukherjee.

There are several traditional Japanese modular origami designs. The modular origami forms may be flat or 3-D. The flat forms are usually polygonal forms, stars, rotors or rings while the 3-D forms tend to be regular polyhedra or tessellations of simple polyhedra. They have been named after the person who designed and first folded them.

Modular origami techniques have been used to create boxes with lids, containers etc. Tomoko Fuse is a name synonymous with modular origami boxes. If you happen to find then there's a book called 'Fabulous Origami Boxes' by Tomoko Fuse. 

To keep it simple and short, Modular Origami is a two staged paper folding technique, which uses multiple sheets of paper. The first stage is to fold individual sheets of paper into identical modules or units. In the second stage, the modules are assembled into an integrated flat shape or a 3-D structure.

Some people love modular origami while some do not like the idea of folding the same units a number of times. It all boils down to the fact that you need to have a fair amount of patience and love for the art of folding.

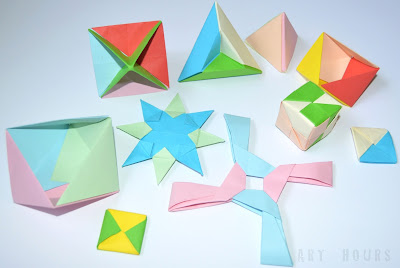
Here is a teeny-weeny glimpse of some modular flat origami forms designed by different people from around the world and folded by me, to understand and explain the concept of Modular Origami better to all of you out there.

nupur acharjya archguideforyou.blogspot.com
The 8-pointed Modular Origami Star
The above beautiful 8-point modular origami star is fairly simple to fold and requires minimal patience. I am not sure as to who originally designed it but discovered this star's diagram that was made by Fumiaki Shingu.

archguideforyou.blogspot
16-point Modular Origami Star 
This requires 16 units to be assembled together. It is easy to assemble the modular units but requires a lot of patience since you have to keep folding 16 similar units. 

nupur acharjya
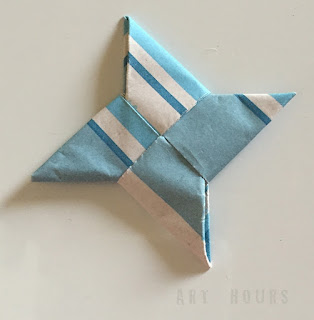
Traditional Ninja Star
nupur acharjya
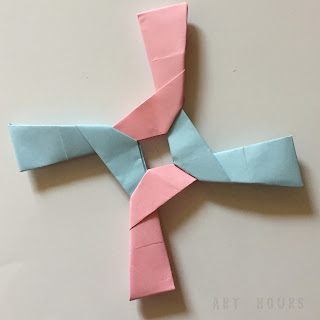
The Rotor/Frisbee - Designed by Francisco Caboblanco
Modular Origami can be fun for the kids as they enjoy folding these small toys like the traditional ninja star and the frisbee/rotor as shown in the pictures above.

nupur acharjya
8-point Star - Designed by Tomoko Fuse
This 8-pointed star known as 8-point Fuse star is named after the renowned Japanese Origami artist  -Tomoko Fuse. Such stars make beautiful pieces for decoration during parties or ceremonies.

Now let's have a look at the 3-D structures/polyhedrons possible using Modular Origami. Again, these have been designed by different people and accordingly named after the designer.

nupur acharjya
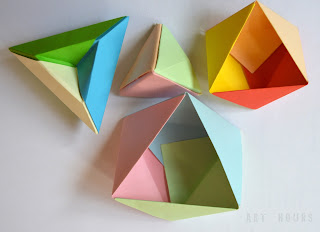
From L to R : Tricorne, Triangular pyramid, Triangular Boxes
The above tetrahedrons are easy to assemble. The Tricorne as designed by David Mitchell, shown in the picture in the extreme left corner, is a tetrahedron with 12 faces and is assembled using only 3 modular units. Similarly, the triangular pyramid with 4 equilateral triangle faces (next to the tricorne in the picture above), is made from 4 units only. While the two triangular boxes that you see are made using only 3 modular units each and is designed by Francisco Caboblanco.

nupur acharjya
From L to R: The Sonobe Cube and
The Japanese Menko
In the above picture you see a 3D cube designed by Sonobe Mitsonobu, hence the name. It uses 6 modular units interwoven into each other. The small flat 2D shape lying next to the Sonobe Cube is the traditional Japanese Menko, a traditional origami envelope. It was real fun folding this one and you need to interlock only 2 units into each other.

nupur acharjya
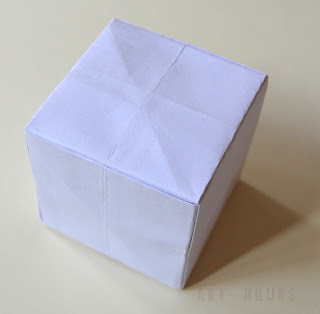
The Jackson Cube
The above simple cube is really very easy to fold and named Jackson cube after the person who designed it of course. It is much simple and easier to fold this one as compared to the Sonobe cube. A must try for all kids or beginners who want to start origami.

The above examples I have cited are just some small examples of Modular Origami. There are a plethora of possibilities with Modular Origami. I hope this article helps you initiate and explore the world of Modular Origami.
---

12 May 2016

Sketching Basics: Basic Techniques using the Pencil

"A line is a dot that went for a walk." Paul Klee (Swiss-German Artist)
Anyone who loves drawing and sketching will understand the above quote and the importance of a line as a basic drawing tool. A line defines a form, suggests a direction, gives texture and shows the tone. 

In this post, we will learn some basic techniques with the pencil using dots, marks and lines. These techniques are the foundation for learning to sketch.


1. HATCHING
A bunch of lines in a particular direction will help in creating values and shades.
  • Linear Lines are used to create value. 
    Linear lines to create value
  • The closer the lines are, the darker will be the value. 
Closer the lines, the darker is the value.
  • Pressing the pencil harder will also give darker values. 
From left to right:
Closer the lines and pressing the pencil harder will give darker values.

2. CROSS-HATCHING
Cross-hatching uses layers of hatching placed at an angle. The first layer is usually vertical, the second one is horizontal and the next one is diagonal. This technique is commonly used by most of the artists. For example, when you want to show the effects of lights, shades and shadow for a cube or other such 3D objects.

nupur acharjya
Cross Hatching

3. CONTOUR HATCHING
The direction of lines suggests contour. Cross-hatching will suggest cross-contours. When hatching follows a contour it will suggest a 3D form. Contour hatching works best when you want to give 3D effects to objects such as fruits or flowers or other such natural shapes.
Left: Cross Contour
Right: Hatching follows contour

4.  SCUMBLING
It uses layers of small scribbled marks by moving the pencil in small circular motion to suggest value and texture. When you vary the direction you can add more interest to the subject instead of using simple circular marks. You can create a variety of texture using this technique, for example, a coarse fabric, bushes, etc.
Scumbling

5. RANDOM HATCHING 
This technique uses layers of short straight marks. You can get a variety of textures using this depending on whether you use these hatches vertically, at an angle, following a contour or at random angles.
Random Hatching

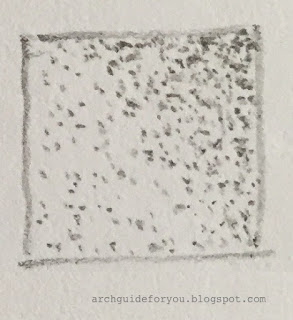
6. STIPPLING
This technique uses tiny dots to create value. The closer the dots are, the darker will be the tone. Farther apart the dots are, the lighter will be the tone. Larger dots can be used to give a coarse effect. This technique requires a lot of patience to master. Personally, I avoid it, for it is very time-consuming.

archguideforyou.blogspot.com
Stippling

The six techniques shown using lines, dots and marks are some of the basic sketching techniques used for different purpose to create tones and textures.
Basic Sketching Techniques from my Sketchpad:
Hatching, Cross-Hatching, Contour Hatching, Scumbling, Random Hatching, Stippling


11 May 2016

Sketching Basics: Using the Line

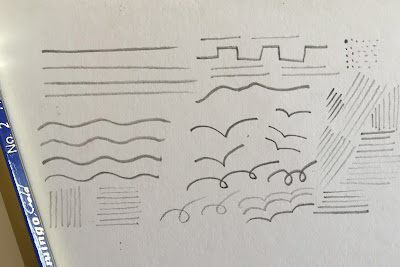
Hold a pencil in your hand...what would you first do? You would start making marks on the paper. Marks in different angles, shapes, size and intensity. As such, when you draw with a pencil, you make marks. Even if you erase it, you are leaving a mark. Marks in isolation makes no sense but when used appropriately, it would describe a form. In the picture below you see marks drawn in different directions, with different intensity, at different angles but they make no sense. 

art hours nupur acharjya
Variety of lines made but they make no sense
Do note that varying the pressure on the pencil will give different line-weight. Also, using different types of pencils will give different effects. In this post, the drawings have been made using a No. 2 pencil. For a beginner, this one pencil is enough to take your first steps towards sketching. Other than that, you may make use of 2B or 4B pencil. We will talk more about the different types and grades of the pencils available and how they can make our sketching more effective in our later posts. 

nupur acharjya art hours
An outline of a scenery using pencil
The above picture made by using a No. 2 pencil, depicts a scene made using just outlines. Note again, varying the pressure on the pencil will give lines a different intensity. 

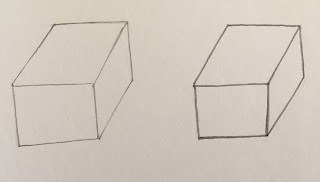
Now let's make a simple cube using a pencil as shown below.

nupur acharjya art hours
Cube made using gentle outline and bold outline
The cube on the left side is made using gentle outlines. This would be idle technique if you are going to outline it over again with a pen or some other medium later. Also, it is easy to erase when you use light strokes and it will not leave any extra marks on the paper.

While, the cube on the right side, shows dark outlines or bold lines wherein you have to assert pressure on the pencil to make dark lines. You would use this method only if this is your final drawing. Remember, once you have darkened the lines using more pressure, erasing it will leave impressions of the previous strokes on the paper. So use assertive pressure only when you want to make it the final drawing.

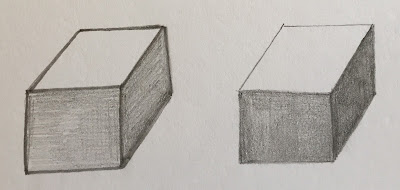
You will know what I mean when you see the next picture.

nupur acharjya art hours
A cube with a line and another one without a line.
The cube on the left side clearly shows the outlines that define its edges and the tones show how the light is hitting it. However, there's something wrong with it. Do we really need both the lines and the tones?

Now move over to the adjoining cube on the right side. The lines are lost into the tone. Yet, its three-dimensional form is visible. A couple of lines at the top and the shading on the two sides completes the 3-D form. This is an example of how tones will support the line to complete a figure. 

In our later posts, we will talk in detail about how you can use tones and shades for effective sketching.


6 May 2016

How can Origami benefit your Child: 10 Easy Animal Faces for Beginners and Kids to Try

Origami is more than Art. Many people aren't aware of the benefits of Origami. So here is a small effort from my side to help you - parents out there, to understand how learning and practicing Origami will help your child.

archguideforyou.blogspot.com
ORIGAMI - The Japanese Art of Paper Folding
Many books have been written on Origami and lots of research has been done on how Origami has educational benefits. Let's have a glimpse as to how Origami can benefit your child.

Origami has a close relationship to Mathematics. A few books that discuss the relation of Origami with Maths are Origami Omnibus by Kunihiko Kasahara, Origami from Angelfish to Zen, Mathematical Origami and more...You would have heard of your maths teacher giving examples such as; Fold the paper into a half to get a rectangle, fold it into further half to get quarters, Fold a square sheet into a triangle, and so on...ORIGAMI HELPS UNDERSTAND MATHEMATICS BETTER.

Origami helps kids in understanding the IMPORTANCE OF SEQUENCING. Origami involves sequential folding of paper. There are steps that have to be followed and that there is no shortcut. 

Research says that Origami promotes CROSS BRAIN ACTIVITY. At body level, your hands are active, sending impulses to your brain and activating the left and right hemispheres. While at the mind level, it is triggering your memory, non-verbal thinking, attention, and imagination.  

Completing a small project creates a SENSE OF ACHIEVEMENT AND PRIDE. It helps in boosting self-confidence. At the first try when you are unable to fold it correctly, you can always refold and try again. On completion, the child would have gained joy and confidence that he/she too can do it.

In short I would say that Origami is a CREATIVE WAY TO IMPROVE BRAIN FUNCTIONING AND ADDING ART to the space around you.

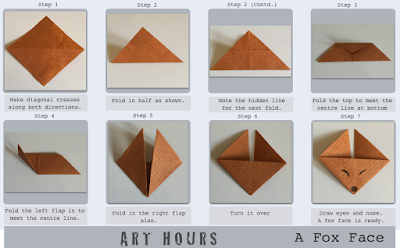
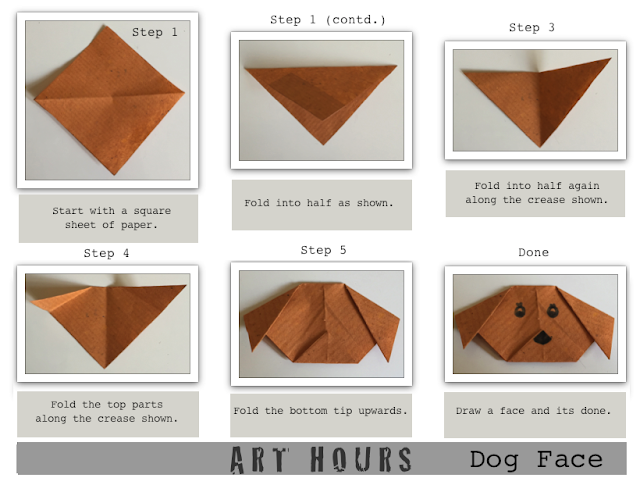
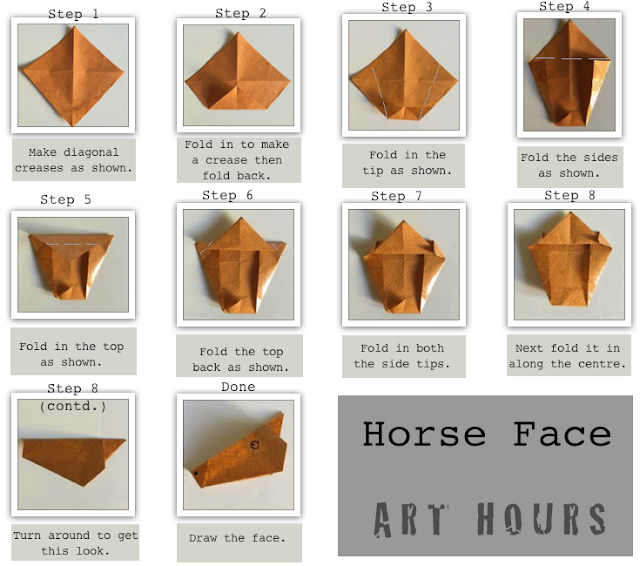
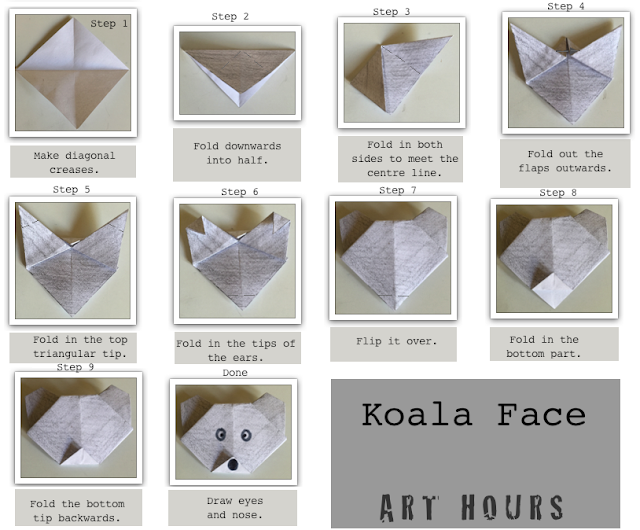
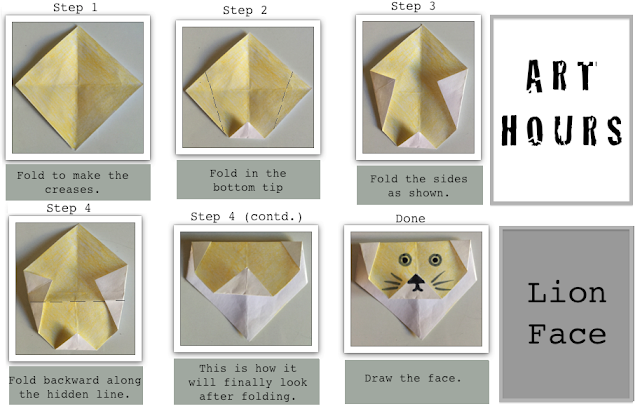
In this post, I am sharing ten tutorials, that would guide you step by step in making animal faces which can be fun for the kids and adults as well. Not only will you enjoy making them but in the end, you would have transformed a scrap of paper into something beautiful...Also, there's one more thing, you don't need expensive or fancy papers to do Origami...to start with just use some waste paper or newspapers, used gift wrappers, brown papers. ORIGAMI IS A GREAT WAY TO RECYCLE PAPER.
archguideforyou.blogspot.com
Origami Paper Size
How to choose the paper:
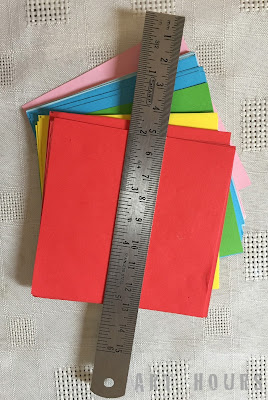
All of them require a square sheet of paper to start with. The standard size of paper is 3" x 3" (75mm x 75mm), 6" x 6" and 10" x 10". The paper must be able to hold a crease. So using thick paper isn't advisable in some cases, as it will be difficult to fold them. The ones that have been used for the tutorials below are mostly 3" square sheets. 

So here are the tutorials...

Have Fun Folding and Refolding!

archguideforyou.blogspot.com

archguideforyou.blogspot.com

archguideforyou.blogspot.com

archguideforyou.blogspot.com

archguideforyou.blogspot.com

archguideforyou.blogspot.com

archguideforyou.blogspot.com

archguideforyou.blogspot.com

archguideforyou.blogspot.com

archguideforyou.blogspot.com

Note:
Each tutorial ranges from 5 to 8 steps and it will take around 3 to 5 minutes, for the beginners, to complete each model. Also, note the hidden lines or creases shown on the pictures; they indicate folds in the next step. Focus on one step at a time. Repetition is the key to remember the sequence!

I hope this article inspires you to make more interesting Origami creations.

---