29 Aug 2017

Modular Origami using Kite Base

This tutorial will show how to make an origami kite base. It is one of the basic origami bases and requires no complicated folding. There are lots of origami models you can make by using the kite base viz. a dolphin, a giraffe and so on...

This post also includes a picture tutorial on how to use the kite base in making an easy origami decoration. Just keep reading forward to learn more.

The Kite base is also known as the Ice-cream cone base. Once you make it you will know why it is called so.

Learn how to make an Origami Kite Base

Firstly, let's learn how to make the kite base. It is one of easiest origami base you can learn to make. All you need to do in the first step is make a crease along one of the diagonals. If you are using a dual colored origami paper with one side colored white, then keep the white side on the top as shown in Step 1 and make a valley fold across one of the diagonal. Thereafter, note the hidden lines made in Step 2 for making the next fold. Step 3 shows the kite base is ready once you have folded the sides to meet at center along the hidden lines shown in step 02.
Steps for making the Origami Kite Base

Using this kite base, it is possible to make many other origami models. Let's learn how to make an easy origami star pattern which can be used for decoration purpose. 

Materials required: 
8 square sheets, glue. The size of paper depends on what purpose you want to use it for. We have used @3.5" square sheets.

Procedure:
Step 01: 
We have used a sheet with even color on both sides. Fold to make the creases as shown.

Step 02:
Make the kite base, by folding the side flaps to meet along the centre.


Step 03:
Turn over the unit and make 7 such similar units. We need to make a total of 8 units for this origami model. Once the 8 units are ready all you need to do is assemble them using some glue.


Step 04:
Apply glue in the area shown in the picture below.


Step 05: 
Note the area to be overlapped. The edge of every new unit has been placed on the center line of the previous unit.


Done:
The assembly is ready and our modular star pattern is done.
Origami Modular Star Pattern

The picture below shows how the pattern would appear if you turn over the entire assembly. 

All we have done is assemble eight kite bases and we have a beautiful origami decoration that can be used as decorations during parties or celebrations.

We have posted a tutorial earlier on how to make an easy origami Dolphin using the kite base. Learn to make the origami Dolphin by clicking on the link here and it will guide you on how to use the kite base to make a paper Dolphin step by step. Also, you can learn to make an origami Diya by clicking on the link here

Hope the tutorial was helpful.

Thank you for stopping by.
---


28 Aug 2017

Monday Musings: Monday Menu with Positive Thoughts


We made ourselves a Monday Menu to keep ourselves motivated this week.
  • Enthusiasm - Be eager to learn new things 
  • Creativity - Use your imagination 
  • Energy - Gather all the strength you can
  • Focus - Don't let yourself get diverted with mundane things in life. Focus and prioritize.
  • Cheerful - Be happy with whatever you do 
  • Positive thoughts - Start your day with an optimistic mind and an open heart.


Monday Musings - Monday Menu

Monday Menu 
Hope this Menu helps us to carry out our mundane and daily activities too in a positive way.

Thank you for stopping by. Have a great Monday!

---

21 Aug 2017

Monday Musings: Learn from Yesterday, Live for Today


Albert Einstein truly said: 
Learn from yesterday, Live for today, Hope for tomorrow. The important thing is not to stop questioning.

Sketching with crayons by Art Hours

We learn from our mistakes. So we must not give up if we fail. Live for the moment and stop whining about the past. Instead of spending our time on complaining and crying, we must analyze why things went wrong and what is the solution that can make a better tomorrow.

Live for today but don't stop questioning. Don't stop thinking and questioning about things that happen around you. Life has a lot to offer and without questions, there will be no answers. So live fully each day keeping your minds open to answers and solutions for a better tomorrow.

Have a good day. Have a great Monday.

Thank you for stopping by.

---


14 Aug 2017

Monday Musings: Things we love about Monsoon


When it rains we all enjoy in India...it brings out the poet in you...
What we all probably enjoy is:

The pitter patter of rain drops,
Petrichor or the smell of wet mud after the first rain.
Jumping on the water puddles,
Or a little dance in the rain.
Maybe a long drive while it drizzles,
Enjoying the fresh green color all around,
Spotting the rainbows in the sky.
And later a hot cup of chai
With some Hot pakoras or samosas...

And what else?
Do let us know what you like about the Monsoon season.

Have a wonderful week with lots of festivities lined up one after the other this month.
Have a wonderful Monday!
---

12 Aug 2017

Penguin Craft: Recycling Plastic

I was just sifting through my craft archive folders on my laptop when I came across this beautiful recycling project we attempted during our last summer break. We recycled a plastic bottle into a decorative penguin model. It was a very easy recycling project and my kid who was just 7 years old back then had great fun while modeling the Penguin.

Materials required for the Penguin Craft:
Plastic bottle (flat shaped as you see in the picture below), newspaper scraps, white glue, water, poster colors, paint brushes, crepe paper, string.

Procedure: 
Step 01: 
Prepare the surface of the bottle to apply paper mache to its surface. All you need to do is keep the surface of the bottle clean.


Step 02:
Tear some newspaper scraps that you would need to apply on the bottle surface. Keep the white glue or mod podge ready. We added white glue and water in the proportion of 1:2.

Step 03:
Apply the glue paste or mod podge on the bottle surface.

Step 04:
Quickly glue the newspaper sheets on the glue surface before the glue starts drying. Be quick while you do this step. You can also apply glue to the paper and then paste it on the bottle surface. 

Step 05:
Cover up the entire surface of the bottle with newspaper. We applied two layers of newspaper coating to the entire surface of the bottle.


Step 06:
We let the paper coating on the bottle to dry for a day. Once the surface had dried we smoothened the surface with sand paper. Thereafter we painted the bottle with poster colors.
Step 07:
Now, to cover up the top of the bottle, we made a pom-pom from crepe paper. For making the pom-pom, we cut the crepe paper into small strips.

Step 08:
Take the crepe paper strips and double them up as shown in the picture below.

Step 09: 
Take a string and tie the center as shown.

Step 10: 
Cut off the extra string.

Step 11:
Rearrange the strips such that the string tied at the center is hidden amongst the paper strips.

Step 12:
We painted the penguin with white color on the front side and painted black on the remaining sides. Also, we painted a red woolen cap with a yellow border, tied a bow with a red satin ribbon and lastly, glued the crepe paper pompom on the top, and tada...our cute little penguin is ready to walk the ramp!


Hope this tutorial is helpful. Let us know if you try making this one. Your feedback is appreciated.

Thank you for stopping by.

---

5 Aug 2017

Origami Modular Decoration


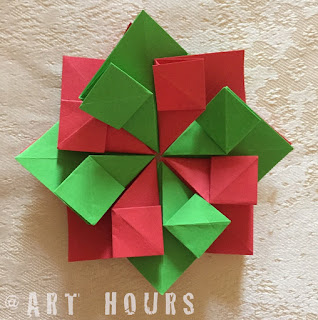
We made this beautiful decoration that can be used for decorating greeting cards or can even be used as gift toppers. The best thing about origami is that you don't need expensive papers; you can use paper scraps or recycle newspapers too and you get such lovely creations.

Unlike other typical modular origami models, this model needs to be glued. This pretty origami model can be used for decorating gifts and with the festive season on, I thought this would be the perfect time to post this model.

Origami Category: Modular
Level: Medium

Materials required: 
8 square sheets, glue

We had some paper scraps of size 14.85 cm x 6.15 cm. We got a pair of square sheets each of size 6.15 cm.


Procedure:

Step 01:
Fold the paper in half along one of the diagonals.

You will get a triangular shape of the model as shown in the picture below.


Step 02: 
Now fold down both the corners to meet at the centre. You will get a square shape of the model now.

Step 03:
Next, take the right flap and fold it up, such that the bottom tip touches the top.

Step 04:
Now, apply squash fold to the flap, to get a small square shape on the right side.

Step 05:
On the left side also we will apply a squash fold. However, we don't need to apply the same steps as we did on the right side. Just lift the triangular flap on the left side and apply squash fold to it as shown in the picture below. One modular unit is ready.

Step 06:
Make 8 such similar units.

Step 07:
Now begin assembling the origami decoration. Place the green unit above the red unit and keep overlapping one unit over the another till all 8 units are used. Keep gluing one unit over the another to hold the units in place.

Done:
This is how the completed modular unit will look like. Pretty isn't it?
Origami Modular Decoration

Come August, and we have the beginning of the festive season in India. This pretty origami decoration can be used for various purposes. Just get creative. Use it a gift topper, make a rakhi out of it, decorate your houses or just make it for fun this season. 

Here's a quick snapshot on our youtube channel.


Hope this tutorial is helpful.

Thank you for stopping by. Have a good day!