7 Feb 2018

Origami Tutorial: Sonobe unit and a glimpse into Sonobe Variations


The last few months have been a great journey while we explored the world of 3D and modular origami. In the process, we discovered beautiful models designed by several origami artists around the world. Most popular is, of course, the Sonobe model. On digging out the internet we found that their origin is still unknown. Two of the possible creators could be Toshie Takohama and Mitsunobu Sonobe, who have published several books together and are members of the Origami Group. 

The beauty of the Sonobe unit lies in its flexibility to combine in several different combinations that can be used to build a simple triangular bipyramid, cube, trisoctahedron to many complicated polyhedrons. Origami artists around the world have experimented with this basic unit and have built several variations using the same unit. 

Here's a picture tutorial you can follow to make a Sonobe unit.
Art Hours
Sonobe Unit: Picture Tutorial by Art Hours

The model made of three units results in a triangular bipyramid. Using six units results in a cube. Using twelve Sonobe units, results in a triakis octahedron.  Using 30 units you can make a triakis icosahedron. 

Here's a picture of a bipyramid (also called a dipyramid) that was built using 3 Sonobe units. Only 3 units were used to build the bipyramid which has 6 triangular faces and hence can also be called a hexahedron.
tutorial by art hours
A Triangular Bipyramid using 3 sonobe units

Below is a picture of a cube that was built using 6 nos. of Sonobe units. This one has six square faces as visible in the picture.
tutorial by art hours
Origami Cube using 6 Sonobe units

We found several models of the Sonobe on the internet and had fun building models from different types of variations. Below is a picture of a Trisoctahedron we built using 12 units of the Sonobe unit but its a slightly different variation of the Sonobe unit. The shape that resulted is actually an octahedron with triangular pyramids added on its every face. So, it has 8 extreme ends or tips and each tip has 3 triangular faces. Totally, it has 24 triangular faces.

We used magazine paper to build the model...one way of putting magazine paper to good use instead of throwing them away, and after all, recycling is the buzzword nowadays!

Trisoctahedron made from 12 units - variation of Sonobe unit

Here are two more models using the same variation of Sonobe unit used above for the trisoctahedron. The cube was made using 6 units and the Triambic Icosahedron was made using 30 units.

Left Front: Cube using 6 units
Right Back: Triambic Icosahedron using 30 units

We tried out several other variations too. Below is something splendid we tried using other variations developed by Maria Sinayskaya. She calls it the Rose Kusudama. You will find the model diagrams on her website. By the way kusudama is a Japanese word which means medicine balls (kusuri means medicine and tama means a ball in Japanese). They were used for incense and potpourri; nowadays typically used as decorations or gifts.

The first model you see in the picture below is a yellow rose kusudama, made from 12 nos. of 1:2 rectangular sheets. The second model is a pink rose kusudama, made from 12 nos. square sheets. Personally, I loved the second model, as it turns out to be a sturdy one. 

Rose Kusudama using 12 nos. 1:2 Rectangular sheet

Rose Kusudama using 12 nos. Square sheet

We are still exploring many other origami models and designing our own variations too.

Our journey is Origami is getting interesting day by day...keep visiting us more often to learn and explore the art world. 

Stay with us, learn, like and share. Your valuable comments and feedback are welcome.

Follow us on Instagram to explore what we are working on currently: www.instagram.com/archguide16 or stop by our FB page:fb.me/arthours to explore our tutorials and student workshops.

Thank you for stopping by.

Have a good day...
---

27 Jan 2018

Origami Sunburst Star Tutorial


“When it is dark enough, you can see the stars.” 
― Ralph Waldo Emerson

Well, sometimes you don't need darkness to see stars. Make one yourself and you will see stars even during daytime...ok...I am talking here about making one all by yourself using paper and here's where Origami comes to help you!

Now, I don't know who is the original designer of this star model but it is probably one of the easiest origami star models, you will find on the internet that comes under the category of modular. All you need is just two equally sized square sheets and follow the instructions closely and you will be able to make an 8-pointed star in just a few minutes. 


In this post, I am giving you a picture tutorial for making the origami star. Found the pictures in my archive folders...have many such pictures but time is a constraint. However, here you will find a detailed step by step tutorial showing you how to make an 8-pointed star using just two square sheets of paper. Fold along with the pictures and you will end up making a pretty star during the daytime!

Category:Modular
Level of Difficulty: Easy. On a scale of 5, I will give it a 2. 
Need to know: Pinwheel Base, Petal fold.
Materials required: 2nos. square sheet. Here we have used 10 cm square sheet for the tutorial.

Procedure: 
If you know how to make a pinwheel base, it is easy from there. However, if you don't then let's just start from the beginning. 

art hours tutorial
Steps to fold an Origami Sunburst Star

Step by Step Procedure:

  • Step 01: Start with a square sheet with white side on top. Here, we have used the same color on both sides. Apply the valley folds on the white side dividing the sheet into 16 equal parts. Also, apply valley folds along both the diagonals.
  • Step 02: Turn the sheet over and fold all the four corners of the sheet to the center. 
  • Step 03: Turn it over, follow the creases to get the pinwheel base. 
  • Step 04: Fold the corners as shown to the centre
  • Step 04b: Open the corners and squash them to four squares.
  • Step 05: Now apply the valley folds as shown one by one to every square. Also, called the petal fold.
  • Step 06: Next peel open the layers along the creases to get diamond shapes at every corner.
  • Step 07: Turn over the model.
  • Step 7b: Fold the tips down for all the four squares. One unit with four points is ready.
  • Step 08: Make one more similar unit.
  • Step 09: Place one module over another and secure the stars together by folding the tips down.
  • Step 10: The 8-pointed star is ready. 
You can make many such stars and use them for cards, decorations or as gift toppers. Try using glossy sheets to get the shining and twinkling effects if you wish to...

If you make one, do post the pictures here. Would love to see your origami models too.

Hope the tutorial is helpful.

Thank you for stopping by. Have a good day!

Note: 
We make a lot of handmade paper products customized on request by clients...Do visit our profile on instagram to view the latest on our products....www.instagram.com/archguide16. Do like, comment and share. Message us directly or write to us with your requirements to help you serve better.

---

22 Jan 2018

Happy Basant Panchami 2018

Today is Vasant/Basant Panchami - a day when Indians all around the world celebrate the Spring Festival. Basant means Spring and Panchami means fifth day, as it falls on the fifth day of the month of Magh of the Hindu Calendar. 

Bengalis and many others celebrate this festival by worshipping Goddess Saraswati, representing creative energy, wisdom and power. So if you are student you will not give exams or even go to the school today without seeking the blessings of Goddess Saraswati...

Basant Panchami-
Goddess Saraswati is seated on a Lotus,
hence my offering to the deity, seeking Her blessings

It also marks the auspicious beginning of learning known as 'Vidyaarambh' for children who iniate writing for the first time. I don't remember my childhood days, but for my daughter this Vidyaarambh ceremony was done in a temple where a Pandit made her write the first alphabets (a,b,c) in English, Hindi and Bengali. He was a Pandit who knew all the three languages!

Educational institutes in India, arrange prayers or puja in the morning seeking blessings of Goddess Saraswati. While in school, I always participated in some creative activity like dance or music, and not to forget the puja celebrations by the Bengali Association in my township. We were a small community of Bengalis but we celebrated Saraswati Puja with great enthusiasm and energy. In fact, we children didn't go to schools that day but would submit our school books at the feet of the deity to seek Her blessings...we would be dressed in our best yellow dresses and would enjoy the festivity with sweets and prasad bhog (offerings made to the deity) and had lots of fun ofcourse. 

These memories are still fresh in my mind, something I regret as an expat since my daughter misses all the cultural associations and festivities...call it the woes of an expat living abroad!

Wishing you all a very Happy Basant Panchami...to all Indians who celebrate this festival around the world...May Goddess Saraswati remove all the Lethargy and Ignorance, and may She brighten our lives with knowledge and wisdom.

Have a good day...while I go ahead and make preparations for the puja at home with khichuri, labra and payesh - small offering to the Goddess from my side.

Thank you for stopping by.

---

7 Jan 2018

Learn to fold an Origami Camel: Origami Tutorial

New Year begins with several new resolutions, new wishes, new hopes and new directions. And as we proceed ahead with the new beginnings, we wish to learn and explore new things and add to our knowledge and skills.

Our first origami project this year begins with an origami camel...yeah..the ship of the desert and these unique creatures are recognized by their humps. And before we begin to learn how to fold an origami camel, here are some interesting facts about a camel that I found on the internet:
  • Camels are social animals who roam the deserts in search of food and water. Also, they are known to be very peaceful animals.
  • Asian camels have two humps whereas Arabian camels only one.
  • Camels have two rows of thick eyelashes to protect their eyes from the desert dust. They can also close their nostrils and lips to keep out the dust.
  • They have a strong hearing sense.
  • A thirsty camel can drink up to 135 liters of water at a go...now that's what I call interesting!
  • In Arab culture, the Camel symbolizes patience, tolerance, and endurance. Oh, and there are over 160 words for 'camel' in the Arabic language. 

Origami Camel
This post contains a freehand sketch of the steps to fold an origami camel. Also, follows is a picture tutorial that will show how to fold the same.

For those of you who know how to fold an origami bird base, the steps to fold an origami camel is easy thereafter. However, if you still wish to learn to fold an origami square base then here the steps to fold the same. Just click on this link that will take you to the tutorial for folding the square base.

Now follows a quick freehand sketch showing steps to fold an origami camel beginning from a square base as shown in step 01. Step 3 shows the bird base and thereafter the steps to fold the origami camel follows.
Steps to fold an Origami Camel

Here is the description of the steps to fold an origami camel.
  1. Step-1 starts with a square base. Apply the folds as shown in the step-1.
  2. Open the flaps of the model and flatten to get a diamond shape as shown in step 3. Repeat the steps on the back side also.
  3. Now, fold along the creases as shown in step-3.
  4. Apply pocket folds along the dotted lines.
  5. Pocket fold on the back flap along the hidden lines shown to get the rear leg.
  6. Fold down the flaps on the front and back side to get the two front legs.
  7. Now focus on the head area. Apply pocket fold to get a beak-like shape. Then apply another pocket fold to get the final shape of the head.
  8. Also, fold along the dotted lines as shown in step 7 to shape the rear end of the model. 
The picture below shows a pictorial diagram to fold the origami camel.
Only one drawback of this model is that it has one rear leg...so it is a three-legged camel!
Steps to fold an origami camel

Finally, this is how the completed model of the camel should look like.
Origami Camel Model Completed

Hope you find the tutorial useful. In our coming posts, we hope to post more such tutorials..so keep visiting this blog to learn and explore the world of art.

Thank you for stopping by...have a good day.

---

6 Jan 2018

Learn to fold Origami Square Base and Origami Bird Base

Wishing you all a very Happy New Year...here's something that origami lovers will find useful.

In this post, you will learn how to fold an origami square base; also called preliminary base. And thereafter learn to fold a bird base. Both these are basic origami bases from which many origami models can be further developed.

Below is a freehand sketch of the origami bases and steps are explained later.

tutorial and diagram by arthours
Origami Square Base - Diagram

Steps to fold an Origami Square base:
  1. Start with the colored side on the top. Apply the crease along both the diagonals as shown in the figure.
  2. Turn over, and fold into half along the center vertically.
  3. Now fold horizontally along the center.
  4. Squash fold on the two sides to get a square base
  5. You get a square base in this step.

Now proceed further to get a bird base.

Steps to fold an Origami Bird base:

    6.  Now apply the folds as shown in step 5
    7.  Open all the folds applied.
    8.  You get a square base again with all the creases ready for the next step.

diagram by art hours
Origami Bird Base - Diagram


    09. Open the top flap along the folds applied.
    10. Keep opening the flap along the crease such that the sides will start to collapse at the center.
    11. Flatten to get a diamond shape. 
   12. Turn over and apply steps 6 to 11 on the back side as well to get a diamond shape on both sides. The bird base is ready.

Hope this tutorial is helpful.

Thank you for stopping by....Have a good day.
---

12 Nov 2017

World Origami Days Celebrated!


World Origami Days was founded by an American Committee to spread awareness about Origami. The World Origami Days is celebrated every year beginning from 24th October to 11th November. Also, Japan celebrates 11th November as Origami Day.


I am not a member of any committee but I love Origami, and since the day I started practicing Origami I have no regrets.

We celebrated the World Origami Days at Art Hours, by folding a new origami model every week. (Here, 'we' implies my daughter and me).

Origami is a challenge to me and folding a new model gives me immense satisfaction and peace. Generally, I don't follow video tutorials but prefer to search for diagrams instead. The entire process, beginning from understanding the fold diagram to folding the entire model, is like solving a puzzle -and this is where the entire fun and challenge lies. Watching a video to fold an origami model is no fun for me - it's like you are reading a mystery story and your killjoy friend tells you the ending of the story, or you go to watch a suspense movie and somebody tells you the end - same is the case with doing origami. If you know the ending it is no fun...However, sometimes I do watch videos when the folds are too complicated, but not all origami models have video tutorials so that makes me happy as I can continue taking up new challenges!

'World Origami Days' was just a pretext for us to try some new origami models. Thanks to the wonderful creations made by the origami artists around the world and thanks to them for uploading the origami diagrams and tutorials on the internet. It has helped origami lovers like us and many others around the world, to fold and explore new origami models.

In this blog, I am not only posting the origami models we attempted but also the links to the tutorials which we followed, wherever possible. We attempted a new model each day beginning from 24th October to 10th Nov. Unfortunately on the last few days of the World Origami Days when I had planned to conduct a workshop, I fell sick and I had to cancel the workshop. I, hereby apologize to all those students who were keen to attend the origami workshop but I had to cancel the same due to my personal health issues. Hope to see them participating in our future workshops.

Day 01: Mandala Serenata
Design Credit: Vagner Alves/Carla Godoy
We folded a variation of the original model as we learned to fold it from a video tutorial and here's the link to the same: https://www.youtube.com/watch?v=8_C01a1GQ5c
Model details: 
Category: Modular Origami
Level: Intermediate, On a scale of 1 to 5, I would give it 3.5 stars (with 1 being easy and 5 being most difficult in terms of complications in folds involved)
Uses rectangular units
We folded it using a gift wrapping paper
Mandala Serenata folded by Art Hours

Day 02: Variation of Mandala Serenata
Design Credit: Carla Godoy
We folded a variation of the original model as we learned to fold it from a video tutorial and here's the link to the same: https://www.youtube.com/watch?v=8_C01a1GQ5c
Model details: 
Category: Modular Origami
Level: Intermediate, On a scale of 1 to 5, I would give it 3.5 stars
Uses rectangular units
We folded it using colored printer paper.
Variation of Mandala Serenata folded by Art Hours

Day 03: Mandala Tamba Taja
Design Credit: Falk Brito
We folded the model following an origami diagram. You will surely get it on the internet.
Model details: 
Category: Modular Origami
Level: Intermediate, On a scale of 1 to 5, I would give it 3.5 stars
Uses rectangular units
We folded it using origami paper.
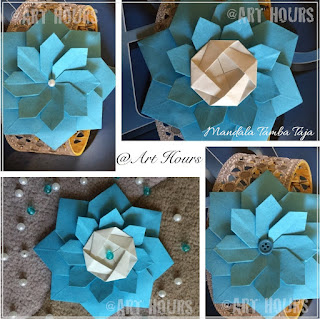
Origami Mandala Tamba Taja folded by Art Hours

Day 04: Origami Tico Star
Design Credit: Maria Sinayskaya
We folded the model following a video tutorial and here's the link to the same: https://www.youtube.com/watch?v=QyZKB4eaD1A 
Category: Modular Origami
Level: Intermediate, On a scale of 1 to 5, I would give it 3.5 stars
Uses square units, requires no glue.
We folded it using origami paper.
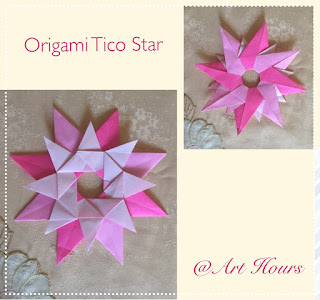
Origami Tico Star folded by Art Hours

Day 05: Origami Clutch Purse
Design Credit: Chrissy
We folded the model following a video tutorial on paperkawaii.com
Category: Single Sheet folding
Level: Intermediate, On a scale of 1 to 5, I would give it 3 stars.
Uses square sheet of size 6"
We folded it with an origami paper.
Origami Clutch Purse folded by Art Hours

Day 06: Origami Navigator Star
Design Credit: Maria Sinayskaya
We folded the model following an origami diagram, you can surely find it on the internet.
Category: Modular origami
Level: Easy, On a scale of 1 to 5, I would give it 2 stars
Uses 4 square units, requires no glue.
We folded it using colored printer paper sized 8.7 cm square each.
This one is fun to fold and even kids can try folding this one. My kid had fun folding this one.

Origami Navigator Star folded by Art Hours

Day 07: Origami Mandala Macuxi
Design Credit: Falk Brito
We folded the model following an origami diagram, you can surely find it on the internet.
Category: Modular origami
Level: Intermediate, On a scale of 1 to 5, I would give it 3.5 stars
Uses 8 rectangular units.
We folded it using gift wrapping paper sized 10cm x 3cm.
Mandala Macuxi folded by Art Hours

Day 08: Origami Humming Bird
Design Credit: Not sure
We folded the model following a video tutorial by Mohamed Galal and here's the link to the same: https://www.youtube.com/watch?v=Si-Mhbu3UCI&t=1s
Category: Single sheet folding
Level: Difficult, On a scale of 1 to 5, I would give it 5 stars.
Though the model is difficult to fold, the video tutorial is very clear and elaborates every step with accompanying diagrams of the folds.
We folded it using McDonald's carry bag paper. 
Origami Humming Bird folded by Art Hours

Day 09: Origami Elephant
Design Credit: Fumiaki Kawahata
We folded the model following a video tutorial by Leyla Torres and here's the link to the same: https://www.youtube.com/watch?v=InIpbaPdA54
Category: Single sheet folding
Level: Intermediate, On a scale of 1 to 5, I would give it 4 stars
We folded it using 6" square origami paper.
Origami Elephant folded by Art Hours

Day 10: Origami Lotus
Traditional design. You can find lots of diagrams and tutorials on the internet hence am not posting a link.
Category: Single sheet folding
Level: Easy, On a scale of 1 to 5, I would give it 2 stars. 
We folded it using tissue papers.
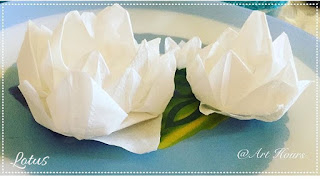
Origami Lotus folded by Art Hours

Day 11: Origami Miniature Mandalas
Design credit goes to many artists. You can find the links to many such stars and patterns in Origami-club.com.
Category: Modular Origami
Level: Easy, On a scale of 1 to 5, I would give it 2 stars
All the models below have 8 square units.
Used paper scraps as units which were as small as 1.5cm squares
We folded it using colored printer paper.
Miniature Mandalas folded by Art Hours

Day 11: Origami Long Bookmarks
Category: Single Sheet folding


Heart Bookmark
Design credit: Jo Nakashima and here's the link to the video tutorial: https://www.youtube.com/watch?v=gml2j4bvT88
Level: Intermediate, On a scale of 1 to 5, I would give it 3.5 stars
Well, those who know Jo Nakashima's Origami Models would agree that his designs are not easy as they look!

Crane bookmark
Design credit: Bob Stack, Video tutorial by Yakomoga and here's the link: https://www.youtube.com/watch?v=UdYTw1u8xk8
Level: Intermediate, On a scale of 1 to 5, I would give it 3 stars

Both the models can be folded from a rectangular sheet.
We folded the bookmarks using origami paper.
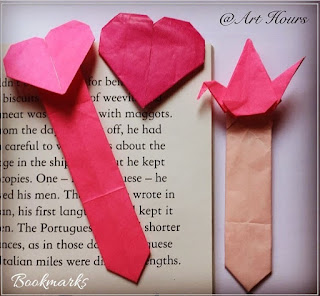
Origami Long Bookmarks folded by Art Hours


Day 12: Origami Long Bookmarks
Category: Single Sheet folding


Pencil Bookmark
Uses a rectangular sheet of paper.
We watched a video tutorial for this bookmark and here's a link:https://www.youtube.com/watch?v=Z73dByO_PVI
Level: Easy, On a scale of 1 to 5, I would give it 1 star.

Crane bookmark
Uses a square sheet of paper.
We followed a picture tutorial on http://www.all-about-origami.com/
Level: Easy, On a scale of 1 to 5, I would give it 2.5 stars.

Cat bookmark
Amongst all of the long bookmarks, we folded, this one had complicated folds and I have lost the link to the tutorial. Sorry for this one!
Level: Intermediate, On a scale of 1 to 5, I would give it 3.5 stars.

We folded all the bookmarks using origami paper.
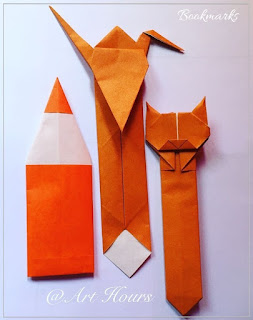
Origami Long Bookmarks folded by Art Hours


Day 14: Origami Spiral
Design Credit: Tomoko Fuse
Category: Modular Origami
Level: Easy, On a scale of 1 to 5, I would give it 3 stars.
Uses 4 square units, requires no glue.
We watched a video tutorial for this one by paperfolds. While I made the units, my kid enjoyed assembling this model.

Origami Spiral folded by Art Hours

Day 15: Origami Magic Circle
Design Credit: Not sure
Category: Modular Origami
Uses 8 square units, requires no glue.
We watched a video tutorial, for this one and here's a link: https://www.youtube.com/watch?v=cb0ICsjkl14
Level: Easy, On a scale of 1 to 5, I would give it 2.5 stars.
We used colored printer paper for this model.
This one was folded entirely by my child watching the video tutorial and she had great fun folding this one, for, in the end, she could even play with it!
Origami Magic Circle folded by Art Hours

For the 15 days of World Origami Days, we had awesome fun folding every model. Each day we tried folding a new origami model, we learned and enjoyed on the way. I wish more people could have been a part of this origami exploration!

Anyways, hope the links to the origami tutorials helps those who are keen to learn origami and love attempting new models. 

Thanks for stopping by...have a good day.

Follow us to know more about classes and latest events. 
Now available on Instagram...link/like/share
www.instagram.com/archguide16...

Link and like our FB page at: FB.me/arthours where we post latest details about our classes and activities.

or you can mail us at archguide16@gmail.com for more queries regarding classes and workshops.

Thank you for stopping by.

---

29 Oct 2017

It's Been a Long Time...from our clay modeling archives today!


It's been a long time since I have posted anything at all. Last week was quite busy all through the weekend and I haven't been able to upload any tutorials recently. Just came across these snaps of clay modeling we had done some time back...maybe at beginning of the last year...thought I should share some pics of the same.

clay modeling by arthours
Clay Modeling 

It was one of those boring summer afternoons here in Dubai...yeah...Dubai and how can it be boring?...Well summers here are hot and boring seriously...either you stay indoors or you spend time loitering around the shopping malls...and people who know me, would also know that I am not of that types who would love to spend hours at a shopping mall doing nothing. Well, so my kid and I, yeah again...my child and I, are most of the time stuck together since the daddy of the house is too busy with his own activities, even on weekends! So my child and I, have to keep each other entertained..

So we took out our stock of clay and our plastic clay modeling tools that came with the clay pack. And we decided to do something creative that afternoon. And the credit of this entire model goes to my daughter for it was her idea completely. Initially, I thought we would model a simple model of a house from clay but she said no...and suggested why not try modeling a mushroom house instead...so there we were...She also had a story to tell...and it went like this...

Once upon a time, there lived a little girl called Melony. I asked her why Melony?...and she continued...Because she loved eating melons and she had a big garden full of melons. So, this Melony lived in a Mushroom house, and she was fond of gardening, and her garden was filled with melons and roses...

clay modeling by art hours
Clay Modeling a little girl 'Melony'

As she wove her story round the character of Melony, we had a nice and playful afternoon, modeling a mushroom house, surrounded with a garden filled with roses and melons. Here, is the final model of the clay mushroom house. By the way, we used plasticine clay for this model.

CLAY MODELING BY ART HOURS
Clay Mushroom House 
As you see in the above picture, we build a mushroom house complete with doors and windows and a small garden. The small garden is complete with a pathway lined up with melons and roses. To the extreme left of the picture, you can also see a tiny girl (yes that's our Melony) with her baskets of flowers and melons.

And here are some more pics of the same clay mushroom house with Melony.
clay modeling by art hours
Mushroom House with Melony
We had a wonderful afternoon with stories and clay...laughter and fun...and wonderful memories that I could share with all today!

Thank you for stopping by...have a good day!

---