Showing posts with label clay modeling. Show all posts

29 Oct 2017

It's Been a Long Time...from our clay modeling archives today!


It's been a long time since I have posted anything at all. Last week was quite busy all through the weekend and I haven't been able to upload any tutorials recently. Just came across these snaps of clay modeling we had done some time back...maybe at beginning of the last year...thought I should share some pics of the same.

clay modeling by arthours
Clay Modeling 

It was one of those boring summer afternoons here in Dubai...yeah...Dubai and how can it be boring?...Well summers here are hot and boring seriously...either you stay indoors or you spend time loitering around the shopping malls...and people who know me, would also know that I am not of that types who would love to spend hours at a shopping mall doing nothing. Well, so my kid and I, yeah again...my child and I, are most of the time stuck together since the daddy of the house is too busy with his own activities, even on weekends! So my child and I, have to keep each other entertained..

So we took out our stock of clay and our plastic clay modeling tools that came with the clay pack. And we decided to do something creative that afternoon. And the credit of this entire model goes to my daughter for it was her idea completely. Initially, I thought we would model a simple model of a house from clay but she said no...and suggested why not try modeling a mushroom house instead...so there we were...She also had a story to tell...and it went like this...

Once upon a time, there lived a little girl called Melony. I asked her why Melony?...and she continued...Because she loved eating melons and she had a big garden full of melons. So, this Melony lived in a Mushroom house, and she was fond of gardening, and her garden was filled with melons and roses...

clay modeling by art hours
Clay Modeling a little girl 'Melony'

As she wove her story round the character of Melony, we had a nice and playful afternoon, modeling a mushroom house, surrounded with a garden filled with roses and melons. Here, is the final model of the clay mushroom house. By the way, we used plasticine clay for this model.

CLAY MODELING BY ART HOURS
Clay Mushroom House 
As you see in the above picture, we build a mushroom house complete with doors and windows and a small garden. The small garden is complete with a pathway lined up with melons and roses. To the extreme left of the picture, you can also see a tiny girl (yes that's our Melony) with her baskets of flowers and melons.

And here are some more pics of the same clay mushroom house with Melony.
clay modeling by art hours
Mushroom House with Melony
We had a wonderful afternoon with stories and clay...laughter and fun...and wonderful memories that I could share with all today!

Thank you for stopping by...have a good day!

---

21 May 2017

Clay Flower Pot: An Easy 2D Clay Modeling Activity for Kids

A small 2D clay modeling project attempted with my daughter on Friday afternoon and here is how we did it. Clay used for this project is plasticine clay that all the kids love to play with and the advantage of using plasticine clay is that you can reuse it for another project if you store them well. We have probably done so many clay modeling work using this same clay. You can refer to some of our previous work done by visiting our previous blog posts.

This post gives you a picture tutorial that explains every step for making clay the flower pot. Its an easy DIY clay modeling activity that the kids can try with little help from parents. 

For this project we used: 
Red, Orange, Yellow, Green, Blue, Pink and Black color clay. 

Firstly let's start with the flower. Make 5 tiny balls of equal sizes first. Then flatten each clay ball, and shape them into a petal as shown in the first step.

Step 01: Shaping the petals

Make five such petals and arrange them in a circle to form a flower.
Step 02: Arrange 5 petals to form a flower

Next, take a yellow color clay ball for the center of the flower
Step 03: Yellow ball for the flower center

Use a sketch pen lid to give an indentation to the flower center. You may even skip this step and move to the next step directly.
Step 04: Make indentation with a sketch pen lid

Shape the flower center as shown using your fingers.
Step 05: Shaping the flower center

Now all you need to do is place it at the flower center.
Step 06: Place it at the center of the flower

Time to make the stems and the leaves using green color clay. Roll them into snakes and bend them to form leaves.
Step 07: Shaping the leaves

Make long snakes for the stems.
Step 08: Shaping the stems

For the pot, we used black color clay. Make a long snake with the black clay and keep bending them and stacking them one upon the other till you get the fpot shape.
Step 09: Shaping the pot

Use the orange, pink and blue color clay to make the flower as shown in the previous steps. Arrange all the flowers, stems and leaves on the pot as shown in the picture below.
Done: Clay flower pot is ready

Note, this is just a 2D clay modeling project which you can just arrange. We disassembled the entire project and rolled back the clay to use it for another project.

It was a fun project done with my daughter and it took us around 30 minutes to finish it all.

Here's a link to a quick preview of the steps on our youtube channel.


Hope this tutorial is helpful.

Thank you for stopping by...Have a good day.

---


28 Dec 2016

Clay Modeling Work at Art Hours


As the year 2016 comes to an end, we, at Art Hours, had great fun learning new skills and exploring new horizons. We had some students who were keen to learn and some who were not so keen, some who had the patience to carry on till the end and some who gave up midway, but mostly all the students who joined Art Hours were enthusiastic learners with creative and intelligent minds. When I say 'we' at Art Hours, it's most often me and my daughter, because most of the activities that you will find in my blog or my FB page are all combined ideas and work of the two of us. I love hearing out to her ideas, sometimes they lead to great innovations! I love listening to her as she chatters all the way about everything and anything and out of the many things that I learned from her is being happy. When you are happy you will do better in life and that's a lesson we all must learn from our children. 

When we started 'Art Hours' classes at the beginning of this year, we started with clay modeling. The twin clay Ganeshas that you see below was our first post on our FB page. From then onwards we have done a lot of experiments with plasticine clay and air dry clay. Below are some work done by us at Art Hours, some done by our regular students, some done by us the 'daughter & mom' duo. All these clay modeling work that you see below are made from plasticine clay. For some models, we learned and gathered ideas from the internet while for some we just experimented on our own. 

Plasticine clay is a versatile and ideal material for kids as it can be stretched or twisted and molded into any shape without the fear of getting cracks or breaks. It doesn't dry fast, in fact, we have reused the clay several times for different models. However, the color from the clay sticks on your hands while you work with it, so if you are a fussy mom who doesn't like untidy hands don't bother to use it. We, at Art Hours, believe that if you don't take the pains you will not learn anything...so if little color sticks on your hands, you can always wash it away later and that should not stop you from experimenting with clay and having fun.

Here, are the pictures of all the work we have done so far using plasticine clay.

Twin Clay Ganeshas
Clay Disney Dolls: Ariel, Aurora, Snowhite, Jasmine, Mulan and Mirinda
from L to R in a circle.
Clay Color Palette
Clay Mushroom House for Melony
Clay Flower Well
Miniature Clay Basket of Flowers

Clay Bunny Rabbit 
Clay Rabbit 
Clay Diyas
Clay Flower Vase
Clay Braided Hearts
Clay Bird Houses
Hope you get some ideas from here, and try them out at your homes. And if you try them do share your pictures with us. So keep learning and exploring, it's never too late. 
---

11 Sept 2016

Clay Modeling Easy Ideas: How to Make Clay Flowers


Clay Modeling is not difficult as it seems to be. It is a fun activity for people of all ages. I remember as a child playing with mud from our garden. I used to collect wet mud, from the potted plants or from under the trees and play with it for hours. Not to mention the wrath of my mother I would incur after this activity! I had an accomplice too; our maid's daughter. Once, she taught me how to make clay pots and utensils. I loved the activity of clay modeling since then. I believe that there's something to learn from everybody and I always look forward to meeting people and interacting with people from whom I can learn something. 

Coming back to clay modeling. I got to play with clay once again when I went to my college of architecture. There we had clay modeling as an elective. That's when I got to understand the properties of clay, how to best express your ideas and imagination in a 3D form and it turned out to be real fun. Thanks to our clay modeling instructor; he let us explore and experiment with clay whenever we wanted to, and he was always present to guide us in the clay modeling studio apart from our scheduled classes.

Nowadays, clay is available in the market in various forms: polymer clay, plasticine clay, air dry clay, under different brand names and each one has a different property. I haven't still had the opportunity to explore with them all, but thanks to my daughter's interest in clay modeling I have explored a little with the plasticine clay that is available in the market for kids under the brand name of 'Kiddy Clay'. The clay modeling box we got for our daughter had 7 colors clay slab with some basic plastic molds and tools, which are sufficient for kids and beginners to explore with clay modeling.

This post contains a few pictures of some easy clay modeling ideas to make clay flowers using minimum tools. Most of them use two basic shapes and have been molded by hands only. The pictures are self-explanatory, however, I have included steps to guide you further. 

Option 1: 
Take two different colored clay for the petals and the center. We took a large round orange ball and divided it into 5 equal round balls. We took a small yellow round ball for the centre. Thereafter, we flattened all the round orange balls and the yellow ball too, using our palms. Then we took the orange ones and made them pointed towards one of the edges using fingers only to get the shape of petals. Once the petals are ready, we arranged them in a round circle and then placed the flattened yellow clay piece at the centre. A simple flower is ready. This option is the easiest one it seems, but reading ahead, you will find some more easy techniques.
art hours dubai
Option 1: Easy Orange Clay Flower

Option 2:
Similar to the above option, here also make 5 round balls for the petals and one small round ball for the center. Flatten all the balls with your hands. Now, for the petals, take each flattened shape and make them pointed towards one edge and curve them upwards gently using your fingers. Arrange the petals around a center and place a small yellow flattened shape at the center. This flower looks more realistic since we have given a 3D shape to the petals by curving them.
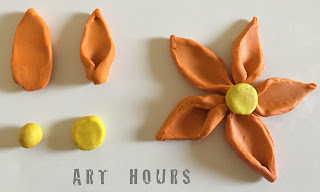
art hours dubai
Option 2: Orange Clay Flower with 3D effect
Option 3:
This option is simple too and fun for kids. All you need to do is take some clay, make 5 equal sized round balls to start with and then make long thin rolls from it. Make 5 such long rolls for the petals and one for the center. Then take the rolls one by one and coil the along the center. If you are familiar with quilling and enjoy quilling activity, this is something even quilling lovers would like to try. Although this one is much simpler than quilling and you don't need any glue or any other tool. Shape the pink coils by squeezing each coiled piece a little towards the edge, gently with fingers only, to get an oval shape for the petals. Arrange them around a center and place a yellow colored one at the centre and your quilled clay flower is ready.
art hours dubai
Option 3: Pink Quilled Clay Flower
Option 4: 
This one we called a peanut clay flower simply because its petals look like peanuts. So here's how we make the peanut shaped petals. We made took a large orange clay ball and divided it into 6 equal sized round orange balls. We made another yellow round ball for the centre. We used a plastic scale to cut halfway through the center. And the peanut shaped petals were ready. Now arrange all the orange petals around the yellow round ball and your peanut clay flower is done. This option is very simple and kids would certainly love making this one as it requires minimum patience and efforts. Just make the round balls and pierce the centre with a plastic scale or any knife-like tool given with the clay moulds.
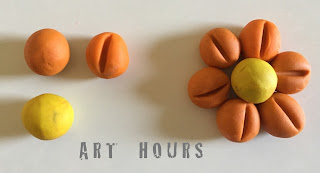
art hours dubai
Option 4: Orange Peanut Clay Flower
Option 5:
This option uses only two balls of clay. We took two different colored clay balls, one small yellow round ball for the centre and one big red colored round ball for the petals. Next, we flattened both the balls; the yellow one with your palms,  and the red one we flatted using the roller just like you would roll a small puri or Indian chappati. Now, using the knife tool we first marked the petals on the red one, and then just cut the petals through the marks made using the same knife tool. Thereafter, curl up the petals upwards to make it look more realistic and place the flattened yellow shape at the centre. And your red clay flower is ready.
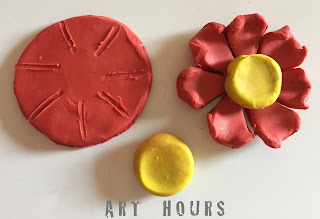
art hours dubai
Option 5: Red Clay Flower
Option 6:
This one combines the technique using Option-1 and Option-3. Take 6 round balls of white colored clay and flatten them between your palms. Take another round ball of pink clay, make a long roll and coil it along the centre like you would do for paper quilling. Arrange the white petals along a centre, overlapping them one over the another as you see in the picture below and place the quilled pink clay for the centre. This one is easy combining the steps using option 1 and option 3. You can also do the other way round, by quilling the petals as in option 3 and placing a flattened centre from option 1.
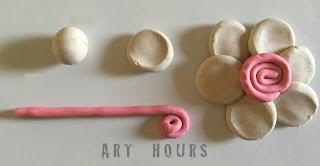
art hours dubai
Option 6: Easy Clay Flower with Quilled Clay Centre
Option 7:
Take a large round ball of red clay and divide it into 8 equal parts. Then roll them into long rolls of equal size. Bend each one of them joining the edges to shape it like a loop; this will be the petals. Take a yellow round ball, flatten it between your palms you have the yellow centre ready. Now, just arrange the 8 petals around the yellow centre and a red looped flower is ready.
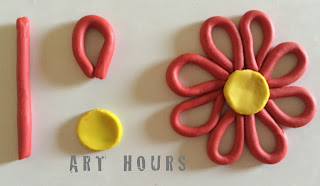
art hours dubai
Option 7: Easy Looped Clay Flower
The above tutorials are easy steps to guide kids and beginners and to encourage all who are interested in clay modeling. Don't be hesitant to explore and try experimenting with clay. You will do wonders once you start exploring. 

Happy Clay Modeling!


Note: By mentioning any brand name, this post or the author doesn't endorse the brand in anyway.