Showing posts with label pencil sketch. Show all posts

21 Mar 2020

Learn to draw a hair braid

Learning to draw a hair braid?
Follow the post till the end and you find it is not so difficult at all.

Here's a simple pencil sketch for kids, beginners or anyone who is keen to learn the art of pencil sketching. This sketching was done by my 11-year-old daughter who loves sketching with pencil and insists on using pencil nowadays more than color pencils. So while she was struggling to make this sketch, I clicked the pictures of the steps as she proceeded with the sketch and made a picture tutorial for all you with tips for improving the sketch. 

Hair Braid Pencil Sketch

Materials required:
HB pencil, 2B pencil, paper, eraser

Procedure:

Step 01:
Start with the rough outline of the braid, using an HB pencil.
Step 01: Draw Braid outline
Step 02:
Using the same HB pencil, draw the interlocking braid pattern as shown below.

Step 02:  Interlocking braid pattern
 Step 03:
Continue the pattern as you go downwards. Make sure the pattern becomes thinner as you go downwards as the braid becomes narrower towards the end.

Step 03: Continue the interlocking pattern downwards
Step 04:
Now, using a HB pencil only start hatching the braid. Start with a downwards stroke following the curves.

Step 04: Start hatching with HB pencil

Step 05:
Now, using a 2B pencil darken the top and bottom strokes, to accentuate the pattern.

Step 05: Darken the strokes using 2B pencil
Step 06:
Notice, that the mid part is left grey. Use an HB pencil to soften the strokes. You can fill up the middles part which looks white with a very light shade of grey using an HB pencil.
Step 06: Leave the mid parts white or fill up with light grey using HB pencil
Step 07:
Now the final step is to add some loose strands to make the braid look more realistic. Use HB pencil to make the loose strands.
Step 07: Add loose strands
Finally, the braid is done. Observe the sketches of the hair braid below. The long one looks incomplete, with strokes not evenly made. The second one of the left has made over-use of hatches, making it dense and it has lost the realistic effect. The third one on the bottom is closer to the effect we wish to achieve. Clear hatches and pencil strokes, with the 3D effect we wish to achieve.

Hair Braids 

Tip:

  • Use a well-sharpened pencil to make clear strokes. Keep sharpening them if the lead of the pencil becomes blunt in between.
  • Try cross-hatching to make it more realistic.


The picture below shows the final result we wish to achieve with cross-hatching.
Hair Braid Pencil Sketch

Happy sketching. Have a nice day ahead and stay safe.

-----

9 Jan 2019

25 different ways to sketch a Christmas tree


Hi there,

Christmas is long gone...and the new year has just begun...so I am a little late in posting this sketching tutorial. Maybe you can learn and use it for the next Christmas...If your child loves to draw, this is one activity that keep him/her occupied for a long time. 

Actually I sketched these for my daughter during the Christmas vacations itself. She was making some greeting cards for her friends during the Christmas break, and was out of ideas. She wanted to draw a Christmas tree differently in every card. So, there I was helping her out. The sketches are very easy to make involving just a few lines.


Picture 01: Pencil Sketches - Christmas tree

You can make use of different shapes and feel free to sketch them. Have a look at picture 02 below. The first five in the entire set makes use of only triangles. It gets a little complicated as we move down towards other options. The 6th one is just a bunch of rectangles, starting from the top, they get bigger as we go down. The 8th one is like a wiggly snake. 9th option is again very simple; begin with a central spine and add a triangle to it. From 10th to 16th, you add the curves to get the spruce effect. the 18th option is just a pile of circles, while the 19th is again just a triangle with a star on the top. Easy ain't it?
Go to 21st option, and its just two triangles one above the other. 


Picture 02: Pencil sketches Colored - Christmas tree

24th option is just adding some eyes and mouth to give it a cartoon look. Children love to draw cartoons. And this one turned out to be a favorite option preferred by my child. The last option is just curvy lines.
Xmas tree sketching - cartoon version

Turns out my daughter used at least 10 of these sketches to make her cards. So my effort was not in vain. 

If you love drawing and sketching, do try them out. I am sure you will come up with more ideas to draw a Christmas tree. 

Hope this tutorial was helpful. Thank you for stopping by.

Have a good day...


---


18 May 2017

Learn to Sketch: Spring Birds Scenery


Art is one medium that brings you closer to nature and there is no better way to understand Art than by observing the nature. This tutorial is a small attempt to bring the nature inside your house by sketching a spring scenery with the little birds.

Also, I intend to post this tutorial to serve as a guide on using some pencil shading techniques. Often we come across various pencil sketches and wonder how they made such masterpieces. Well, there lies not only the drawing skills but also awareness of the techniques and of course hours of patience labor. These techniques can't be mastered in a day but require a lot of practice. This post will highlight some of the shading techniques that have been used in the scenery made below.

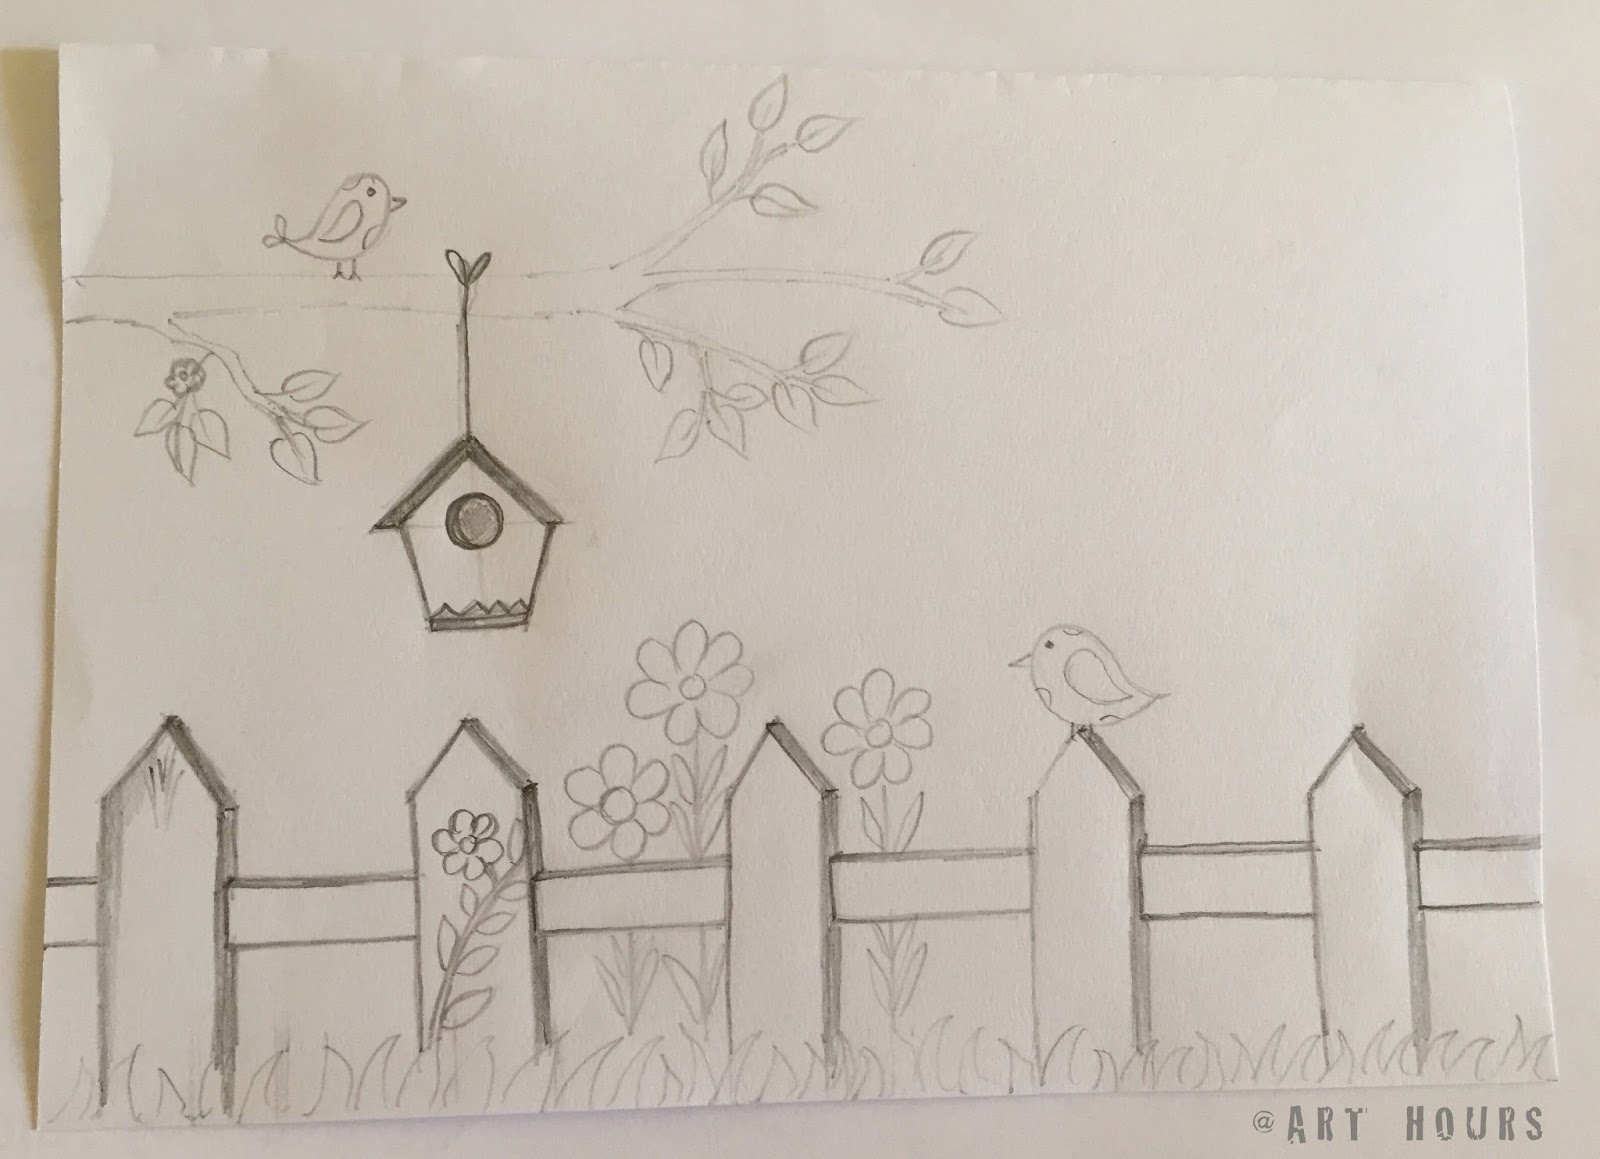
This tutorial will show you step by step to create a small scenery with a wooden fence, a tree branch, tiny birds, flowers and a birdhouse. All the elements mentioned above are easy to draw and sketch, just observe closely and follow the steps. We actually converted a colored vector image found on the internet into a pencil sketch. Don't know who the vector artist is, but thanks to the unknown artist, we found a good art inspiration.

tutorial by art hours


If you are a beginner, before you begin the sketch, you must be aware of some pencil shading techniques that you will need to apply in this sketch. In case you are indeed a beginner or wish to improve your sketching skills, do read this post on Sketching Basics that shows different sketching techniques using a graphite pencil to get a better idea on pencil sketching tutorial that I had posted earlier. 

For this 'Spring Birds' sketching tutorial, you need to learn linear shading, cross hatching and gradated shading techniques as shown in the reference guide below. Also, you will need to apply the wood-grain texture as shown below.
Pencil Shading Reference Guide

Now, let's start with the scenery. All you need for this sketch is a paper, HB and 2B pencils and an eraser. No fancy tools are required. We have used an A5 size printer paper.

Start by adding the outlines of the fence, the grass beneath and the tree branch. Use an H or HB pencil to roughly sketch the layout. This will help you to erase without leaving any dark pencil lines on the drawing sheet.


Next, we add a depth to the fence by adding more lines on the sides.


Now, add a bird house hanging from the tree branch.

Time to add the small birds on the fence and on the tree. We have not added any complicated bird shapes, just a simple doodle sketch of the bird will do for this sketch.

Next, add a few leaves to the branch.

Spring is incomplete without flowers. Add as many flowers you wish to near the fence, to the tree branch, and so on.

Once, all the detailed outlines are added with an HB pencil, time to start adding shades and textures to the sketch using a 2B pencil.

Here, we added pencil shading to the bird house. Oops forgot to add the pencil shading to the walls of the house...will see that in later pictures.

Now, we add the wood-grain texture to the fence with 2B or HB pencil.

Add pencil shading to the grass below the fence with 2B pencil. Use gradated shading or linear shading techniques.

Add, the wood-grain texture to the tree branch also. Add pencil shades to the flowers and the leaves. You can add either linear pencil shading or gradated pencil shading.

You can use the dark to light tone using gradated shading to the leaves and flowers preferably.

Complete the bird house by adding cross hatch pencil shading.


Add some gradated pencil shading to the tiny birds too.


Add some more foliage, creepers and/or flowers to the area near the fence.

Lastly, I added one more flying bird and done.

It was that simple...wasn't it? Do give it a try...

For those of you who wish to watch a quick snapshot, here's a quick view of the sketching steps on our youtube channel.


Try this beautiful sketch at home. I am sure you will enjoy making it as much as we did.

Here's another quick sketch made using the same pencil shading and textures. This cartoon is again an inspiration from a vector artist, but we have added the pencil textures and shades, and also some details as the bird and the flowers to the original sketch.
A Man Fixing a Fence - Pencil Sketching

Using the right pencil shading techniques and textures is as important as your drawing. Combine your drawing skills with the right pencil shading techniques and you will see the difference it makes to your drawings and sketches.

Thank you for stopping by.

---

7 May 2017

Sketching Tulips - Pencil Shading Guide


“A tulip doesn’t strive to impress anyone. It doesn’t struggle to be different than a rose. It doesn’t have to. It is different. And there’s room in the garden for every flower. You didn’t have to struggle to make your face different than anyone else’s on earth. It just is. You are unique because you were created that way. Look at little children in kindergarten. They’re all different without trying to be. As long as they’re unselfconsciously being themselves, they can’t help but shine. It’s only later, when children are taught to compete, to strive to be better than others, that their natural light becomes distorted.” -―Marianne Williamson

These words, by the spiritual teacher and author, Marianne Williamson, really impressed me. They are so true in today's age of competition and survival of the best and the fittest and God knows what not., that we have forgotten to be ourselves, we only want to study to compete, we want to participate to win...this attitude of ours to be a winner in every race has not only made our life stressful but we have put this same pressure on our kids too. We don't give them their space to think, to play, to live, to thrive and be happy. 

I don't know how many of you will even bother to read this blogpost...but whoever reads this I hope will understand and agree that life is not just about winning and shining, competing and thriving, but it is a lot more than that. It doesn't matter if we don't win a trophy always, what matters is our happiness, the moments of love and laughter that we share with our family and friends, that makes our life worth living.

Anyways, let us move on to the main topic of this post, that is, learning to draw and render a bunch of tulips. Drawing tulips is not very difficult. Nothing is difficult if you put your heart in it!


Let's start with a rough sketch first. Draw a rough outline of the tulips and draw some broad leaves as shown in the sketch below. Use an H or HB pencil to start with. We don't want the pencil lines to be seen in the final shading hence light rough outlines will do. 


Define the petals and the stem in this step. Remove any unnecessary lines or pencil marks at this stage. The rough drawing is ready to color. 


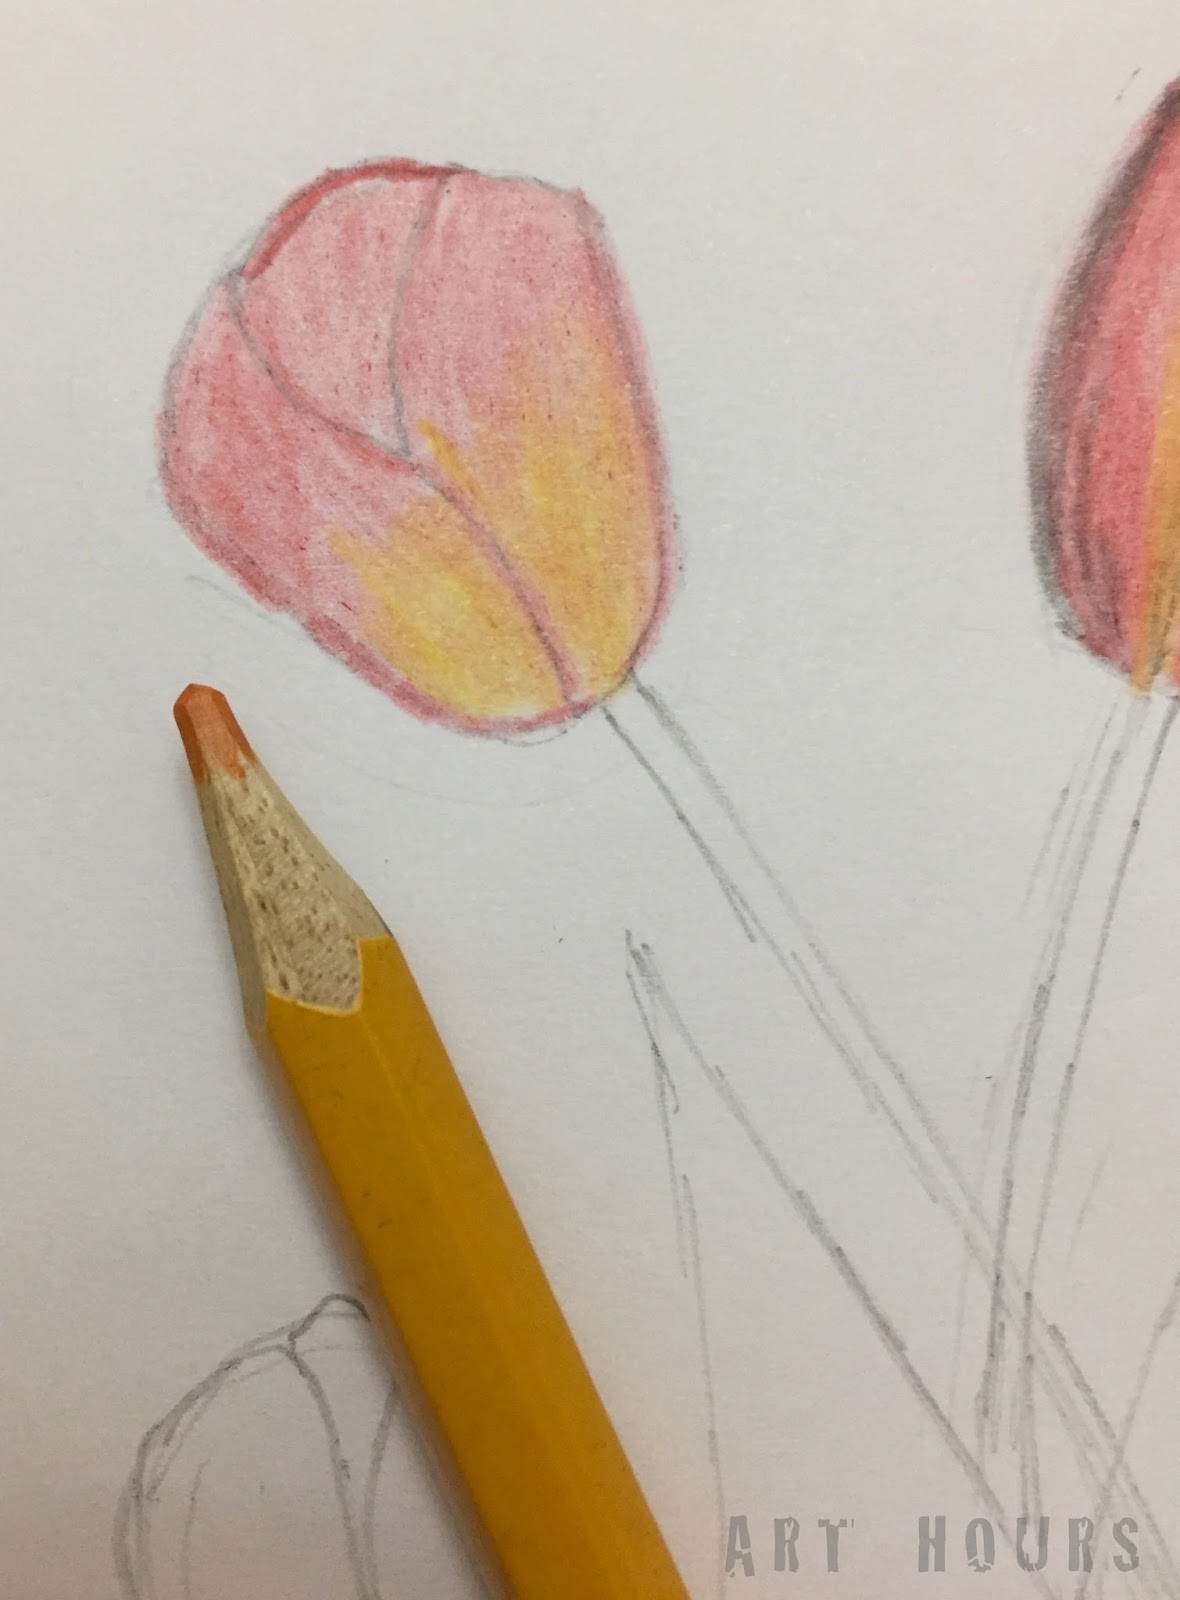
Now begin coloring. For the tulips, you will need three color pencils as shown below: red, ochre and black. Instead of ochre, you can use a yellow color instead.


Begin with the red color first, leaving white spaces where you would add the yellow or the ochre color later.


Add the yellow or the ochre and blend it with the red color applied in the last step. The picture below shows how the flower would look after blending yellow with the red.


Add black wherever you want to show the dark areas to the flower, preferably to the petals at the back.


Once the flowers are done, take a dark green color pencil and start with the base of the flower and the stem.

You can even highlight the borders first using the dark green color pencil.

For coloring the stem and the flowers, you can color with dark green and also add some browns or ochre yellow later.

Once all the stems and leaves are colored with green and brown/yellow, you can add some blacks to some areas as shown below.

Once the bunch of tulips is done, it is time to add a background to the sketch. Using a yellow ochre fill up the entire background and then add orange shading near the flowers and the leaves to highlight the area near the flowers and the leaves as shown in the sketch below.


Here's a quick snapshot of the entire process on our youtube channel.


Hope this tutorial on sketching the tulips is helpful.

And, here are some tulip sketches, rendered by our students.


Thank you for stopping by. Have a good day.

---

27 Apr 2017

Learn to draw Monstrous Expressions!


We didn't wait until the end of the year for Halloween to arrive to keep a Monster theme...we enjoyed instead in April itself. It is just that the kids are simply intrigued by the very word MONSTER and creepy, scary and so on...hence the theme for this month was randomly selected MONSTER....its not that we have a theme every month...but this month I thought let's just do it...let the Monsters rule!

We learned to draw and sketch different types of cute monsters this month. We made monsters with one or more eyes, of varied shapes and expressions and numerous compositions...the month has ended but we still have so many ideas...maybe we'll continue with this theme again...our little students at Art Hours just don't want the Monsters' rule to end!

This post will provide the guidelines in general to sketch the eyes of the monsters. Most of us are used to making realistic eyes with detailed eyeballs, eyebrows and so on..but when you are drawing monsters it's difficult to keep away from being realistic, as your mind subconsciously tends to draw what you observe in your daily lives. Hence, the mantra I gave my students this month was: Stretch your imagination....feel free to experiment with different shapes and sizes.

Learn to draw Monstrous Expressions

Below I have posted a picture tutorial for sketching the Monster Eyes, ranging from single eyed monster to 3 eyed monsters, and vary the facial expressions at the same time. These guidelines can also be used when you are drawing cartoons.

Now, let's begin with the One-eyed monster faces. We have 4 options as shown in the Reference Guide 01 below. Start with 4 concentric circles as shown in the picture below. Keep changing the size, the location of the inner circles or the corner cuts as shown in the options to get different types of the eyes. 

Monster Eyes - Reference Guide 01

If you are bored of drawing single eyed monsters then let's learn to draw a monster with two eyes. You can make one big eye and another small one to make it look scarier. Bored with round shapes for the eyes? Then switch to different shapes as shown in option-7. The picture below shows how to make monster eyes using just two simple circles as well.
Monster Eyes - Reference Guide 02

You can experiment with different shapes, for example, try oval shapes for the eyes now. Add eyelids or make 3 oval shapes for the eyes. You can also overlap the eyes to give a scary look again. The picture below shows how you can experiment with oval shapes to make the eyes.
Monster Eyes - Reference Guide 03

Have a look at the painting below that shows the monster eyes combined with different shapes of the mouth and this will give you a better idea to learn to draw some cute monsters. The picture depicts the various eyes we learned to draw above combined with varied mouth shapes. Draw simple shapes for the mouth and add details like the teeth or the tongue and make it look weird, funny or scary. Our students had fun as they learned to draw the varied expressions.

Monster Faces Reference Guide

Here's a glimpse at some of the work from our students' gallery this month. They have learned to draw some cute monsters, draw monsters alphabets, sketch some monster mountains, painted some cute monsters and more...Below you will find monsters of different shapes and sizes, as our students learned and experimented with different monster forms!

Student's work 01

Student's work 02

Student's work 03

Student's work 04

You can visit our FB page to view more details of the activities undertaken by our students at Art Hours. Here's a link to the page: FB.me/arthours.

Hope the above guidelines and drawings helps you to learn and develop your drawing skills further.

Thank you for stopping by.

Have a good day.
---