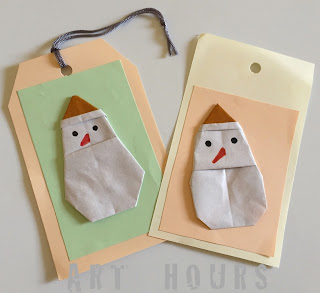
With Christmas bells ringing and knocking at the door very soon, here is a quick and easy DIY that you can try all by yourself this season.
I had made a few origami stuff for Christmas a month back with the intention of making some cards but I couldn't make them due to unavailability of time. Some origami elements I had in stock were; an Origami Santa, a Boot, a Heart, a Xmas Tree, a Snowman and a Bell. As usual, left with a tight schedule for the day, I had to make something that would be quick and easy too and something that I could use as gifts this season itself. So after a little bit of online searching, I had decided, no cards, nothing complicated...let's keep it simple and let's make it fast.
I had made a few origami stuff for Christmas a month back with the intention of making some cards but I couldn't make them due to unavailability of time. Some origami elements I had in stock were; an Origami Santa, a Boot, a Heart, a Xmas Tree, a Snowman and a Bell. As usual, left with a tight schedule for the day, I had to make something that would be quick and easy too and something that I could use as gifts this season itself. So after a little bit of online searching, I had decided, no cards, nothing complicated...let's keep it simple and let's make it fast.
Here, is how they ended up... cute little Christmas Gift Tags that I could use this year itself.
 |
| Christmas Gift Tags |
Below is a brief tutorial, with pictures that highlight the steps the way I made them - the Art Hours' way. Well, that's what my FB page is called..."Art Hours" - this is where I keep uploading most of the work we do as students and teacher.
Generally, the gift tags come in various standard sizes such as; 1.75"x3", 2.25"x4.5", and more...However, the gift tags shown are of size 4"x 2.5" in size and I didn't follow any standards for I made use of whatever scrap paper I had in hand. I make sure to use every scrap paper even newspapers for that matter since I believe in recycling and reusing of paper. I am sure unlike many other crafters or artists, I am comparatively more frugal when it comes to making use of paper and I use every last bit of scrap. So let's begin with the tutorial.
Materials required:
Card paper, origami paper, scissors, scale, pencil, glue, a hole punch and some ribbons or strings.
Step 01:
Prepare the base for the tag. Here I have used two different sizes, one for the base and another layer to add on the base. I would suggest use card paper or any thicker sheet for the base.
Here, the orange base is about 4"x 2.5" in size, and the green paper is about 3.5"x1.5" in size.
 |
| Step 01: Prepare the base for the gift tag |
Glue the green paper on the orange base, leaving equal borders on the 3 sides and more margin on the top to insert the ribbon. You can also leave more space on the bottom to write personalized messages. The size of the 2nd layer depends on how you want to design your gift tag.
 |
| Step 02: Glue one colored paper over another. |
Now, glue the origami element made earlier onto the surface of the tag. I used several different elements viz: the Xmas tree, a Heart, a Boot, a Santa, a Bell and so on. These origami elements have been made using square origami papers of size 3.0"x3.0".
 |
| Step 03: Glue the origami element on the base |
Once, the origami element is added, make a hole on the top center of the tag using a hole punch.
 |
| Step 04: Make a hole at the top center |
Next step is to give a shape to the tag, you can trim the top sides or you can even leave them as it is.
 |
| Step 05: Shape the tags by cutting the top sides |
Step 06:
Now, all you need to do is insert some strings or ribbons through the hole made and the gift tags are ready.  |
| Step 06: Pass the ribbons or strings through the holes made |
Step 07:
Lastly, add messages to your tags. You can either follow a calligraphy style or write messages in your own good handwriting to make it more personal. You can even use stamps or stencils to make it look neat. I leave that option for you to decide.
Lastly, add messages to your tags. You can either follow a calligraphy style or write messages in your own good handwriting to make it more personal. You can even use stamps or stencils to make it look neat. I leave that option for you to decide.
 |
| Step 07: Add personalized messages |
Here's how the Christmas Gift Tags look like after adding the handwritten messages.
You can use these lovely gift tags to tie with your gifts or you can even hang them as decorations on the Christmas tree. If not then you can just gift them to your friends as a small gesture of love and good wishes for the season.
 |
| Christmas Gift Tags with Handwritten Messages |
---

No comments:
Post a Comment