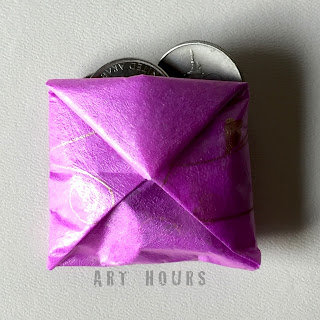
It was the auspicious occasion of Akshar Tritiya this year when I made this beautiful coin purse. And I am posting the tutorial today on the auspicious occasion of Onam. Well in India, every day is a festival. So let's celebrate each day...let's be happy always.
 |
| Origami Coin Purse |
I made this small purse, with the intention, to use it as an organizer in my ladies purse to store some coins. The origami folds used here are not very complicated but it has to be folded with a certain amount of precision to get a neat look, and of course origami is all about neat folding and a little patience too.
Here's a tutorial on how to make the origami coin purse.
Materials required:
All you need is a square sheet of size 15cm x 15cm. You can use a larger size too for a larger product size. Here, I used a 15cm square sheet cut out from a gift wrapper.
Step 1:
-Start with a square sheet. Since it has to be divided into thirds, use a size of sheet that is in multiples of 3 for ex: 9cmx9cm, 12cmx12cm, 15cmx15cm, 18cm x18cm, etc. I would suggest a larger size of sheet since after folding it, you will end up with a small size purse of exactly one third the size of your sheet.
 |
| Step 1: Take a square sheet |
Step 2:
-Fold it into a half horizontally, as shown in the picture below.
 |
| Step 2: Fold into half horizontally |
Step 3:
-Use a scale to mark 5 cm on both the sides and make the required vertical creases at 5cm from both sides.
 |
| Step 3: Divide the folded sheet into thirds by using a scale |
Step 4:
-Now fold in the right side, along the vertical crease made in the last step.
-Open it and make a squash fold as shown in the picture below. You will get a triangle at the bottom side.
 |
| Step 4: Fold in the right side along the vertical crease made in the last step. |
 |
| Step 4 (contd.): Open the fold on the right side and squash fold it. |
Step 5:
-Repeat step 4 on the left side as well. You will see two triangles at the bottom now.
 |
| Step 5: Squash fold on the left side |
Step 6:
-Turn it over.
 |
| Step 6: Turn it over |
Step 7:
-Fold in the right side to touch the visible crease as shown. The crease is the one you made for dividing into the thirds.
 |
| Step 7: Fold in the right side |
Step 8:
-Fold in the left side to meet the right edge as shown.
 |
| Step 8: Fold in the left side |
-Fold the top flap to touch the edge and you will get a triangular flap as shown in the picture below.
 |
| Step 9: Fold in the top flap to touch the edge |
Step 10:
-Fold the entire top flap down as shown. Also, note the dotted line made across the diagonal for the next fold.
 |
| Step 10: Fold the entire top flap down |
-Make a mountain crease along the diagonal marked in the step 10 picture, such that you will get a triangle shape as shown in the picture below. Tuck the flap into the pocket below.
 |
| Step 11: Tuck the flap into the pocket below |
Step 12:
-Turn over and repeat the steps from 9 to 11.
 |
| Step 12: Turn over and repeat steps 9 to 11 for this side also. |
Done: Once done, pry open the center to use it.
 |
| Done: Pry open the centre to use it |
Suggestions and tips:
Though the purse turned out to be a pretty little piece of about 5cm x 5cm in size, I was not happy with the final product since its sides were bulky due to several layers of folds, while its base was not so strong due lack of layers.
However, the purse can be handy and can be used as an organizer for storing small objects like pins, garters, small binder clips, safety pins, etc. in your drawer so finding them is easy. You can also keep this small purse in your wallet or ladies purse to store coins so that you don't have to search for them when you need some change and the coins are not lost amongst the miscellaneous things in your large purse.
However, the purse can be handy and can be used as an organizer for storing small objects like pins, garters, small binder clips, safety pins, etc. in your drawer so finding them is easy. You can also keep this small purse in your wallet or ladies purse to store coins so that you don't have to search for them when you need some change and the coins are not lost amongst the miscellaneous things in your large purse.
You can watch a slideshow video for the tutorial on how to make the origami coin purse on our youtubechannel below.
Thanks for stopping by. Hope the above tutorial is helpful.
---

No comments:
Post a Comment